Chapter 3. Configuration System Overview
All key configuration tasks can be carried out either from the command line, using the gconfig tool, or vi the web interface, using the “Configuration” → “All options” menu item. Both these methods invoke the same underlying software and present identical navigation and parameter options.
The web interface presents some additional options. Some of these are merely short-cuts into the main configuration system while others offer additional monitoring information. Configuration of attached digitisers can be carried out using the web interface but not from the CMG-EAM's command line (although access to the digitiser's command line is available).
The command-line interface also supports a number of advanced facilities which are not available via the main configuration system: these are mostly diagnostic tools which are not required for normal operation.
3.1 Using the configuration system via the web interface
The web interface to the configuration system is split into two frames.
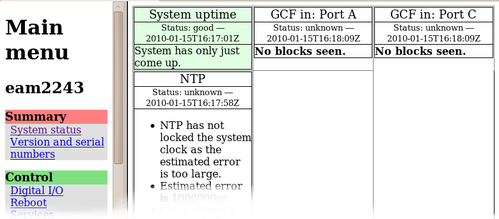
The left-hand frame contains the system ID above a menu while the right-hand frame displays sub-menus, input forms and display screens. When a sub-menu has been used, the top of the right-hand frame shows the menu options that have been selected in order to reach the current screen. These options are hyper-linked and can be used to return to previous screens.
In the example shown below, the operator has clicked on “All options” in the left-hand menu (in the “Configuration” section) and then chosen “Networking” from a right-hand pane sub-menu and then “eth0” from the resulting right-hand pane sub-menu.
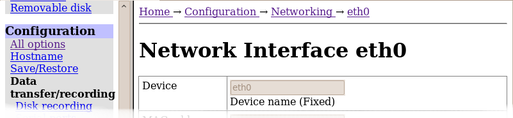
The “All options” item from the “Configuration” section of the left-hand menu is referred to simply as “Configuration” and this is also the entry point for the command-line interface to the configuration system. This page can be reached from almost every point in the system by clicking on the  button displayed at the bottom of most right-hand pane forms.
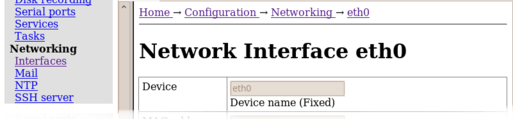
In some cases, the same screen can be reached by a variety of routes. For example, the screen above can be reached (with two fewer clicks) by selecting the “Interfaces” short-cut from the “Networking” section of the left-hand pane menu and then clicking through to “eth0”. The links at the top of the right-hand pane will not reflect the fact that a short-cut has been taken.
Most of the configuration forms have on-line help available. This can be turned on for the current page by clicking the  button displayed at the bottom of the form. The help text will appear in blue, interleaved with the form itself.
Many of the configuration forms have two modes, “simple” and “expert”. They display, by default, only the parameters most likely to be used. For example, the network interface form mentioned above does not normally display IP aliasing parameters. When access is required to these additional features, they can be displayed by clicking the  button displayed at the bottom of the form. They can be hidden again by clicking on the
  button.
In all cases, any changes made to the contents of the forms only exist in the browser until they are sent to the CMG-EAM using the  button.
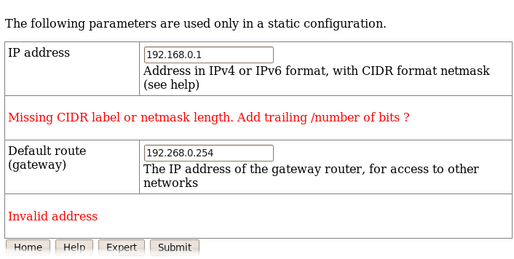
User input to the forms can often only be validated after submission. Where invalid parameters have been detected, this is signalled back to the operator by redrawing the same form with extra text, in red, added. The number of errors is displayed at the top of the form:
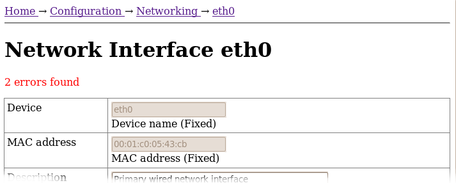
The actual error messages are displayed next to the fields whose contents have offended:
Throughout the remainder of this manual, screen-shots of the configuration system's web interface will normally omit the left-hand pane, as in the two illustrations above.
3.2 Using the command-line configuration system
All of the configuration facilities available under the “All options” menu item (in the left-hand menu of the web interface) are also available from a text-based GUI tool called gconfig (Güralp Configurator). This can be accessed either by using a serial link or, over the network, by using ssh.
Connection via a serial link is discussed in section 2.1 and connecting over Ethernet is described in section 2.2. The use of ssh is covered in section 2.2.4.
For optimal display, you must let the CMG_EAM know what type of terminal or emulator you are using. This is done by setting the terminal type as an environment variable using the command:
eam999 ~ # export TERM=TERM_TYPE
The value of the TERM variable, TERM_TYPE, depends upon the terminal emulator you are using and should be chosen as follows:
Emulator in use | TERM setting |
ssh under Unix | No action required - the ssh protocol sets the TERM environment variable automatically. |
PuTTY (in ssh mode) under Windows | No action required - the ssh protocol sets the TERM environment variable automatically. PuTTY will default to xterm emulation, allowing the mouse to be used within gconfig. |
Minicom under Unix | Minicom emulates a vt100-style terminal and automatically maps the keystrokes and display sequences for the actual terminal you are using, so the default TERM setting of vt100 is correct. |
HyperTerminal under Windows | Using the File menu option “Settings”, ensure that the terminal type is set to VT100. HyperTerminal will then emulate a vt100-style terminal, which will match the default TERM of vt100 on the CMG-EAM. |
Scream! | Scream! versions before 4.5 do not support the required screen-drawing control codes so its use with gconfig is not recommended. |
When you enter the gconfig command, the initial screen looks like this:
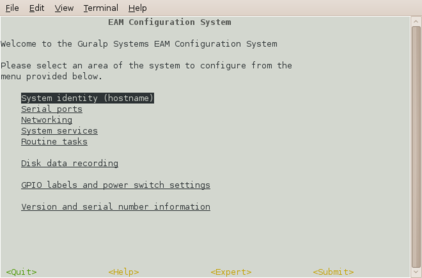
The gconfig interface can be navigated entirely using the keyboard but, if you use xterm (or your terminal emulator supports an “xterm” mode) you can use your mouse to select menu items, input fields and items from drop-down menus. The scroll-wheel is not currently supported, so you need to use the keyboard to access second and subsequent pages of multi-page forms.
gconfig displays menus and forms. The screen-shot above is an example of a menu. The following table shows the navigation keys that are available for use with menus:
Keystroke | Used for... |
| Cursor to next item |
| Cursor to previous item |
| Select item under cursor |
| Move to the next page of a multi-page menu |
| Move to the previous page of a multi-page menu |
| Go to the home menu or, if there already, exit gconfig. |
The four words enclosed in chevrons at the bottom of the above screen-shot,

act as push-buttons. They are always present at the bottom of each gconfig screen, although they change slightly according to the context. To invoke the action associated with any of them, move the cursor to it and press the  key.
key.
In the example, all options other than  are disabled and this is indicated by the colour coding. If you select an item from a menu which leads to a sub-menu, the option changes to
  and invoking it will then take you back to the top-level menu.
Selecting a menu item will lead you either to another menu or to a form. Forms are composed of editable fields, which are either:
Text-entry fields, into which the operator can type textual parameters. Text-entry fields are identified by surrounding braces: '[' and ']';
Check-boxes, where the operator has a “yes/no” choice. Check-boxes are identified by surrounding guillemots: '{' and '}'; or
Drop-down menus, where the operator must choose one option from a list. Drop-down menus are identified by surrounding chevrons: '<' and '>'.
To move between fields, use the  ,
,  or
or  keys.
keys.
3.2.1 Text entry fields
To edit the contents of a text-entry field, place the cursor on the field, using the , or keys, and start typing. Characters typed are always inserted at the current cursor position i.e. existing characters are never over-typed. The whole field is shown with a black background, as seen below, and the cursor is identifiable as a pale block.

The  and
and  keys move the cursor within the field and the
  key deletes characters to the left of the cursor. When you are satisfied with the new value, the and keys allow you to move to the previous and next fields, respectively.
3.2.2 Check-boxes
To change the setting of a check-box, place the cursor on the field, using the , or keys, and use the  key to toggle between selected and not selected. When you are satisfied with the new value, the and keys allow you to move to the previous and next fields, respectively.
When the value is “yes”, “enabled” or otherwise selected, the field is shown with an 'X' in it:

When the value is “no”, “disabled” or otherwise de-selected, the field is shown as blank:

3.2.3 Drop-down menus

To change the setting of a drop-down menu field, place the cursor on the field, using the , or keys, and activate the menu by using the key.
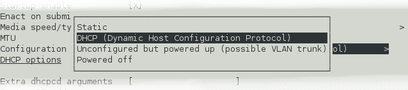
While the menu is active, you can move between options using the the , , , and keys: the currently selected option is shown highlighted. When the desired option is selected, press the key again to confirm the choice and de-activate the menu.
3.2.4 Using forms
Most of the configuration forms have on-line help available. This can be turned on for the current page by using the  button displayed at the bottom of the form. The help text will appear in blue, interleaved with the form itself. Help can also be activated using the
  key.
key.
Many of the configuration forms have two modes, “simple” and “expert”. They display, by default, only the parameters most likely to be used. For example, the network interface form does not normally display IP aliasing parameters. When access is required to these additional features, they can be displayed by using the  button displayed at the bottom of the form. They can be hidden again by using the
  button. It is also possible to toggle between simple and expert mode using the
  key.
key.
Some forms are too large to fit in a single page. In this case, an indicator appears at the top right of the screen. For example, the network interface configuration form, in expert mode, takes three pages to display:

To move to subsequent pages, you can use either the  or the
  key.
key.
To return to previous pages, you can use  or
or  .
.
When all required fields have been set to the desired values, the changes can be enacted by using the  button or the
  key.
key.
It is possible to leave any form by using the button ( or the  key) but, if you have made changes to the contents of any fields, the system will warn you that you will lose your changes if you continue.
It offers an opportunity to return to the form:
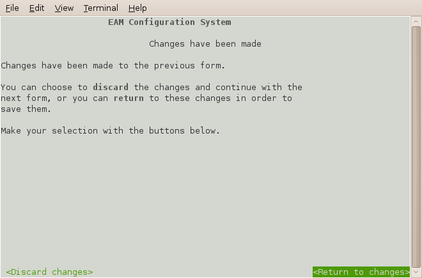
Select  to ignore any parameters that you have altered and continue to the home menu or select
  to review the form and, if desired, submit it before navigating away from it.
The following table provides a summary of all keystrokes that can be used when filling or navigating forms:
Keystrokes used in forms | |
Keystroke | Used for... |
| Cursor to next field or, if in activated drop-down menu field, next item in drop-down menu |
| Cursor to next field or, if in text field, move edit cursor rightwards |
| Cursor to previous field or, if in activated drop-down menu field, next item in drop-down |
| Cursor to previous field or, if in text field, move edit cursor leftwards |
| Activate or deactivate list field or bottom-line button |
| Toggle check-box |
| Go to the home menu or, if there already, exit gconfig. |
| Display help text |
| Show “expert mode” fields |
| Submit the current form |
| Move to the next page of a multi-page form |
| Move to the previous page of a multi-page form |
3.3 Configuration Management
The CMG-EAM has a comprehensive configuration management system that allows both complete configurations and individual classes of configuration information, such as data processing and networking, to be saved individually and merged during restoration.
This feature can be very useful when multiple CMG-EAMs are to be configured for a project. In a typical array with a central communications hub arrangement, only two data processing configurations need be created: one for the hub and one for an array element. The latter can then be copied from CMG-EAM to CMG-EAM to avoid having to configure each unit individually. Network configurations need be created for each element of the array and for the hub but these can all be created and stored on a single CMG-EAM. If the complete set of stored configurations is then copied to each machine and to any “hot spares”, then every CMG-EAM becomes rapidly interchangeable: all that is required to deploy a unit is to restore the correct data processing configuration (hub or element) and then restore the appropriate network configuration.
Configuration files can also be backed up and stored on different sites to provide a disaster management resource.
3.3.1 Saving a configuration
From the “Configuration” section of the main menu, select “Save/Restore”. The following screen appears:
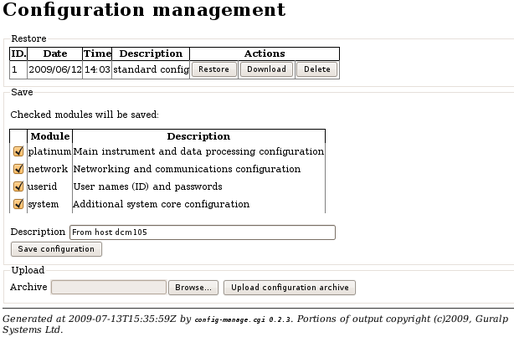
To save a configuration, use the check-boxes to select which elements you wish to include, enter a descriptive name in the “Description” field and click on “Save configuration”. The configuration is saved onto the CMG-EAM and will appear in the list of saved configurations at the top of the page.
If you are using the web interface, you can download this configuration to the computer running the browser by clicking the “Download” button in the list of saved configurations at the top of the page.
3.3.2 Deleting a saved configuration
If a configuration has been saved in error or a saved configuration is no longer required, it can be deleted using the above screen. Each saved configuration in the “Restore” table has an associated “Delete” button in the “Actions” column. Clicking the button deletes the associated configuration.
3.3.3 Restoring a configuration
The same screen is used for restoring a configuration. Simply select the required saved configuration from the list at the top of the page and hit the restore button. The following screen appears:
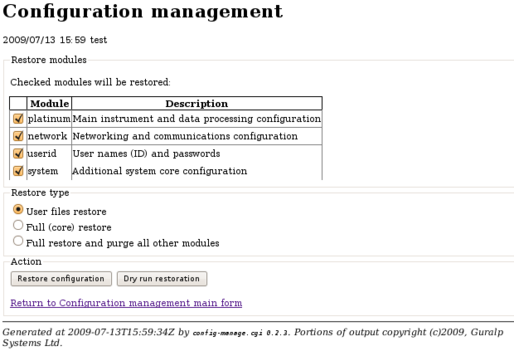
The date and time at which the configuration was saved is shown; in the example above, this is the 13th of July, 2009 at 15:59. The name of the configuration is also given; in the example above, this is “test”.
Even if a configuration was saved with all modules selected, it is possible to restore only a subset of configuration information. Select what you wish to restore by ticking or clearing the appropriate check-boxes.
Unless you are recovering from, say, a corrupted device, you should leave the “Restore type” set to “User files restore”.
Click the “Restore configuration” button to load the configuration values from the saved data into the CMG-EAM's files. Depending on the significance of the changes between the saved configuration and the previous, active configuration, you may need to stop and restart a number of services (see “Services” in section 13.2.4) or reboot the unit completely (see section 13.2.3) before all your changes will come into effect.
If you have a reasonable working knowledge of the service configuration files used internally by the CMG-EAM, you may find the dry run facility useful. Clicking the “Dry run restoration” button produces a list of files that would be over-written - but without actually making any changes. This is also a useful tool for exploring the effects of different configuration classes.