Chapter 3. System description
3.1 Güralp Minimus digitiser
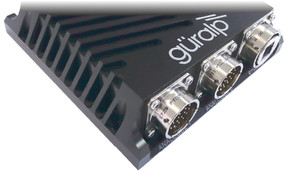
The Güralp Minimus is a combined digitiser and advanced communications unit. The Minimus acquires data from – and allows direct control (where appropriate) of – connected analogue instruments (e.g. Güralp Fortis, 3-series, 5-series, 40T and 6T sensors) and digital instruments (e.g. the Güralp Radian).
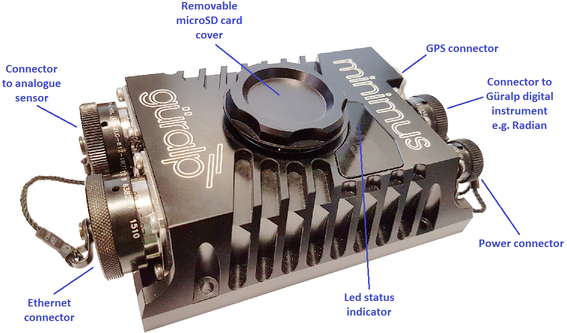
The Güralp Minimus functions as the Surface Interface Unit (SIU) for Radian post-hole instruments in shallow (<100 metres).
⨹ The Minimus+ features an additional analogue sensor connector:
A full description of the operation, control and configuration of the Güralp Radian instrument via the Minimus is not within the scope of this manual; please refer instead to the Radian manual, MAN-RAD-0001.
Caution: Analogue sensors with true floating outputs connected to the Minimus – included geophones, infra sound sensors, pressure gauges, etc. – must have their outputs ground-referenced using a >100 kΩ resistor.
3.1.1 LED indicator
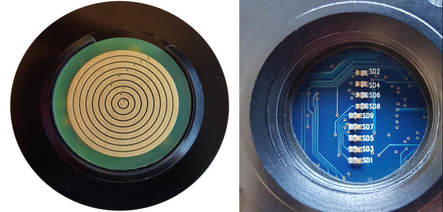
The Minimus has an LED indicator on the upper surface, which provides status and configuration information.

Flashing white rapidly: This occurs from power-up until the 1 kHz clock is set and typically lasts for a period of two to three seconds.
 No flashing: This occurs during the boot-up and initialization stages and typically lasts for a period of twenty to thirty seconds.
One quick red flash followed by a one second pause: the removable microSD card is present in the Minimus’ external slot, but no fixed microSD card is present inside the Minimus.

Two quick red flashes followed by a one second pause: the fixed microSD card is present inside the Minimus but no removable microSD card is present in the Minimus’ externally-accessible slot.

Three quick red flashes following by a one second pause: both microSD cards are present but either the GNSS receiver is disconnected or the GNSS lock is not sufficiently accurate.

A green flash every four seconds: this is the standard operating heartbeat. GNSS and both internal & external microSD cards are present, which indicates that the Minimus can be successfully deployed and left to record data.
Note: Depending on the digitiser’s recent history, it can take up to ten minutes to reach this state after power-up.

1 blue flash: a trigger event has been detected.
3.1.2 Bluetooth connectivity
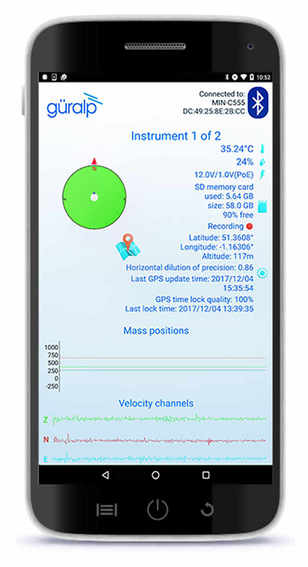
The Minimus features Bluetooth connectivity, allowing sensor and state-of-health data to be monitored using the Güralp GüVü app (see section 3.4) on an Android mobile phone or tablet.
The Bluetooth can be disabled via software to save processor usage but the hardware module cannot be switched off. BLE (Bluetooth Low Energy) technology is used to minimise the power requirement. The Bluetooth transmitter/receiver is in permanent standby mode and always ready to receive a connection from a phone or tablet.
See Chapter 6 for further details on connecting to the Minimus and its attached sensors using a phone or tablet.
3.1.3 Data storage
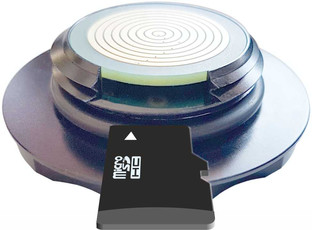
The Minimus uses microSD (non-volatile) memory technology to store seismic data locally. The Minimus features two such microSD cards in order to provide redundancy; this helps to protect the recorded data in the unlikely event of any corruption or problem with the memory cards. One card is internal and cannot be removed by the customer; the other is hot-swappable and easily accessible without any technical knowledge.
The Minimus is supplied with two microSD cards that are of equal storage capacity (e.g. two 64 GB cards).
Note: In order to ensure data integrity and security, Güralp only recommends the use of the supplied industrial-grade microSD cards.
Caution: When the external microSD card is removed, the internal card keeps recording data. However, when the external card is re-connected, any data written to the internal card while the removable card was absent will overwritten.
Starting from summer 2018, two designs of the card-holder for the removable card became available. The following two sections describe how to change the card in the newer models (section 3.1.3.1) and the original models (section 3.1.3.2).
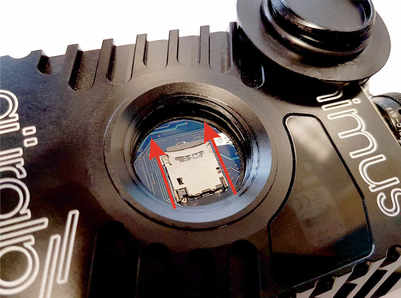
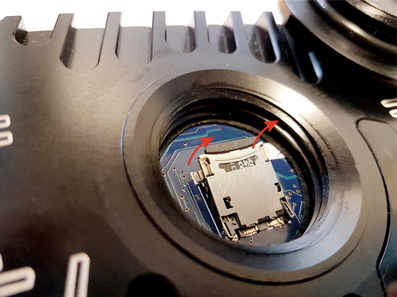
3.1.3.1 Primary (hot-swappable) microSD card – new style
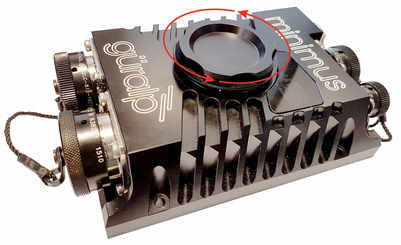
The upper surface of the Minimus has a waterproof screw-in card-holder that is sealed by an O-ring.
To insert or replace a microSD card, proceed as follows:
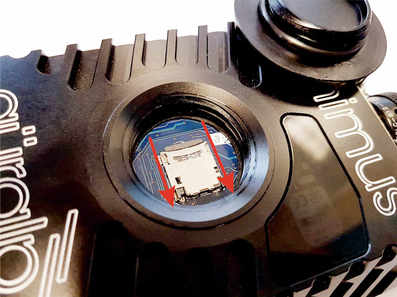
Rotate the card-holder in an anti-clockwise direction, unscrewing it from the body of the digitiser..
Caution: The card holder connects electrically to the Minimus via a series of slip-rings which ride on metal fingers in the main body of the digitiser:
It is very important that the slip-rings and the metal finger-contacts do not become damaged or tarnished. Take care not to touch either part. If a Minimus has had its card-holder removed, do not leave it exposed to the elements. If a card-holder is to be transported when it is not installed in a Minimus, enclose it in a protective bag or covering so that it cannot be scratched or contaminated.
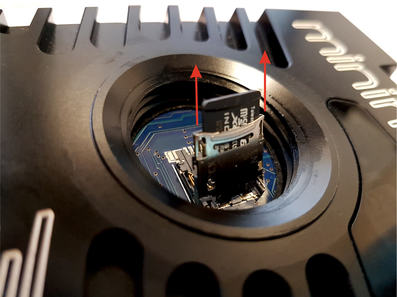
The microSD card is accessible via the slot in the side of the card-holder. Using a pair of tweezers, first push the card in gently and then release the pressure: the card will spring outwards a little. It can now be grasped and withdrawn.
To insert a new card, line it up with the slot as shown and push it gently into place. Once you feel the spring pressure, continue pushing until more resistance is felt and then release the pressure: the card will lock into place.
Finally, replace the cap and rotate clockwise until hand-tight. Do not over-tighten and do not use tools.
3.1.3.2 Primary (hot-swappable) microSD card – old style
Early models of the Minimus had a different arrangement. The upper surface of the Minimus had a waterproof screw-cap that is sealed by an O-ring. This protects the microSD card slot from the environment.
To insert or replace a microSD card in an older Minimus, proceed as follows:
To reveal the microSD card slot, rotate the cap in an anti-clockwise direction.
The microSD card is now exposed.
To make the microSD card slot available, use your finger to move the card carrier in the “Open” direction:
Gently lift up the free end of the card carrier, which hinges at the other end, as shown:
You should now be able to insert/remove a microSD card. The replacement should be positioned so that the gold contacts on the microSD card will be facing downwards when the carrier is hinged back down.
Push the hinged carrier firmly down and slide it in the “LOCK” direction:
Finally, replace the cap and rotate clockwise until hand-tight. Do not over-tighten and do not use tools.
Note: In order to ensure data integrity and security, Güralp only recommends the use of the supplied industrial-grade microSD cards.
Caution: When the external microSD card is removed, the internal card keeps recording data, unless stopped using the  button (see Section 5.8.3). However, when the external card is re-connected, any data written to the internal card while the removable card was absent will overwritten.
3.1.3.3 Internal (back-up) microSD card
The second microSD card is factory-installed in a slot inside the Minimus.
Caution: The internal microSD card is not accessible by the user. Attempts to remove or replace it will void the Minimus’ warranty.
3.1.4 Web interface
The Minimus contains on-board firmware that presents monitoring and configuration interfaces. These are accessible through Güralp’s Discovery software (see section 3.3) or, with the built-in web server, via Discovery's browser interface or any standards-conformant web browser.
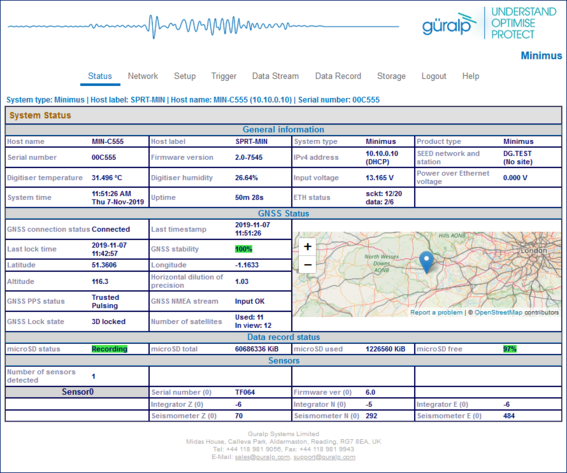
The web interface allows a number of instrument monitoring, control and configuration options:
Sensor readings and instrument State-of-Health
Network configuration and authentication
Sensor, timing, and station configuration/information
Remote data-streaming configuration
Local data-storage configuration
Please refer to Chapter 5 for full usage instructions.
3.2 Accessory package
3.2.1 Ethernet cable
The Ethernet connector allows use of 10BASE-T, 100BASE-T or 1000BASE-T networks. The cable that connects to the Minimus has a metal cover which is IP68-rated and ensures consistent connections in harsh installation environments. At the other end of the blue Ethernet cable, there is a standard 8P8C modular jack (often incorrectly called an RJ45) for attachment to all common networking devices (e.g. PC, laptop, router, switch, modem etc.).
Please see section 10.1 for the pin-out and further details.
3.2.2 Compact GNSS receiver and cable
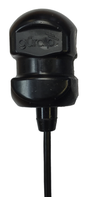 The Minimus is supplied with a new-generation compact GNSS receiver with an in-built antenna that supports the GPS (Navstar), GLONASS, BeiDou and Galileo satellite constellations.
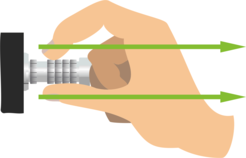
The receiver comes with a black RS-422 cable that has an over-moulded 14-way LEMO connector. LEMO connectors use an innovative latching mechanism which is different to the bayonet connectors used elsewhere. To mate, simply line up the red marks – one on the chassis and one on the free connector – and gently push the connector into place until they latch together with a click. To disconnect (un-mate), grasp the outer sleeve of the connector and pull gently.
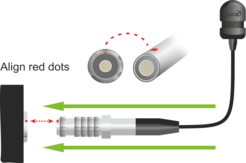
Caution: Do not twist the connector or use any tools.

Please see section 10.3 for pin-out details.
3.2.3 Power cable
The Minimus comes with a dedicated power cable with a standard military-specification bayonet connector on one end and bare ends at the other.
Note: The Minimus does not use a grey/blue combined power/data cable, as used with many other Güralp products.
Please see section 10.2 for the pin-out details.
Caution: We recommend fitting an in-line 3.5 A anti-surge fuse in the positive power lead to protect the external wiring of the installation.
3.2.4 Diagnostic GNSS to Serial cable adapter
The Minimus comes with an adapter to connect the GNSS LEMO connector to a female nine-pin D-subminiature connector (DE9f), which can be used with a standard serial port to allow diagnosis and debugging of the Minimus using a serial terminal emulator (see section 7).
Note: This facility should rarely be required. It is primarily intended for use by the Güralp Support Team to help diagnose any problems with the Minimus that may be experienced by the user.
A serial-to-USB converter (not supplied) may need to be used to connect to PCs or laptops that don’t have a nine-pin serial connector. Please see section 10.3 for full pin-out details.
3.3 Güralp Discovery software
Güralp Discovery is a software application for seismometer configuration and control, state-of-health monitoring, and waveform viewing and acquisition.
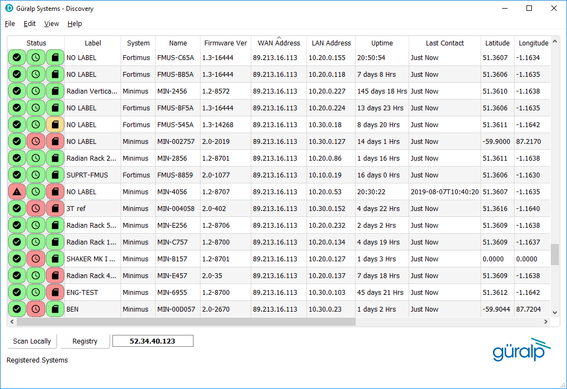
An important benefit of Discovery is that it allows the user to identify the instruments’ I.P. addresses on a LAN or via a cloud-based or organisational registry server without the need for static I.P. addresses at the stations.
Discovery also provides simple, convenient instrument and data management with access to hardware State-of-Health (SoH), data streaming; GNSS location; response and calibration data.
Discovery can download Minimus firmware from the Internet and remotely install it onto any connected Minimus digitisers.
3.4 Güralp GüVü Android and iOS app
For added confidence during deployments in the field, Güralp GüVü, a Bluetooth App, displays waveforms, orientation, temperature and humidity data for instant checking of installation integrity.
Please refer to Chapter 6 for installation and usage instructions.