Chapter 2. Getting started
The following steps will enable you to connect and start using your CMG- EAM-R.
2.1 Configuring networking
There are three ways in which your EAM-R can acquire a network address, DHCP, APIPA or static configuration.
2.1.1 DHCP
If the EAM-R is connected to a network which includes a DHCP (Dynamic Host Configuration Protocol) server, the EAM-R will automatically obtain an IP address from the server. You can either consult the DHCP server's log file to determine which address has been allocated or try one of the techniques described in section 2.1.4.
2.1.2 APIPA
Many modern systems support Automatic Private IP Address (APIPA) allocation (also known as “link-local addressing”). On networks without a DHCP server, computers can negotiate addresses in the range 169.254.0.0 to 169.254.254.255 (or in the block fe80::/64 for IPv6 systems). This scheme will, for example, allocate addresses to both systems if the EAM-R is connected directly to a laptop running Windows. To determine which address has been allocated, use one of the techniques described in section 2.1.4.
2.1.3 Static addressing
You can configure your EAM-R to use a static IP address by connecting a PC running a terminal emulator (such as PuTTY, HyperTerm or minicom) to the console port on the front panel. Configure your emulator for a line speed of 38,400 with no hardware or software flow control.
Once connected, you will be presented with a login prompt. Enter the user-name root and the password guralp3 when prompted. The password will not be displayed as you type it.
Once logged in, issue the following command:
eam999 ~ # ip addr add 192.168.0.1/24 dev eth0
replacing 192.168.0.1/24 with the desired IP address. It must be specified in CIDR format where the actual address is followed by the number of bits of the network mask. The above example uses 192.168.0.1 with a netmask of 255.255.255.0 (24 bits of network address). A PC connected to this network could communicate with the acquisition module if it was configured to use an IP address of (for example) 192.168.0.2 with a matching netmask of 255.255.255.0.
Note: IP addresses assigned using this method will be lost if the unit is rebooted. To permanently assign an IP address, refer to the Platinum manual, MAN-EAM-0003, available from www.guralp.com
If you wish to connect to the EAM-R from a PC, they must either both be on the same subnet (usually the first three numbers of the IP address) or be able to connect to each other via routers.
In the latter case, you will need to tell the acquisition module the address of its default router. Please refer to the Platinum manual, MAN-EAM-0003, for more details.
2.1.4 Discovering dynamically allocated addresses
There are three ways to discover a dynamically allocated address. You can read it from the unit's LCD display, you can connect to the serial port and enquire or you can use a broadcast address in Scream.
2.1.4.1 Using the serial port
To use the serial port, connect a terminal emulator (as described in section 2.1.3 and issue the command:
ip addr show dev eth0
You will see output like
eam999 ~ # ip addr show dev eth0
2: eth0: <BROADCAST,MULTICAST,UP,LOWER_UP> mtu 1500 qdisc pfifo_fast qlen 1000
link/ether 00:50:c2:40:54:75 brd ff:ff:ff:ff:ff:ff
inet 192.168.0.101/24 brd 192.168.1.255 scope global eth0
inet6 fe80:250:c2ff:fe40:5475/64 scope link
valid_lft forever preferred_lft forever
eam999 ~ #
The first line of the output should contain the word UP, confirming that the adaptor has been enabled. The IP address that has been assigned is shown on the line beginning inet - in this case, it is 192.168.0.101 (with a netmask of 24-bits indicated by /24).
2.1.4.2 Using Scream
Scream is a software package for Seismometer Configuration, Real-time Acquisition and Monitoring, developed by Güralp Systems. To obtain a free copy of Scream, please send an email to scream@guralp.com, describing briefly your equipment and the organisation for whom you are working. For more information , please see www.guralp.com/scream.
To determine the IP address of your EAM-R(s), start Scream and open the network control window ( +
+ ). Key
  to add a new UDP server and enter the address 255.255.255.255 – this is a broadcast address that will be recognised by all hosts on the network. The new server will appear in the Servers list: click on it once to highlight it and then key +
 . This sends a “GCFPING” packet to which all GCF servers will reply. The address of your EAM-R will appear in the control pane as shown below:
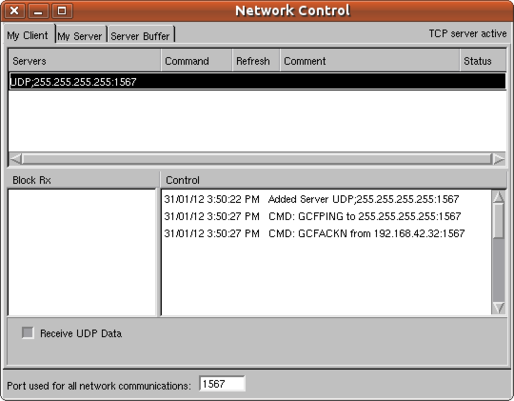
In this case, a single acknowledgement response (GCFACKN) was received and it came from the address 192.168.42.32 so this is the address of the EAM-R. If there are more than one EAM-R (or other GCF servers) on the network, multiple GCFACKN packets will be reported.
2.2 Hook-up diagrams
The hook-up diagrams on the following pages show the most common usage scenarios.
2.2.1 Multiple CD24-R8s with GPS synchronisation
The diagram below illustrates how to connect an EAM-R to a rack of CMG-CD24-R8 digitisers when using a GSL GPS receiver for synchronisation. The EAM-R needs only Power, Ethernet and input (USB) connections to start collecting and forwarding data.
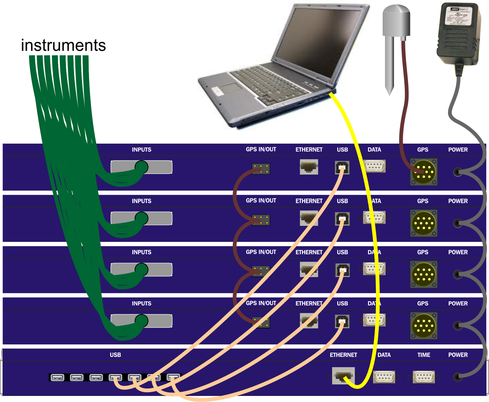
The CMG-CD24-R8 is a rack-mounted, 8-channel digitiser designed for use with the EAM-R. For further information about the CD24-R8, please see its manual, MAN-C24-0004, which can be downloaded from www.guralp.com/documents/MAN-C24-0004.pdf.
Multiple CD24-R8s can be connected to a single EAM-R using USB cables, as shown.
The GPS receiver should be connected to only one CD24-R8. A GPS “daisy-chain” cable is used to pass timing information to other units in the rack. The EAM-R is preconfigured to receive its timing information from the digitisers.
The EAM-R and CD24-R8s are supplied with separate power supplies but, if a suitable DC power source is available, a “daisy-chain” power supply cable can be made up to run all the units from a single supply.
2.2.2 Multiple CD24-R8s with GPS synchronisation
The diagram below illustrates how to connect an EAM-R to a rack of CMG-CD24-R8 digitisers when only NTP (internet Network Time Protocol) synchronisation is available. It must be stressed that GPS synchronisation is significantly more accurate than NTP.
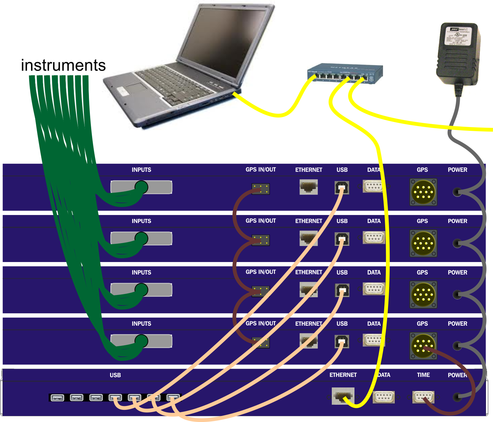
In this arrangement, a special cable, CAS-DCM-0059, is used to connect the TIME output of the EAM-R to any one of the GPS inputs. NTP is received from the internet (or from a local NTP server) via the ETHERNET connector. All other connections are as described in the previous section.
The EAM-R needs to be configured to accept NTP synchronisation and to output NMEA (GPS timing signals) from the TIME connector. For further details, please see the “Digitiser synchronisation” chapter of the Platinum manual (MAN-EAM-0003), where the TIME connector is referred to as “Port C”. The Platinum manual is available for download from www.guralp.com/documents/MAN-EAM-0003.pdf.
2.3 Operation
The EAM-R runs Platinum firmware which has been developed specifically for the Güralp Systems range of data acquisition products, including the CMG-EAM and CMG-NAM. Platinum includes features for data collection, processing, storage, forwarding and protocol conversion and well as digitiser and instrument configuration and control facilities.
Unless ordered otherwise, the EAM-R is supplied pre-configured to:
acquire a DHCP or APIPA network address;
collect GCF data from all seven USB connectors (this is, in fact, entirely automatic and not configurable);
synchronise its own clock to connected digitisers; and
provide a Scream server on the default network port (1567), forwarding all collected data;
In many situations, this means that you can start using your EAM-R immediately with no further configuration.
There are, however, many other features of Platinum firmware on the EAM-R which you may wish to explore and enable. Full details are provided in the Platinum manual, MAN-EAM-0003, which should be read in conjunction with this document and is available for download from www.guralp.com/documents/MAN-EAM-0003.pdf.
The rest of this section discusses features of the EAM-R which differ from or are not mentioned in the Platinum manual.
2.3.1 The LCD display
The front-panel LCD display is not mentioned in the Platinum manual: it scrolls through several pages of status information, showing the same content as the “System status” page of the web interface, as well as the current IP address.
2.3.2 The FLUSH button
The “FLUSH” button on the front panel is not mentioned in the Platinum manual. Pressing this button has exactly the same effect as clicking the “Flush to storage” button in the “Tools” → “Storage and recording” page of the web interface, causing recorded data to be flushed from the ring-buffers to the tertiary (or external) storage device. USB storage devices, such as USB “thumb drives” may be connected to any of the USB ports for this purpose: see the following section for more details.
2.3.3 Connectors
2.3.3.1 Console
The CONSOLE connector is not configurable via Platinum: it is permanently configured as a terminal running at 38,400 Baud. You can access the command line of the EAM-R by connecting a terminal emulator to this port. Set your emulator to 8 data bits, 1 stop bit and no parity bits (8-N-1) and disable both hardware (XON/XOFF) and software (RTS/CTS) flow control.
2.3.3.2 Data
The DATA connector is referred to throughout the Platinum manual as “DATA OUT”. It is a general purpose serial port and is fully configurable within Platinum as PortDO.
2.3.3.3 USB
The USB connectors can be used to connect up to seven CD24-R8 digitisers and at most one external storage device, such as a USB thumb-drive.
CD24-R8 digitisers connected to these ports are automatically configured as GCF input sources. Entries will appear for each on the System Status page of the web interface and appropriate entries will appear in the instrument control and digitiser configuration menus. If the digitisers are connected and powered-up after the EAM-R has been started, you will have to refresh the web page in order to see these entries.
Note: In order for this feature to work correctly, the DATA OUT ports of the CD24-R8 digitisers must be configured to operate with a line speed of 115,200.
A USB storage device connected to any of the USB ports becomes available to Platinum as “External USB storage”. It can be selected as the recording device using the “Configuration” → “Storage and recording” page of the web interface. Please see the “Recording and Retrieving Data” chapter of the Platinum manual for more details.