Chapter 3. Getting started
These steps enable you to connect to and start using your Güralp NAM.
3.1 The console
The NAM can be controlled using either the web interface, the console command-line or a terminal command-line.
3.1.1 Video console
Connect a suitable display to either:
the VGA video connector on the rear panel; or
the DVI connector on the rear panel.
Connect either:
a PS2-style keyboard to the lower, purple PS2 connector on the rear panel; or
a USB keyboard to any USB connector on the front or rear panel
Note: The console displays system messages while the unit is booting and operating. This is essential for some diagnostic purposes but may be inconvenient when performing routine monitoring or configuration.
3.1.2 Serial terminal
Connect a PC/laptop running terminal emulation software (such as minicom under Linux or PuTTY under Windows) to the upper RS232 terminal connector on the rear panel, next to the VGA socket.
Configure the emulator for 115,200 Baud, 8 data bits, no parity bits and one stop bit (commonly referred to as “8-N-1”). Disable both hardware (XON/XOFF) and software (RTS/CTS) flow control.
3.1.3 SSH terminal
Switch on the NAM, as described in section 4.2, configure a network interface, as described in section 4.3, and then use an ssh client (such as the ssh command on Linux or PuTTY on Windows) to connect to the IP address of the NAM using TCP port 22.
3.2 Logging in
The default login name is root and the default password is guralp3. (Older units had a default password of rootme.) Note that the password is not displayed while you type it.
Note: The password must be changed if the unit is to be connected to the Internet. Refer to the Platinum manual, MAN-EAM-0003, for instructions regarding changing the password.
3.3 Switching on and off
3.3.1 Switching on
To switch on the NAM, connect a mains (line) power cable to the power inlet on the rear panel. The unit will start immediately.
3.3.2 Switching off
The NAM should be shut down before removing power. This can be done using the web interface, from the console or from the command line.
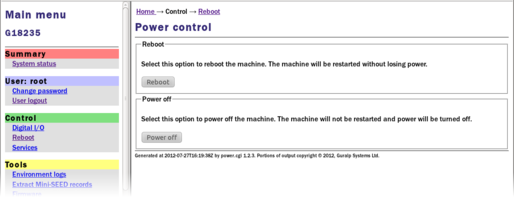
3.3.2.1 Switching off using the web interface
To safely shut down the NAM from the web interface, select “Reboot” from the “Control” menu. Click  on the resulting screen. Wait until the green front panel power indicator has extinguished before removing power.
3.3.2.2 Switching off using the console or command line
To safely shut down the NAM from the console or command line, enter the command
poweroff
Wait until the green front panel power indicator has extinguished before removing power.
3.3.3 Restarting
If the NAM has been shut down without removing power, it can be restarted by briefly holding the front-panel power control in the '1' position.
3.3.4 Emergency shut-down
If it is not possible to shut down the NAM using the web interface or command line, it is possible to stop the system by holding the front-panel power control in the '1' position for a few seconds, until the green front panel power indicator extinguishes. Note that the system will not have had a chance to write any outstanding data to the storage media so some data may be lost.
3.4 Configuring networking
There are three ways in which your NAM can acquire a network address, DHCP, APIPA or static configuration.
3.4.1 DHCP
If the NAM is connected to a network which includes a DHCP (Dynamic Host Configuration Protocol) server, the NAM will automatically obtain an IP address from the server. The resulting address will be displayed in the LCD display on the front panel.
3.4.2 APIPA
Many modern systems support Automatic Private IP Address (APIPA) allocation (also known as “link-local addressing”). On networks without a DHCP server, computers can negotiate addresses in the range 169.254.0.0 to 169.254.254.255 (or in the block fe80::/64 for IPv6 systems). This scheme will, for example, allocate addresses to both systems if the NAM is connected directly to a laptop running Windows. The resulting address will be displayed in the LCD display on the front panel.
3.4.3 Static addressing
You can configure your NAM to use a static IP address from the command line: either from the console or over an SSH connection.
Log in and issue the following command:
nam999 ~ # ip addr add 192.168.0.1/24 dev eth0
replacing 192.168.0.1/24 with the desired IP address. It must be specified in CIDR format where the actual address is followed by the number of bits of the network mask. The above example uses 192.168.0.1 with a netmask of 255.255.255.0 (24 bits of network address). A PC connected to this network could communicate with the acquisition module if it was configured to use an IP address of (for example) 192.168.0.2 with a matching netmask of 255.255.255.0.
Note: IP addresses assigned using this method will be lost if the unit is rebooted. To permanently assign an IP address, use the net-setup command or refer to the Platinum manual, MAN-EAM-0003, available from www.guralp.com.
If you wish to connect to the NAM from a PC, they must either both be on the same subnet (usually the first three numbers of the IP address) or be able to connect to each other via routers.
In the latter case, you will need to tell the acquisition module the address of its default router. Please refer to the Platinum manual, MAN-EAM-0003, for more details.
3.4.4 Discovering dynamically allocated addresses
There are three ways to discover a dynamically allocated address. You can read it from the unit's LCD display, you can query it from the command line or you can use a broadcast address in Scream.
3.4.4.1 Using the command line
To use the command line, log in via the Platinum console or an SSH connection and issue the command:
ip addr show dev eth0
You will see output like
nam999 ~ # ip addr show dev eth0
2: eth0: <BROADCAST,MULTICAST,UP,LOWER_UP> mtu 1500 qdisc pfifo_fast qlen 1000
link/ether 00:50:c2:40:54:75 brd ff:ff:ff:ff:ff:ff
inet 192.168.0.101/24 brd 192.168.1.255 scope global eth0
inet6 fe80:250:c2ff:fe40:5475/64 scope link
valid_lft forever preferred_lft forever
nam999 ~ #
The first line of the output should contain the word UP, confirming that the adaptor has been enabled. The IP address that has been assigned is shown on the line beginning inet - in this case, it is 192.168.0.101 (with a netmask of 24-bits indicated by /24).
Substitute eth1 in place of eth0 to see the address of the second port.
3.4.4.2 Using Scream
Scream is a software package for Seismometer Configuration, Real-time Acquisition and Monitoring, developed by Güralp Systems. To obtain a free copy of Scream, please send an email to scream@guralp.com, describing briefly your equipment and the organisation for whom you are working. For more information , please visit www.guralp.com/scream.
To determine the IP address of your NAM(s), start Scream and open the network control window ( +
+ ). A multicast address - 239.193.15.67 - should be listed. If it is not, key
  to add a new UDP server and enter the address 239.193.15.67. – this is a broadcast address that will be recognised by all hosts on the network. The new server will appear in the Servers list: click on it once to highlight it and then key
+
to add a new UDP server and enter the address 239.193.15.67. – this is a broadcast address that will be recognised by all hosts on the network. The new server will appear in the Servers list: click on it once to highlight it and then key
+ . This sends a “GCFPING” packet to which all GCF servers will reply. The address of your NAM will appear in the control pane as shown below, along with the addresses of any other GCF servers.
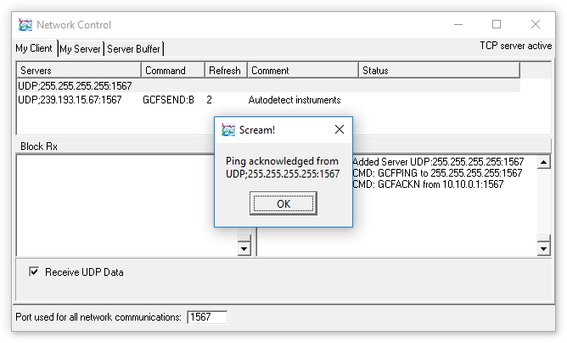
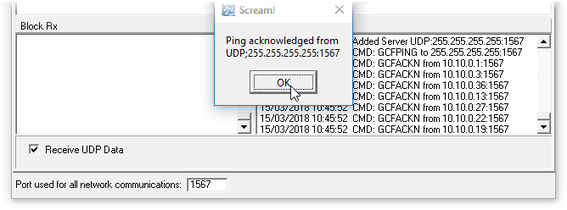
In this case, a single acknowledgement response (GCFACKN) was received and it came from the address 10.10.0.1 so this is the address of the NAM. If there are more than one NAM (or other GCF servers) on the network, multiple GCFACKN packets will be reported, as shown here:
3.5 Using the web interface
Once the NAM is powered up and you have configured or determined its IP address, you can access the web interface by entering the IP address of the unit in the address bar of your web browser. You can use either HTTP or HTTPS: HTTPS provides encrypted connections which are desirable if you are accessing the NAM via an insecure network and essential if is connected to the public Internet.
For example, if your NAM has an IP address of 192.168.0.101, you can access its web interface by entering either
or
3.6 Operation
The NAM runs Platinum firmware which has been developed specifically for the Güralp Systems range of data acquisition products, including the EAM and nTDE instruments. Platinum includes features for data collection, processing, storage, forwarding and protocol conversion and well as digitiser and instrument configuration and control facilities.
There are many features of Platinum firmware on the NAM which you may wish to explore and enable. Full details are provided in the Platinum manual, MAN-EAM-0003, which should be read in conjunction with this document and is available for download from www.guralp.com/documents/MAN-EAM-0003.
The rest of this section discusses features of the NAM which differ from or are not mentioned in the Platinum manual.
3.6.1 The LCD display
The front-panel LCD display is not mentioned in the Platinum manual: it scrolls through several pages of status information, showing the same content as the “System status” page of the web interface, including the current IP address.
3.6.2 Connectors
3.6.2.1 Platinum console - serial terminal
The upper serial terminal connector beside the VGA connector is not configurable via Platinum: it is permanently configured as a terminal running at 115,200 Baud. You can access the command line of the NAM by connecting a terminal emulator to this port. Set your emulator to 8 data bits, 1 stop bit and no parity bits (8-N-1) and disable both hardware (XON/XOFF) and software (RTS/CTS) flow control.
3.6.2.2 Ports A, B and C
Ports A, B and C are general purpose serial connections that can be configured for a wide variety of purposes. They are identified within the user interface as PortA, PortB and PortC. See the Platinum manual, MAN-EAM-0003, for more details.
Note that Port C presents an RS422 interface, allowing cable runs of up to 1,500 metres.
3.6.2.3 USB
Each USB connector can be used for multiple purposes, including:
a USB console keyboard
a CD24-R8 digitiser (or up to seven such devices via a USB hub).
CD24-R8 digitisers connected to these ports are automatically configured as GCF input sources. Entries will appear for each on the System Status page of the web interface and appropriate entries will appear in the instrument control and digitiser configuration menus. If the digitisers are connected and powered-up after the NAM has been started, you will have to refresh the web page in order to see these entries.
Note: In order for this feature to work correctly, the DATA OUT ports of the CD24-R8 digitisers must be configured to operate with a line speed of 115,200.
a USB-to-serial converter (see section 5.1). The resulting serial ports are dynamically named within the user interface and each can be used for a wide variety of purposes. See the Platinum manual, MAN-EAM-0003, for details of serial port configuration.
at most one external storage device, such as a USB thumb-drive.
A USB storage device connected to any of the USB ports becomes available to Platinum as “External USB storage”. It can be selected as the recording device using the “Configuration” → “Storage and recording” page of the web interface. Please see the “Recording and Retrieving Data” chapter of the Platinum manual for more details.