Chapter 3. The procedure
This procedure applies to a number of different instruments. The illustrations show a 6TD but the procedure is similar for all instruments. If in any doubt, please stop and contact support@guralp.com for advice and assistance.
3.1 Removing the old bubble level
If the old bubble-level is still in place, follow these steps to remove it.
Warning: Risk of eye injury. Impact-resistant safety glasses must be worn at this point.
Using an airline/compressor and blow-gun, blow air around the circumference of the bubble level. This is often sufficient to blow the old level out of its housing. If so, proceed to section 3.2.
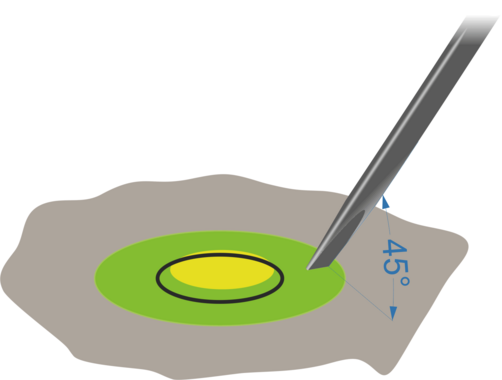
Point a flat-headed screwdriver downwards at 45° into the top surface of the bubble-level with the blade aligned radially as near to the edge as possible:
Tap the screwdriver with a hammer to try and rotate the level slightly. Do this alternately in opposite directions.
If you see any movement, repeat step one, above.
If the old bubble-level is still firmly in place, it will have to be broken up and removed piece by piece:
Pierce the top using the hammer and screwdriver
Use paper towel or tissues to soak up the liquid from inside
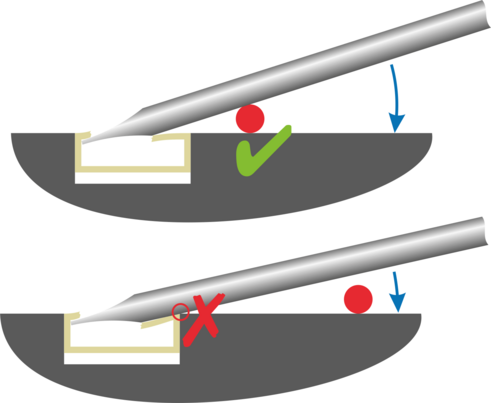
Rest an insulated screwdriver or similar item on the instrument's lid to act as a fulcrum while preventing any damage to the lid. Lever the bubble level out with another screwdriver:
If this successfully removes the old level, proceed to section 3.2.
If the top of the bubble level breaks off but the base remains in its recess, use the screwdriver and hammer to break the level into individual pieces and remove them one by one.
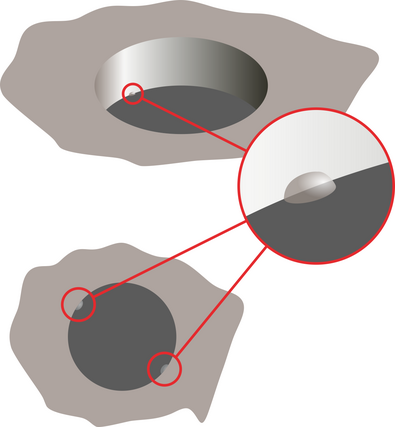
Caution: Take extreme care not to scratch or damage in any way the recess because that would cause the replacement bubble level to foul and not sit correctly in the recess, possibly requiring the entire lid to be replaced.
3.2 Cleaning the recess
Once all of the plastic parts of the old bubble level have been removed, the orifice should be cleaned thoroughly of all traces of glue.
 Gently scrape the sides of the recess with a modelling knife or scalpel. Be careful not to damage the recess.
Gently scrape the bottom of the recess with a modelling knife equipped with a square- or angle-ended blade, if available. If not, use the end of the flat-bladed screwdriver, being careful not to damage the inside of the recess.
Use the compressor/air-line and blow-gun to blow any remaining debris out of the recess.
Thoroughly wipe the inside of the recess with isopropyl alcohol / isopropanol and allow to dry.
Perform a last visual check to ensure that no traces of the original level remain and that the recess is undamaged, clean and dry.
3.3 Fitting the new level
3.3.1 Preparation
The replacement level must have a perfectly flat base and be free from any flashing - extra plastic create by the moulding process - before it is fitted.
Prepare the new level by placing it, face up, on a sheet of fine abrasive paper placed on a hard. flat surface and applying a gently, circular motion for a few seconds. This ensures that its base is perfectly flat.
Carefully inspect the side surface of the level for any imperfections caused by the moulding process. If there are any protrusions, carefully remove them with a scalpel or modelling knife. Rub flat with fine abrasive paper if necessary.
The instrument must be perfectly level in order to ensure that the new level is aligned correctly.
Place the spare bubble-level as a reference on a clean part of the top of the instrument (not on the label) and use the adjustable feet to level the instrument.
Rotate the reference level through 180° and check that it still shows correct alignment. If it does not, check the base of the level for any imperfections and abrade if necessary. Discard the level if it does not show consistent results after rotation.
Rotate the reference level through 90° and re-check.
Rotate the reference through a further 180° and re-check. It should show correct alignment regardless of any rotation. Discard the level if it does not.
Do not move the instrument until the procedure is complete.
Test the replacement level as described above and discard it if it does not give consistent results.
3.3.2 Fitting
Start with the instrument perfectly levelled, as described in the previous section, and leave the reference level on top of the instrument to alert you if it should move at all.
Fit the new level as follows:
Using a sewing pin or needle as an applicator, apply two small drops of cyanoacrylate adhesive to the base of the recess against the sides.
Caution: Over-application of adhesive is the most common cause of problems at this stage. Only the smallest amount is required.
Press the new level in to the recess until it is flush with the instrument's surface.
Check the indication shown on the level against that on the reference level and apply pressure to a point on the rim to adjust if necessary.
Once positioned, hold in place for 10 seconds to allow the glue time to start to dry.
Wait ten minutes for the glue to fully dry and then check that the indication is stable despite moderate, asymmetric pressure on the level.
This completes the procedure.