Chapter 10. Recording and Retrieving Data
Data can be recorded to internal and external storage, in raw GCF format or in miniSEED format. Data can be browsed via the web interface or copied to external computers for further processing.
10.1 Preparing removable drives
When a new removable disk is to be used with a CMG-EAM, it must first be formatted for use. The disk can be formatted by any computer, but the CMG-EAM also has the capability of formatting the disk itself. The CMG-EAM accepts disks formatted in either ext3 format (which is faster and more reliable, but can only be read under Linux systems) or VFAT format (slower and arguably less reliable, but can be read under all operating systems). To prepare the disk on a PC, simply format it with a single partition containing either of the above file-systems; it can then be inserted directly into a CMG-EAM.
Note: When using removable disks from CMG-EAMs and CMG-DCMs with PCs, you may need to provide a power supply for the disk.
 When using a six-circuit (powered) IEEE1394 FireWire interface, the disk can draw its power from the host PC. When connected to a four-circuit (un-powered) FireWire interface, such as Sony i.Link, external power needs to be applied as described below. Power also needs to be supplied when using the USB interface.
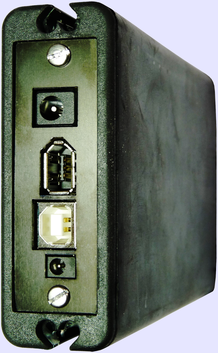
A power supply of between 4.5V and 30V DC should be connected to the 2.1mm barrel connector (lowermost in the picture). The central pin of the connector should be connected to the positive supply line.
IMPORTANT: Do not connect anything to the larger barrel connector, which is used for the heater and temperature sensor.
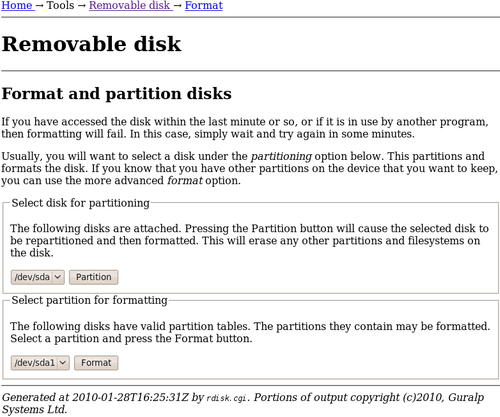
The drop-down menus for device selection use the Linux device naming convention, where /dev/sda is the first device, /dev/sdb is the second and so on. Individual partitions on devices are identified by an appended number, so /dev/sda1 is the first partition on the first device and /dev/sdb3 is the third partition on the second device.
The “Partition” button causes the selected device to be repartitioned with a single partition which is then reformatted. If you are using a device with existing partitions that you wish to preserve, you should use the “Format” button instead.
Successful completion of the format is signalled by a short, on-screen message. The disk is then ready for use.
Disks can also be formatted from the command line with the command
eam999 ~ # rdisk format
10.2 Recording data
All data recording is performed by the gdi-record module. Data are recorded first to a buffer held in flash memory. When the buffer utilisation exceeds a configurable percentage, a process is triggered to flush the data to the hard drive. In low power applications, the hard drive will normally be powered down and, so, must be powered up, and mounted before use. It is then dismounted and powered down once the flush is complete.
The disk is equipped with a temperature sensor and heating element. In low temperature applications, the disk will automatically be warmed to a safe operating temperature before power is applied.
The options that control this process are all on one page but, given its size, it is shown here in sections.
To configure data storage, select “Disk data recording” from the “Configuration” → “All options” menu or select the “Disk recording” short-cut from the Configuration” → “Data transfer/recording” menu. To configure recording from the command line, start gconfig and select “Disk data recording” from the top level menu.
The first part of the configuration screen for gdi-record looks like this:
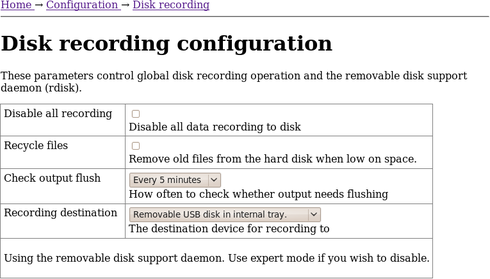
The default settings for this service will work in most installations but, if you wish to fine-tune the behaviour of gdi-record, there are a number of configurable options.
10.2.1 Configurable parameters in standard mode
The following configuration options are available from the “simple” dialogue:
Disable all recording. This check-box, when ticked, unconditionally disables all recording.
Recycle files – If this check-box is ticked, gdi-record will remove the oldest files from external storage to make room for new data when the external storage becomes full. If this option is cleared then, when the storage becomes full, the module will check periodically for free space and start writing again when it can.
In order to reduce power consumption, gdi-record does not write continuously to the hard drive. Data are buffered in flash memory and, at a configurable interval, these data are checked to see which complete files can be written to disk. The Check output flush option controls how often this happens. The options are every minute, every five, fifteen or thirty minutes and every hour.
The Recording destination drop-down menu controls where data are stored. The options may include one or more of:
“Removable USB disk in internal tray” - this is the default setting for CMG_EAMs and CMG-DCMs. Data are written to the removable USB/FireWire disk and can be read via the web interface, the command line or by removing the disk and attaching it to an external USB or FireWire host, such as a laptop.;
“External USB drive on mil-spec connector” - data will be stored on external media, which should be attached to the USB connector. The rdisk daemon handles the required operations for mounting and un-mounting the fie-system;
“Internal USB storage” - for authenticated digitisers only, data can be stored on internal USB-accessible flash memory. It can be retrieved by a USB host (such as a laptop) connected via the GPIO connector. See section 14.2.3.1 on page 197 for more details;
“Ring buffer on flash module” - some systems are equipped with an external flash module to extend the storage capacity beyond that available on the normal file-system. Data written here are accessible via the web interface or, from the command line, under the path /media/flash_module;
“Record files under /var/spool/recdata” - this is the only option on CMG-NAMs and CMG-NAM64s and it is not available on other platforms. Data are written directly to the internal hard drive and are accessible via the web interface or, from the command line, under the path /var/spool/recdata.
10.2.1.1 GCFraw Options
GCFraw is the native recording format of Platinum firmware. It can be read directly by Scream! and other GSL software packages are available for converting it into other formats.

GCFraw recording is enabled by default. To disable it, select the Disable GCF recording check-box.
GCF files contain data from all streams and can grow quite large. The data are split into manageable chunks on the basis of sample times. By default, every thirty minutes the current file is closed and recording recommences to a new file. This interval can be changed using the File period drop-down. The options are 15 or 30 minutes and 1, 2, 3, 4, 6 or 12 hours.
Extra options are introduced to this screen by pressing the “Expert” button. These include file name format control for GCF and miniSEED. See the following section for details.
10.2.1.2 Mini-SEED Options
For some applications, it is more convenient to store the data directly in mini-SEED format. The third section of the “Disk data recording” page controls options related to recording in this format. If recording in mini-SEED format is enabled, a GDI Mini-SEED compressor (convertor) is started automatically. See section 11.3 for more details.
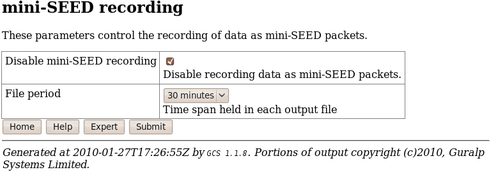
Mini-SEED recording is disabled by default. To enable it, clear the Disable mini-SEED recording check-box.
By default, every three hours the current mini-SEED file is closed and recording recommences to a new file. This interval can be changed using the File period drop-down menu. The options are 15 or 30 minutes and 1, 2, 3, 4, 6 or 12 hours.
10.2.2 Configurable parameters in expert mode
The first set of extra options, shown above, apply to all recording.
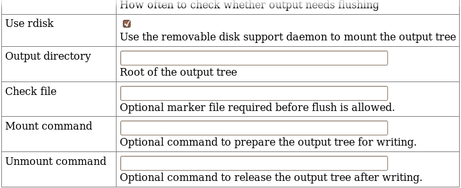
The rdisk daemon controls the disk's power and heater and is designed to simplify the process of mounting and dismounting the removable disk pack. Its user interface is described in detail in section 10.3.1.2. Where there are no removable drives (as, for example, in a typical CMG_NAM configuration), the use of rdisk is unnecessary. It may be turned of by clearing the Use rdisk check-box.
If rdisk is not used, the Output directory text field must be populated with a pathname to the desired storage directory. If a directory name is given here and rdisk is used, the directory named must be the same as or a subdirectory of the directory managed by rdisk.
It is sometimes desirable to synchronise the flushing of memory to disk with an external application. This can be achieved with the use of a semaphore file: the external application writes the file when it is ready to receive data and can remove it in order to inhibit flushing. To activate this feature, enter the desired semaphore file into the Check file text field. The same technique can be used to detect the mount status of removable hardware.
An arbitrary command can be run immediately prior to flushing the memory to disk. This is typically used for mounting external storage devices on, say, a CMG-NAM but could also be used for synchronising operations with an external application. If you require to use such a command, specify it in the Mount command text field.
The Unmount command text field fulfils a similar function but is run immediately after flushing.
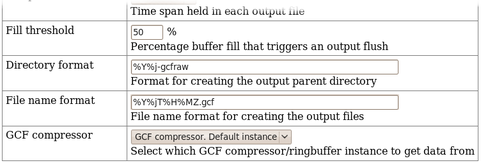
The second set of expert options, shown above apply only to GCF recording.
The Fill threshold text field allows control over the percentage utilisation of the buffer memory which triggers a flush to disk. The default is fifty percent.
The Directory format text field can be used to control the base directory under which all GCF files are stored. It can be populated with a constant path name component or it can include escape sequences to include variable data such as the stream name: these are described in section 10.2.3 on page 115.
The File name format text field allows files to be given descriptive names to help identify the data within. Escape sequences can be used to include variable data such as the stream name: the available escape sequences are described in section 10.2.3. A hierarchical directory structure can be created by incorporating forward-slash characters, '/', into the name: these act as directory separators.
The GCF compressor drop-down menu allows the operator to select which instance of gdi2gcf is used as the data source. The menu will offer all configured instances.
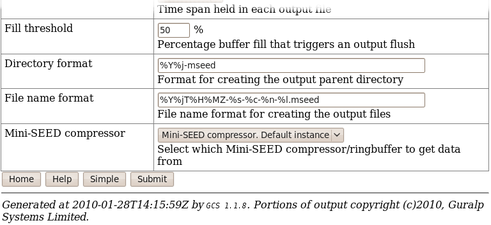
The third set of expert-mode options, shown above, apply only to miniSEED recording.
The Fill threshold text field allows control over the percentage utilisation of the buffer memory which triggers a flush to disk. The default is fifty percent.
The Directory format text field can be used to control the base directory under which all miniSEED files are stored. It can be populated with a constant path name component or it can include escape sequences to include variable data such as the stream name: these are described in section 10.2.3 on page 115.
The File name format text field allows files to be given descriptive names to help identify the data within. Escape sequences can be used to include variable data such as the stream name: the available escape sequences are described in section 10.2.3. A hierarchical directory structure can be created by incorporating forward-slash characters, '/', into the name: these act as directory separators.
The mini-SEED compressor drop-down menu allows the operator to select which instance of gdi2miniseed is used as the data source. The menu will offer all configured instances.
10.2.3 File name escape sequences
Escape sequences are used in the file and directory name fields in the disk recording configuration page. They all begin with a '%' character and are used to insert variable data such as the data or stream name into the file or directory name; each escape sequence is replaced with the relevant value. Any non-escape sequence characters are copied verbatim into the name. All numbers are decimal and will have leading zeroes added to fill the number of digits.
The available escape sequences are:
%d 2 digit day of month (01-31)
%H 2 digit hour in 24 hour clock (00-23)
%j 3 digit Julian day
%m 2 digit month (01-12)
%M 2 digit minute (00-59)
%y 2 digit year i.e. without century digits (00-99)
%Y 4 digit year
%s 5 char SEED station identifier (spaces are removed from all SEED Ids)
%c 3 char SEED channel identifier
%n 2 char SEED network identifier
%l 2 char SEED location identifier
If the format string ends in a .extension (without any escape sequences in the extension) then this extension will be noted and used in some other locations – e.g. for the top level date directory.
The default format string is %Y%j-%H%M-%s-%c-%n-%l.mseed
Slashes “/” will cause subdirectories to be created. Using them as date separators will have unintended and, usually, undesirable consequences.
10.2.3.1 Some examples
The default %Y%jT%H%MZ-%s-%c-%n-%l.mseed includes every piece of information possible. The date format matches that used by the GCF recorder. This will produce file-names like:
2008315T1442Z-TEST1-BHE-NN-LL.mseed
To combine all the channels from a given station simply omit the channel marker from the file name format string:
%Y%jT%H%MZ-%s--%n-%l.mseed
It is recommended that the “--” is left in place to highlight the omitted channel id. This will produce file-names like:
2008315T1442Z-TEST1--NN-LL.mseed
If you specifically want to include a marker to identify that it contains all channels, the use of a lower case string will differentiate it from a regular channel name, which is always presented in upper case.
%Y%jT%H%MZ-%s-all-%n-%l.mseed
yields file-names like:
2008315T1442Z-TEST1-all-NN-LL.mseed
If you prefer human readable dates, rather than using the Julian date
%Y_%m_%d-%H:%M-%s-%c-%n-%l.mseed
yields file-names like:
2008_08_14-14:42-TEST1-BHE-NN-LL.mseed
Note: don't use / as a date separator as this will split the data into sub-directories which is probably not the desired result.
It is often required to separate the data into sub directories by network and station prefix. In this case, it is recommended that the network and station id are still included in the file-name so that the contents of the file are still recognisable even if it is moved to a different location.
%n_%s/%Y%jT%H%MZ-%s-%c-%n-%l.mseed
will store the data like this:
NN_TEST1
2008315T1442Z-TEST1-BHE-NN-LL.mseed
2008315T1452Z-TEST1-BHE-NN-LL.mseed
2008315T1502Z-TEST1-BHE-NN-LL.mseed
...
NN_TEST2
2008315T1442Z-TEST2-BHE-NN-LL.mseed
2008315T1452Z-TEST2-BHE-NN-LL.mseed
2008315T1502Z-TEST2-BHE-NN-LL.mseed ...
10.3 Retrieving data
Data are recorded first to a buffer held in flash memory. When the buffer utilisation exceeds a configurable percentage, a process is triggered to flush the data to the hard drive. In low power applications, the hard drive will normally be powered down and, so, must be powered up and mounted before use. It is then dismounted and powered down once the flush is complete.
If you wish to work with data on the removable drive, it must first be powered up. This is done automatically when using the web interface but must be done manually when working from the command line. If you wish to work with recent data, a manual flush should first be performed in order to move the data from the buffer memory to the drive.
10.3.1 Retrieving data from the removable drive
10.3.1.1 Downloading over a network, using the web interface
Note: It can take several seconds to pre-heat and power up the drive. Be prepared for short delays when using some of the following commands.
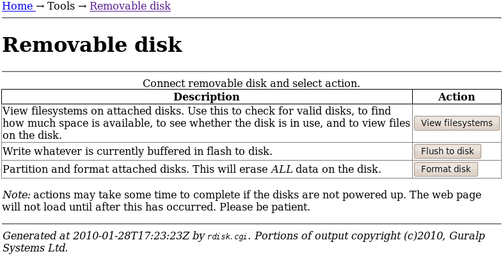
If you wish to retrieve recent data, click the “Flush to disk” button to copy all pending data from the buffer memory to the hard drive. A progress screen will display messages as the various stages of the process complete.
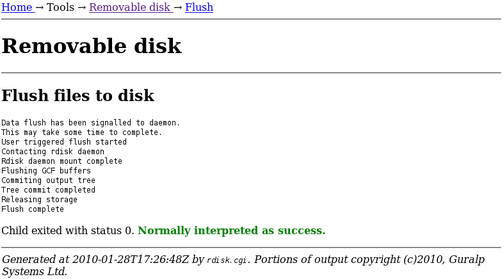
Once the flush process has completed, as shown above, return to the main disk menu by clicking on “Removable disk” on the “Tools” menu.
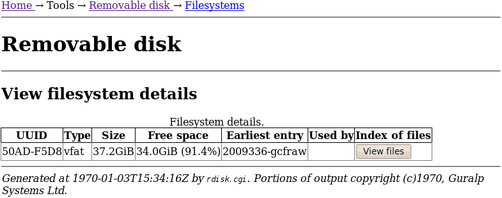
You can now click the “View filesystems” button. This will power up any connected disks and, after a short delay, present a list of attached disks and their details (filesystem, free space, etc).
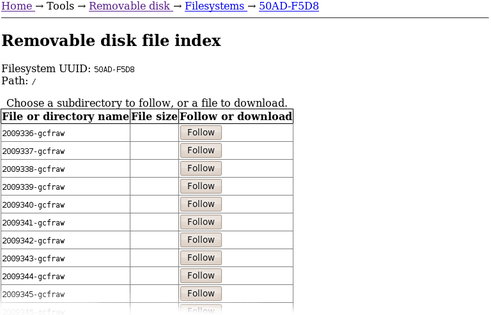
Clicking on the “View Files” buttons takes you to the “Removable disk file index” screen, which displays folders and files. Sub-directories (folders) have a “Follow” button next to them and files have a “Download” button.
The first screen typically looks like this:
Descending into one of these directories (using the follow button) produces this:
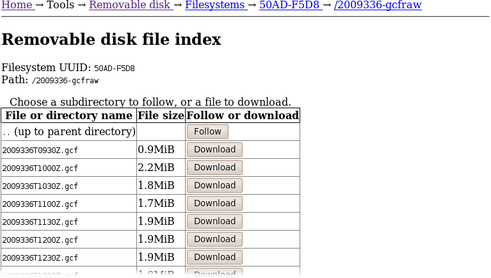
If the displayed directory contained subdirectories, you could continue to navigate down them using the “Follow” buttons. When files are present, as in the above screen-shot, they each have an associated “Download” button which invokes your web browser's standard download facility to copy the data to your computer.
10.3.1.2 Downloading over a network, using the command line
Note: It can take several seconds to pre-heat and power up the drive. Be prepared for short delays when using some of the following commands.
When invoked without arguments, rdisk displays a menu:
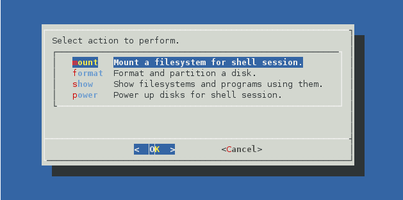
The “mount” option, which can be selected with the  key, displays a menu of available file-systems on removable media. When you choose your desired file-system, it is mounted under /media and you will be told the exact mount point and then presented with a command prompt. This is a sub-shell: the file-system will remain mounted and the disk will remain powered up until you exist the shell (with the exit command or by keying
  +
+  ).
).
The “format” option, which can be selected with the  key, prepares a drive for use, as described in section 10.1.
The “show” option, which can be selected with the  key, lists all available removable drives, together with their file-system type, size, free space and date of earliest entry.
When using shell scripts, all of these menu functions can be accessed by passing the function name as an argument to rdisk. For example:
eam999 ~ # rdisk show
performs the same function as selecting ”show” from the rdisk menu.
Once the disk is powered up and the relevant file-system mounted, the recorded files can be browsed with standard Linux shell commands such as cd and ls. They can be copied to a remote PC using the network or over the serial port (as described in section 10.3.1.3).
To copy files over the network, the use of scp or rsync is recommended. The scp program is most convenient to use and can copy single files or recursively copy directories. The rsync program is more complicated but is ideal when a remote copy of the data is to be updated regularly, since it minimises the traffic over the network by only copying new or changed files.
For Linux users, scp is installed by default or available as an optional package in most distributions. Consult your operating system documentation for more details. For Windows users, the WinSCP package is recommended: this has the additional benefit of providing a graphical, explorer-like interface for browsing files on the CMG-EAM. WinSCP can be downloaded for free from http://winscp.net.
The screen-grab below shows a complete session recorded from a Linux PC. The operator connects to a CMG-EAM, powers up the disks, downloads all recorded files, powers down the disks and then disconnects.
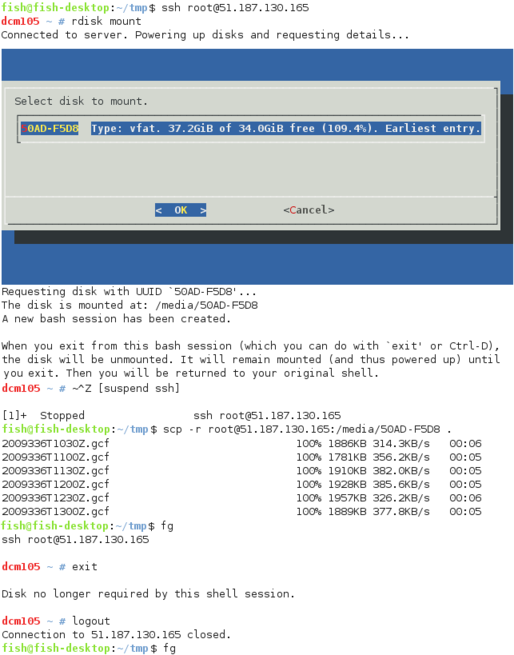
Note the use of ssh's tilde ('~') escape followed by +  to suspend the ssh session and return to the calling PC, in order to run the scp command with the disk still mounted. The fg command (foreground) returns control to the ssh session.
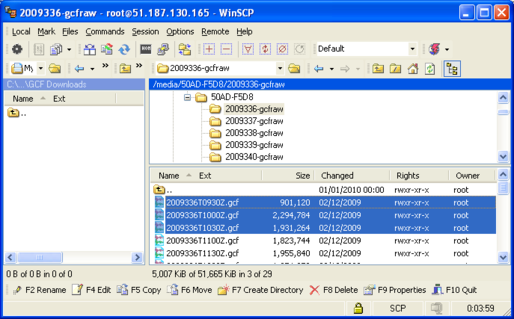
Windows users should follow the same procedure to log in, power up and mount the file system. At this point, rather than suspending the ssh shell, they can connect with WinSCP and navigate to the /media directory. The recorded files will then be displayed and can be dragged and dropped to appropriate locations on the PC:
When the transfer is complete, return to the ssh session and power down the disks (with the exit command or by keying + ).
Using rsync is very similar: simply replace the invocation of scp in the above instructions with an appropriate rsync command.
For Linux users, the simplest usage is
me@mypc:~/dl $ rsync -avz root@51.187.130.165:/media/*/ .
This will copy all files from all removable drives to the current directory on the invoking computer. Only the differences are transferred, making this particularly efficient when used regularly. For more advanced usage, please see the rsync manual, available on-line at http://man-wiki.net/index.php/1:rsync-2006.11.06
Windows users can download a free port of rsync using the cygwin library (see http://www.cygwin.com/ for more information) or use one of several free, graphical interfaces, such as grsync, available from http://sourceforge.net/projects/grsync-win/files
The following screen-shot shows grsync about to download all data from a removable drive. Note the password prompt appearing in the separate console window.

10.3.1.3 Downloading over a serial port, using the command line
In situations where it is not convenient to use the network interface, files can be downloaded from the removable disk using one of three file-transfer protocols, X-modem, Y-modem or Z-modem. None of these protocols were ever rigidly standardised so, if you are not using one of the terminal emulators discussed in this section, you may need to experiment a little: this is reflected in the huge range of optional arguments that the transfer program accepts.
The X-modem transmitter is invoked as sx, the Y-modem transmitter as sy and the Z-modem transmitter as sz. They are, in fact, all implemented by the same program so the detailed help message (displayed with the --help option) describes options relevant to all three protocols.
Linux users are advised to use the minicom terminal emulator. This includes X-modem support and its use is described below. For Windows users, we describe the use of HyperTerminal, which is supplied with many Windows systems.
For minicom users, the X-modem protocol should first be configured: start minicom and type +  (minicom's escape sequence) and then
  to display the options menu:
Welcome to minicom 2.3
OPTIONS: I18n
Compiled on Sep 25 2009, 23:40:20.
Port /dev/ttyS0
Press CTRL-A Z for help on special keys
+-----[configuration]------+
eam2243 logi| Filenames and paths |
Password: | File transfer protocols |
eam2243 ~ # | Serial port setup |
| Modem and dialling |
| Screen and keyboard |
| Save setup as dfl |
| Save setup as.. |
| Exit |
+--------------------------+
Select “File transfer protocols” and ensure that the command used for X-modem transfers is set to /usr/bin/sx -vv
To download a file, mount the disk if required, enter the command
eam2010 ~ # sx path-to-file
and then immediately type + followed by  to activate minicom's receive file function. Select “xmodem” from the resulting menu and then enter a name for the downloaded file. The transfer should start immediately:
The disk is mounted at: /media/50AD-F5D8
A new bash session has been created.
When you exit from this bash session (which you can do with `exit'+-----[xmodem download - Press CTRL-C to quit]------+ remain| | you wi|rx: ready to receive 2009336T1030Z.gcf |
|Bytes received: 154112 BPS:5978 |
eam201| |
|Transfer complete |
| |
| READY: press any key to continue... |
+---------------------------------------------------+
A display counter indicates the progress and eventual completion of the transfer.
HyperTerminal users should mount the disk, type the command
eam2010 ~ # sx path-to-file
and then immediately select “Receive File...” from the “Transfer” menu. A dialogue asking for the destination directory name is followed by another asking for the destination file name:
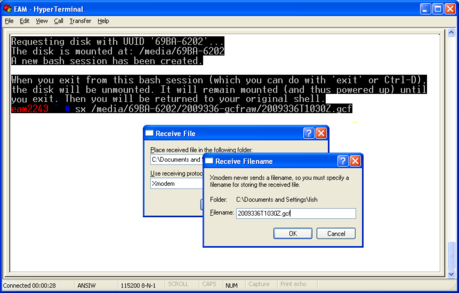
When you click the “OK” button, a progress indicator appears:
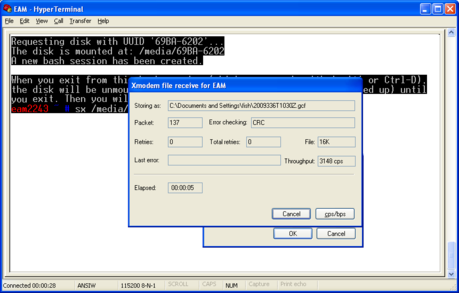
You will be returned to the prompt when the transfer is complete.
10.3.2 Reading the removable drive on other computers
The removable drive may be disconnected from the system at any time without risk of data loss. In practice, users will normally manually flush the memory contents to disk (using either the rdisk flush command or the “Flush to disk” button on the “Removable disk” page of the web interface) and allow that process to complete before removing the drive.
The drive can then be connected to any computer that supports external USB or FireWire storage devices. In some circumstances, you may need to provide a power connection to the drive: see section 10.1 for more details.
The disk may have been formatted as either a VFAT or ext3 volume. Windows computers cannot read ext3 volumes without additional software such as “Explore2fs” or “DiskInternals Linux Reader”. See http://www.howtoforge.com/access-linux-partitions-from-windows for more details about these two packages.