Data flow choices
An important consideration in the design of a seismological installation is how data from the instrumentation will be stored or transmitted, so that it can be read at a later stage.
Storage
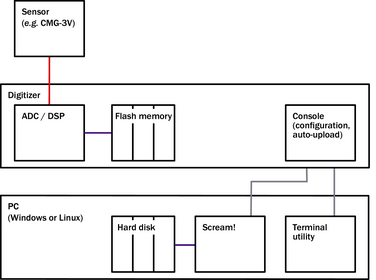
If real-time data will not be required, a simple storage system is sufficient. Digital instruments, such as the 3TD and 6TD, and DM24 digitisers can be ordered with up to 8 Gb of non-volatile Flash memory storage. As soon as the instrument has power, it will begin recording to this memory, if so configured. To configure the instrument to act as a storage system, set the transmission mode to FILING. This is most easily done using in Scream!
To download new data from an instrument:
-
Load Scream! onto a local PC.
-
Choose from the menu bar to open the Setup window.
-
Click on the Files tab, and choose a suitable Base Directory on your PC’s hard disk, a Filename format and a Data format.
-
Click on the Recording tab, and select Auto Record uploaded streams and Auto-upload on heartbeat.
-
Click Apply
-
Connect the output port of the digitiser or digital instrument to the serial port of the PC.
-
The digitiser should soon appear in the left-hand pane of the main window. Any new data held by the digitiser will now be downloaded into Scream! and shown in the main window, as well as being written to the directory you specified.
For digitisers in DUAL mode, where the Flash memory is used to store triggered data, the above steps will download and save all recent triggered data. Real-time data will not be recorded to your local hard disk, although it will be displayed in Scream! (see below).
Transmission
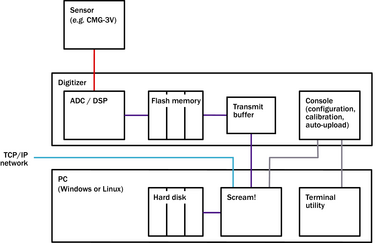
A digitiser or digital instrument in the DIRECT, ADAPTIVE, FIFO or DUAL filing modes will automatically transmit data over the serial connection to a connected PC.
-
If the data are acknowledged by Scream! (or some other GCF-compatible program running on the PC) the digitiser will move on to the next block.
-
If a block is corrupted in transmission, or fails to arrive, Scream! sends a NACK to alert the digitiser. The digitiser has a small transmit buffer, which it uses to overcome these problems. This is called the BRP (Block Recovery Protocol) and is a transparent feature of all programs that send and receive GCF data over serial links.
-
If Scream! fails to reply, what the digitiser does next depends on the filing mode. See the documentation for the digitiser or Scream!, or other “how-to”s on this site, for information on the different filing modes.
You can instruct Scream! to record the blocks it receives:
-
Load Scream! onto a local PC.
-
Choose from the menu bar to open the Setup window.
-
Click on the Files tab, and choose a suitable Base Directory on your PC’s hard disk, a Filename format and a Data format.
-
Click on the Recording tab, and select Auto Record-Enable for data streams and Auto Record-Enable for status streams (if appropriate.)
-
Click Apply
-
Connect the output port of the digitiser or digital instrument to the serial port of the PC.
The digitiser should soon appear in the left-hand pane of the main window. Real-time data will now be downloaded into Scream! and shown in the main window, as well as being written to the directory you specified. If the communications link is fast enough, and depending on the filing mode, the digitiser may also transmit data held in its Flash memory which has not yet been acknowledged.
Alternatively, Scream! can pass the data streams it receives onto a local TCP/IP network, or over the Internet. See Scream!’s documentation for more information.
You must set a communication rate (baud rate) sufficient to transfer all real-time streams. If you tell the digitiser to transmit more data than it can fit over the link, you will see gaps in the data received by Scream!. The FIFO and ADAPTIVE filing modes will store any data which Scream! fails to acknowledge, and may be able to transmit the missing data to Scream! later, but this is not guaranteed. In any case, you will end up with data streams out of time order, which some software packages cannot handle.
As a rule of thumb, a 9600 baud serial link is enough to transmit three 100 samples/s streams in real time. The actual amount of data a link can carry depends on the compression, which depends in turn on the strength of the signal. As a result, you may not notice that the link is insufficient until a seismic event occurs which requires more data to be transmitted.
You can set up Scream! to dial in to a remote installation periodically, over a modem link; the digitiser should use one of FIFO, ADAPTIVE or FILING modes to achieve this. See the dial-up “how-to” on this site for recommendations.
Using a DCM
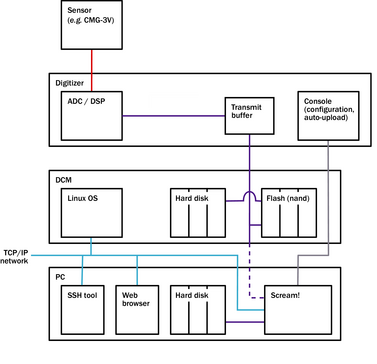
The DCM (Data Communications Module) is a general-purpose communications centre for seismic installations. It is at heart a fully network-enabled Linux computer with its own hard disk, yet it consumes less than 1 W of power and functions down to –30 °C.
You can connect several digitisers to Scream! using serial links to a DCM, and a further serial link from the DCM to your PC. If you do this, the DCM will appear transparent to Scream!, similar to a Güralp CRM/SAM. Real-time data will be passed through unchanged, but will also be saved in the DCM’s Flash memory if present, according to the DCM’s configuration.
The above arrangement does not, however, use the full networking capabilities of the DCM.
Networking
Once set up, a DCM can provide a full range of services to your local network or the wider Internet:
-
An SSH server allows you to connect to its console from anywhere (firewalls permitting) and issue commands.
-
A secure Web server allows you to configure the DCM and attached digitisers or digital instruments.
-
A Scream! server can provide GCF data to any clients on your network running Scream!. If required, these clients can record the data onto your computer’s local hard disk in a number of formats.
-
The DCM supports AutoDRM and CD1.1; the related Authentication Module (AM) additionally supports strong cryptography for generating authenticated data at source.
Flash storage
All DCMs are supplied with two regions of Flash memory. One part holds the operating system and includes user space for your own programs and data; the second contains a buffer of all data received by the DCM. A DCM without an internal hard disk will normally have several Gb of internal Flash memory.
Hard disk storage
A stand-alone DCM is normally supplied with a 40 Gb FireWire/USB hard disk. Data can be written to this disk, or you can flush the contents of the Flash data store manually. The module can be configured either to stop recording if the disk becomes full, or to begin overwriting older data. A 40 Gb disk is capable of storing over 50 days of 3-channel, 100 samples/s data.
To retrieve data stored on a DCM’s hard disk:
-
Physically unplug the disk from the DCM and attach it to a computer using a USB or FireWire cable, where it will appear as an external hard disk. The DCM uses a special FAT32-compatible file system which cannot be corrupted by removing the disk, even if the DCM is writing to it at the time. This method is the simplest, and also has the highest bandwidth.
-
Alternatively, you can list all the files on the disk in the Web page interface, and download each file with a single click.