Debugging serial connections between a 6TD/3ESPCD/CD24 and an EAM-U or EAM
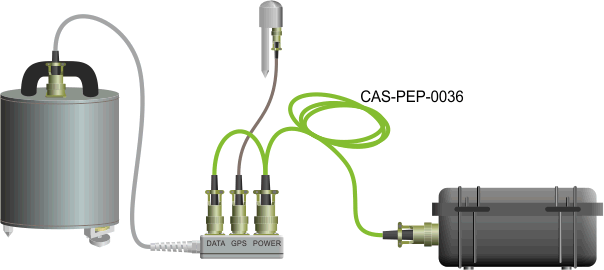
CD24 digitisers and instruments that contain them, such as the 6TD and some ESPCDs, can be connected serially to an EAM using an adaptor cable, part number CAS-PEP-0036. This is a 'Y' cable, allowing power and data to be routed to the break-out box via separate connectors.
This page describes how to debug this connection when no data are received by the EAM-U or EAM.
Equipment required
- Voltage meter or multi-meter
- A short length of 1 mm² solid wire or a paper-clip
Checking the power connection
This part of the procedure traces the power supply from the EAM, through the cable and the break-out box to the instrument.
-
Turn off the power to the EAM. Unplug the 6TD and its cables from the EAM and then, on Port A of the EAM, connect the volt-meter between pins B and A. Apply power to the EAM.
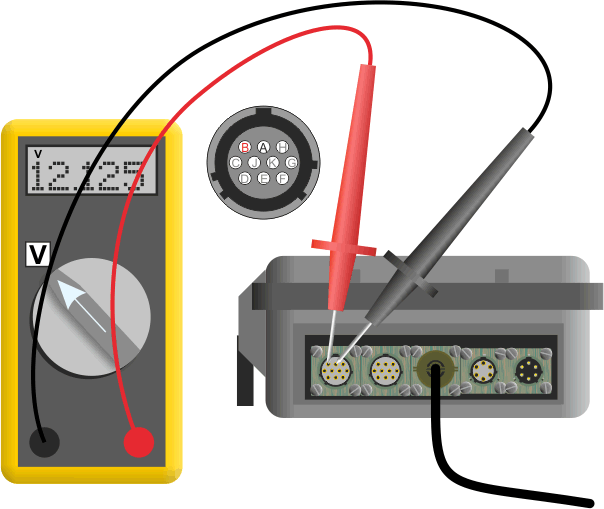
The meter should show the power-supply voltage, with positive on pin B and negative on pin A. If not, there's a fault in the EAM.
The power supply connection to the EAM will not be shown in the following diagrams. -
Turn off the power. Plug the green 'Y' cable into Port A of the EAM and connect the volt-meter between pins B and A of the 10-way free plug. Apply power to the EAM.
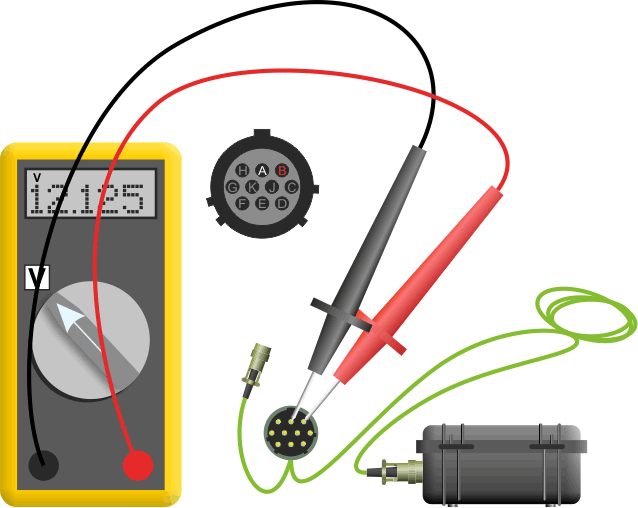
The meter should show the power-supply voltage, with positive on pin B and negative on pin A. If not, there's a fault in the green cable.
-
Turn off the power. Plug the 10-way free plug of the green cable into the CD24 break-out box and connect the volt-meter between pins A and B of the 19-way free socket. Apply power to the EAM.
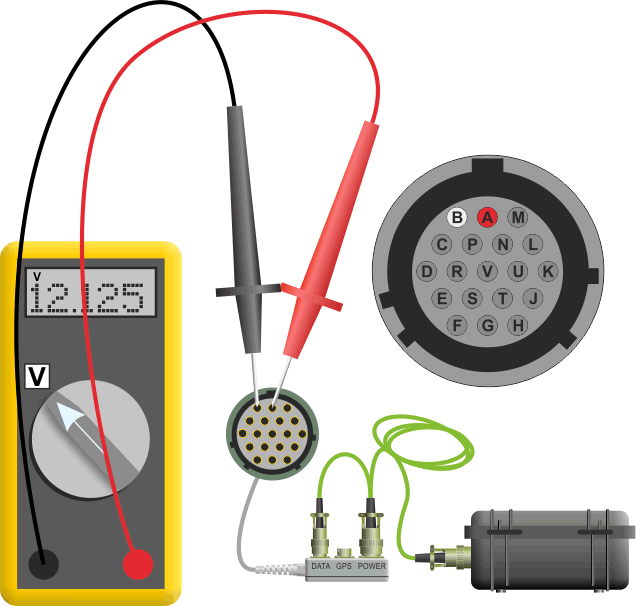
The meter should show the power-supply voltage, with positive on pin A and negative on pin B. If not, there's a fault in the break-out box.
Positive is on pin A in this test, unlike the previous two tests, where it was on pin B.
Checking the data connection
This part of the procedure checks the data path between the EAM and the instrument by inserting a loop-back link at various points along the path and checking that data transmitted are looped back to the EAM and received correctly.
-
Unplug the 6TD and its cables from the EAM and then insert the paper-clip or link wire into the Port A socket so that it connects together pins J and K - the centre two pins of the connector.
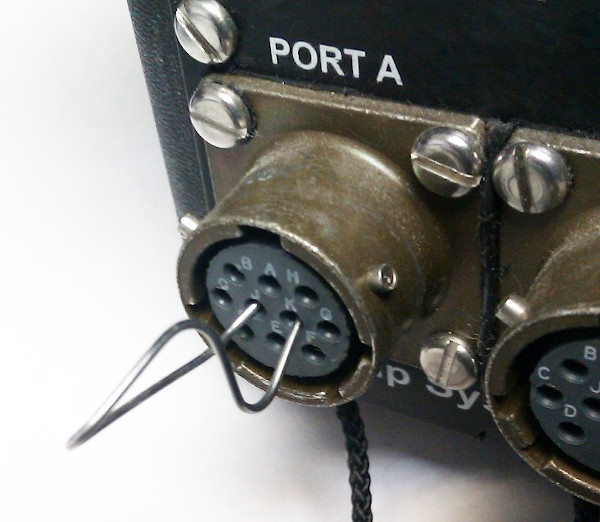
Connect to the command-line of the EAM and run the commands
svc PortA stop minicom PortATry typing characters into the minicom window. If you cannot see the characters that you type being echoed back to you, there's a fault in the EAM. If you see incorrect characters echoed when you type letters or numbers, there is a fault in the EAM.
✔✘ -
Leaving minicom running, remove the link wire and plug the green 'Y' cable into Port A of the EAM. Connect the link wire between pins A and B of the six-way free socket on the green cable.
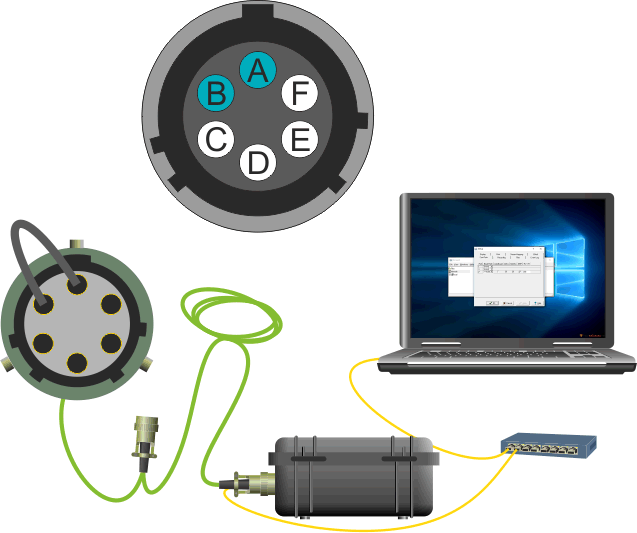
Try typing characters into the minicom window. If you cannot see the characters that you type being echoed back to you, there's a fault in the green cable.
-
Leaving minicom running, remove the link and plug the six-way free socket on the green cable into the break-out box. Connect the link between pins C and D of the 19-way free-socket on the green cable
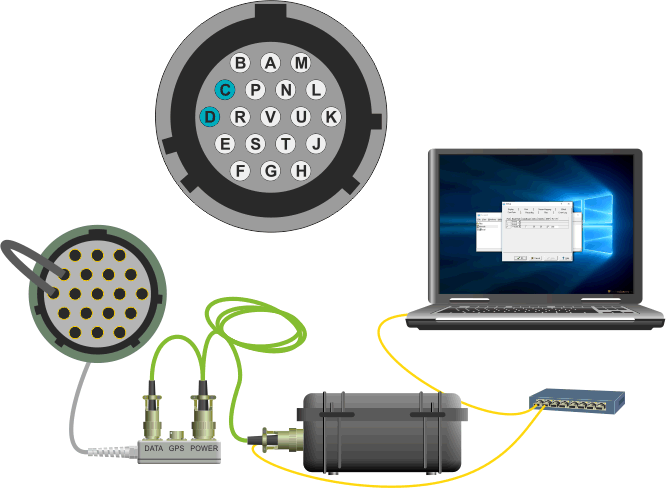
Try typing characters into the minicom window. If you cannot see the characters that you type being echoed back to you, there's a fault in the break-out box.
-
Remove the link and exit minicom by typing Ctrl + A then Q. Run the command
svc PortA startto restart the Port A service on the EAM.
Checking the instrument
The last part of the procedure performs some basic checks on the instrument.
-
Plug everything back together and power-cycle the EAM while listening to the instrument. You should hear a click within a minute or so of powering up. If not, there is a fault in the instrument.
-
Connect to the command-line of the EAM and run the commands
svc PortA stop minicom PortAUnplug the 6TD from the break-out box, wait a few seconds and then plug it back in again. If you see any characters displayed, take a screen-shot and send it to Güralp Support at . If, after a few minutes, nothing at all is displayed, there is a fault in the instrument.
-
Exit minicom by typing Ctrl + A then Q. Run the command
svc PortA startto restart the Port A service on the EAM.
If you've found a fault
If you have discovered a fault in the EAM, the instrument or the cables, please contact for more advice.