The WNRO Firmware Update for the Güralp DM24 Mk3
Some GPS receivers report incorrect dates because of the GPS Week-Number Roll-Over problem (WNRO). This firmware update allows some Güralp DM24 Mk3 digitisers to continue to operate correctly while still using these receivers.
Scope
Not all Güralp digitisers can or need to be updated. Please check the following points carefully
| CD24s | 
|
This upgrade does not apply to CD24 digitisers in any form, including digital instruments with embedded CD24s, such as the 6TD and some 3ESPCDs. There can be no equivalent firmware upgrade for CD24s. CD24 digitisers will only work when connected to WNRO-compliant GPS receivers |
| Minimus Minimus+ Minimus₂ Minimus Lite |


|
This upgrade does not apply to Minimus digitisers in any form, including digital instruments with embedded Minimus units. The GPS/GNSS receivers shipped with Minimus and Fortimus systems are already WNRO-compliant. |
| Affinity | This upgrade does not apply to Affinity digitisers. | |
| DM24wUSB | 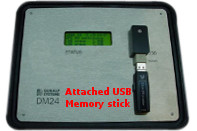
|
This upgrade does not apply to stand-alone,
Peli™-cased DM24 Mk3 digitisers having direct USB support.
These digitisers can be recognised by the presence of a type-A
USB socket under the lid, as shown in the photograph.
If physical access to the digitiser in inconvenient, these systems
can also be recognised by the system program firmware revision which
they are currently running, which will begin V103. To find out what
version of the system program you are currently using, right-click on
the digitiser’s icon
( The version number is given in the Software revision box: 
|
| DM24 Mk3s | 
|
This upgrade only applies to Mk3 DM24 digitisers, including those embedded in digital instruments such as the 3TD and 3TDE, some 3ESPCDs and 3ESPCDEs, 40TDs and 40TDEs; and 5TDs and 5TDEs. If you do not know whether your DM24 digitiser is a Mk2 or Mk3, please see the guide How do I distinguish between Mk2 and Mk3 DM24 digitisers? |
Overview
The digitiser has three firmware components, which can be updated separately: the main system program, the DSP code and the boot loader. The .zip file for this upgrade contains all three of these files. The upgrades must be applied in the following order:
- Boot-loader 3.02
- System code V107b27
- DSP code 1091
If any component is already at the correct version, it need not be upgraded.
-
For units without a programmable (variable) gain amplifier:
ok-1 0 [pwm] ! [pwm] nv! 59920 bias ! bias nv! $06010F dspsync ! dspsync nv! -
For units with a programmable (variable) gain amplifier:
ok-1 0 [pwm] ! [pwm] nv! 50920 bias ! bias nv! $06010F dspsync ! dspsync nv!
Upgrade instructions
There are two ways to upgrade a DM24: automatic and manual. Use the automatic method if you are are upgrading:
- the DM24 digitiser embedded in a *TDE instrument (a 3TDE, a 40TDE or a 5TDE)
- the DM24 digitiser embedded in a DM24S3EAM, a DM24S6EAM, a DAS-S3 or a DAS-S6
- a standalone DM24 which you can connect serially to an EAM
- a DM24 embedded in a *TD instrument which you can connect serially to an EAM
If this is the case, follow the instructions under "Automatic Upgrades", below.
If you do not have access to an EAM and wish to upgrade a stand-alone DM24 or a DM24 embedded in a *TD instrument, please skip to "Upgrading without an EAM".
Automatic Upgrades
If you have an EAM or a system which contains an EAM, the EAM should be used to automate firmware upgrades of attached or integrated digitisers. This is the safest and fastest way to upgrade a DM24.
You should also use this method if you have a DM24SxEAM, a DAS-Sx, a 3TDE, a 40TDE or a 5TDE instrument.
The latest version of Platinum software always includes the latest DM24
firmware so, first, ensure that your EAM's firmware is up-to-date by selecting
from the
menu in the web interface and then clicking the Upgrade button - see
the release notes for Platinum firmware for more
details. Connect your DM24 to the EAM if necessary and, from the web
interface, visit the configuration page for the digitiser at
.
Select the required DM24 - usually Port A - and click
![]() .
It will take a few seconds for the page to load. If an upgrade is available,
this page will notify you and a check-box near the bottom will allow you to
upgrade the firmware on the DM24 when the page is submitted.
.
It will take a few seconds for the page to load. If an upgrade is available,
this page will notify you and a check-box near the bottom will allow you to
upgrade the firmware on the DM24 when the page is submitted.
If you prefer to use the EAM's command line, the necessary commands can be as simple as
The first command upgrades Platinum from the Internet and the second upgrades the attached digitiser firmware using the image embedded within Platinum. Please see section 8.2.3 of the Platinum manual for details of the dm24-upgrade command-line tool.
Upgrading without an EAM
You can update the digitiser firmware using any terminal program which supports the X-modem protocol, such as minicom (for Linux users), ExtraPuTTYExtraPuTTY is an extension to Simon Tatham's free (both as in “free speech” and also as in “free beer”) and highly-recommended PuTTY software, an SSH client, telnet client and serial terminal emulator that runs under Windows and Linux. In addition to all the features of PuTTY, ExtraPuTTY provides x-modem, y-modem and z-modem file transfers over serial links. ExtraPuTTY can be downloaded from SourceForge's ExtraPuTTY page. or Scream!. Use of Scream! is recommended. If you wish to proceed with an alternative emulator, you will need to adapt the instructions below accordingly.
To install this firmware using Scream!:
-
Download
the latest v.107 DM24 Mk3 firmware
a 275 K .zip file containing:
- system program v.107 build 27
- boot loader v.30 build 02
- DSP code v.10 build 91
-
Unzip the downloaded file into a folder on your PC. We recommended that you make a new folder for this purpose so that the required files can be found easily when required, later in this procedure.
-
Right-click on the digitiser’s icon (
 - not the Local or the
Comxx icons) in the
main window and select from the
pop-up menu:
- not the Local or the
Comxx icons) in the
main window and select from the
pop-up menu:
A terminal window should open. Check that there is two-way communication with the digitiser by pressing enter. The digitiser should reply with ok on a new line.

-
Right-click in the Terminal window and select from the context menu:

Select a suitable location and file-name for the session log from the resulting dialogue.
-
Type re-boot to reinitialise the digitiser,

and confirm with y. As it is restarting, the digitiser will report its status over the terminal connection, followed by a maintenance menu. (The first few lines will scroll off the top of the screen so the output is presented here in text form.)
I/OPort =$42 : RTModule no I2C ACK @ $78 MPE ARM ANS ROM PowerForth v6.30 ARM Serial BootStrap v1.100, 11 August 2003 Copyright (c) 2002-3 GSL, EDSL & MicroProcessor Engineering Ltd. Port 0 38400 baud Port 1 4800 baud Port 2 38400 baud Guralp Systems Ltd - ARM-BOOT v3.0 mgs 13/12/12 (Build _02) System Code versions loaded :- Current 0105:0000 Guralp Systems Ltd - DM+FW v.107 mgs 13/09/16 (Build _26) Backup 010E:0000 Guralp Systems Ltd - DM+FW v.107 mgs 13/09/16 (Build _26) Previous 0117:0000 Guralp Systems Ltd - DM+FW v.106 mgs 11/11/14 (Build 57w) DSP Code : 0103:0000 dsp1091.bin loaded 2016-09-29 Default 0104:0000 dsp1091.bin loaded 2016-09-29 Command keys: C - set real time Clock (2016 9 29 14:37:06 ) I - view/upload InfoBlock F - run the Forth monitor S - update System program O - select Other system program B - update Boot program D - update DSP code T - Toggle default DSP code Q - Quit maintenance system 5 seconds to auto-startIf you do not press a key in the next five seconds, the digitiser will start up normally. If you want a little more time to read the menu, press spacebar and the time-out will be increased to thirty seconds.
-
Look in the boot-up messages to find the version of the boot loader you are currently using. It will be reported in a line like this:
Guralp Systems Ltd - ARM-BOOT v3.0 mgs 13/12/12 (Build _02)In this example, the current boot loader is version 3.0, build 2.
If your current boot loader is version 1.0 or 2.0 (any build), stop now and follow these instructions before returning here.If the boot loader you currently have installed is not version 3.0, build 2, you will need to update the bootloader first. Press b at the maintenance menu to do this.

You will be asked for confirmation: press y to proceed. You will then be asked to select a file transfer protocol. Press X to specify the X-modem protocol.
The digitiser will then request an X-modem file transfer.
- If you are using Scream!, a file browser window will appear automatically:

Navigate through the directories on your computer and select dm24mk3-boot3002.img, or simply type in the full path and file name. Click
 to proceed.
 - If you are using a different terminal emulator, you may need to manually initiate an X-modem upload at this point.
Whilst the file is loading, a progress window will be displayed. Depending on the speed of the link, it may take several minutes to transfer the bootloader.
- If you are using Scream!, a file browser window will appear automatically:
-
The next step is to update the system program.
It is essential to ensure that the boot loader is up to date before proceeding with upgrading the system program. If in any doubt, please contact for advice before continuing.To update the system program, press s at the maintenance menu. The digitiser will display the message Updating Application and then prompt you for your choice of file transfer protocol. Press x to specify the X-modem protocol.

The digitiser will then request an X-modem file transfer.
- If you are using Scream!, a file browser window will appear automatically:

Navigate through the directories on your computer and select dm24mk3-107b27.img, or simply type in the full path and file name. Click
to proceed. - If you are using a different terminal emulator, you may need to manually initiate an X-modem upload at this point.
Whilst the file is loading, a progress window will be displayed. Depending on the speed of the link, it may take up to twenty minutes to transfer the system code. Once the file is fully transferred, the digitiser will return to the maintenance menu.
- If you are using Scream!, a file browser window will appear automatically:
-
The next step is to update the DSP code.
It is essential to ensure that the boot loader and system program are both up to date before proceeding with upgrading the DSP code. If in any doubt, please contact for advice before continuing.Look in the boot-up messages to find the version of the DSP code you are currently using.
DSP Code : 0103:0000 dsp1091.bin loaded 2016-09-29 Default 0104:0000 dsp1081.bin loaded 2016-03-16There are two slots available for DSP code. In this example, the version in use is dsp1091.bin, i.e. version 1.091.
If the DSP code in the firmware package is newer than the version you currently have installed, you will need to update it. Press D at the maintenance menu to do this. The digitiser will reply with
Enter 0/1 to select DSP code to updatePress 0 or 1 to specify which of the two DSP code slots you want to overwrite, and then press ENTER. The default is slot 0. This is the recommended slot to use unless you are performing diagnostic comparisons. The digitiser will then prompt:
Enter Filename/date – upto 31 charactersYou can enter a descriptive string for the particular DSP code here. The digitiser will print this string at every boot-up, to remind you which version of the DSP code you are using. It is advisable to include the version number and the upload date. If you leave this blank, the original file-name will be used.
We have had some reports of text entered here not being echoed. This is not a problem: simply proceed as if your typing has been accepted.You will then be asked for your choice of file transfer protocol. Press x to specify the X-modem protocol.
-
The digitiser will then request an X-modem file transfer.
- If you are using Scream!, a file browser window will appear automatically:

Navigate through the directories on your computer and select dm24mk3-dsp-1091.bin, or simply type in the full path and file name. Click
to proceed. - If you are using a different terminal emulator, you may need to manually initiate an X-modem upload at this point.
Whilst the file is loading, a progress window will be displayed. Depending on the speed of the link, it may take up to three minutes to transfer the DSP code.
- If you are using Scream!, a file browser window will appear automatically:
-
When the upload is complete, the digitiser will reprint the maintenance menu. Press enter (without selecting a menu option) and the digitiser will respond with
Invalid command - Starting Systemand then proceed to boot up using the updated firmware. Exit your terminal emulator in the normal way; In Scream!, you only need to close the emulator window.
This completes the upgrade procedure.
For more information, first contact your local distributor or email .