Contents
Affinity Firmware Recovery
To obtain a configuration save-file from the command line, log in and enter the command
config-backup --backup file-nameThis will create a file file-name which you can then download.
If neither of these methods work (perhaps because a file-system has been remounted read-only), try using scp -p to copy all files from /var/lib/config-backup.auto/ and then keep the most recent. before proceeding.
Affinity Firmware Recovery
This procedure re-formats the file-systems and reloads the operating system. The system serial number and calibration values for the internal ADCs are retained but all other configuration is lost. This procedure should only be used when other recovery avenues have been exhausted. In case of any doubt, please stop and contact for advice.
Preparation
Equipment required:
- A laptop or PC with either a free 9-pin serial port or a free USB socket.
- A terminal emulator:
- under Windows: a copy of our free Scream! software
- under Linux: a copy of minicom (included in most Linux distributions).
- A network with access to the public Internet.
- A network cable for the Affinity, part number CAS-AFF-0004. (Part number CAS-DCM-0002 can also be used for this purpose.)
- GPIO/Console cable. Either:
- Part number CAS-AFF-0005: A 12-way military-specification bayonet to USB Type A plug with built in RS232↔USB adapter; or
- Part number CAS-DCM-0036, a 12-way military-specification bayonet to DE9f. (This can be used in conjunction with an external RS232↔USB adapter if the laptop or PC does not have a 9-pin serial port.)
-
Note that the GPIO/USB cable part number CAS-DCM-0044 cannot be used for this purpose.
Physical access to the Affinity will be required.
Your choice of Terminal Emulator
Preparing the user-programmable function keys
The procedure requires some text to be entered very quickly. The simplest way to achieve this is to configure the user-programmable function keys in the terminal emulator to generate the required strings. To do this:
Open minicom and key Ctrl + A then Z O to open the configuration dialogue:
Welcome to minicom 2.7.1 OPTIONS: I18n Compiled on Dec 23 2019, 02:06:26. Port /dev/ttyUSB0, 12:06:31 Press CTRL-A Z for help on special keys +-----[configuration]------+ | Filenames and paths | | File transfer protocols | | Serial port setup | | Modem and dialing | | Screen and keyboard | | Save setup as dfl | | Save setup as.. | | Exit | +--------------------------+Use the down key to move the cursor to and then key Enter. The following screen is displayed:
Welcome to min+-----------------[Screen and keyboard]-----------------+ | A - Command key is : ^A | OPTIONS: I18n | B - Backspace key sends : BS | Compiled on De| C - Status line is : enabled | Port /dev/ttyU| D - Alarm sound : Yes | | E - Foreground Color (menu): WHITE | Press CTRL-A Z| F - Background Color (menu): BLACK | | G - Foreground Color (term): WHITE | +-| H - Background Color (term): BLACK | | | I - Foreground Color (stat): WHITE | | | J - Background Color (stat): BLACK | | | K - History Buffer Size : 2000 | | | L - Macros file : .macros | | | M - Edit Macros | | | N - Macros enabled : Yes | | | O - Character conversion : | | | P - Add linefeed : No | +-| Q - Local echo : No | | R - Line Wrap : No | | S - Hex Display : No | | T - Add carriage return : No | | Change which setting? (Esc to exit) | +-------------------------------------------------------+|Key M to open the page:
Welcome to min+-----------------[Screen and keyboard]-----------------+ | A - Command key is : ^A | OPTIONS: I18n | B - Backspace key sends : BS | Compiled on De| C - Status line is : enabled | Po+---------------------------[F1 to F10 Macros]----------------------------+ | | Pr| 1 : | | 2 : | | 3 : | | 4 : | | 5 : | | 6 : | | 7 : | | 8 : | | 9 : | | A : | | | | Change which setting? (Esc to exit) | | | | (LEGEND: ^M = C-M, ^L = C-L, ^G = C-G, ^R = C-R, ^~ = pause 1 second, | | \u = username, \p = password, \\ = \, \e = toggle echo, | | \l = toggle LF, \bX1..Xn= change baud rate. Example: "\beq " | | = 115200 8N1. (See the "Comm Parameters" menu for valid values of X.))| Program three function keys:
Program the F2 key by keying 2 followed by fishsoupEnter
Program the F3 key by keying 3 followed by setenv bootargs "quiet service"^MEnter
Program the F4 key by keying 4 followed by run nor_boot^MEnter
The characters ^M in the entries above should be entered literally using the shift + 6 and M keys.The result should look like this:
Welcome to min+-----------------[Screen and keyboard]-----------------+ | A - Command key is : ^A | OPTIONS: I18n | B - Backspace key sends : BS | Compiled on De| C - Status line is : enabled | Po+---------------------------[F1 to F10 Macros]----------------------------+ | | Pr| 1 : | | 2 : fishsoup | | 3 : setenv bootargs "quiet service"^M | | 4 : run nor_boot^M | | 5 : | | 6 : | | 7 : | | 8 : | | 9 : | | A : | | | | Change which setting? (Esc to exit) | | | | (LEGEND: ^M = C-M, ^L = C-L, ^G = C-G, ^R = C-R, ^~ = pause 1 second, | | \u = username, \p = password, \\ = \, \e = toggle echo, | | \l = toggle LF, \bX1..Xn= change baud rate. Example: "\beq " | | = 115200 8N1. (See the "Comm Parameters" menu for valid values of X.))| Key Esc Esc Esc to return the emulator's main screen.
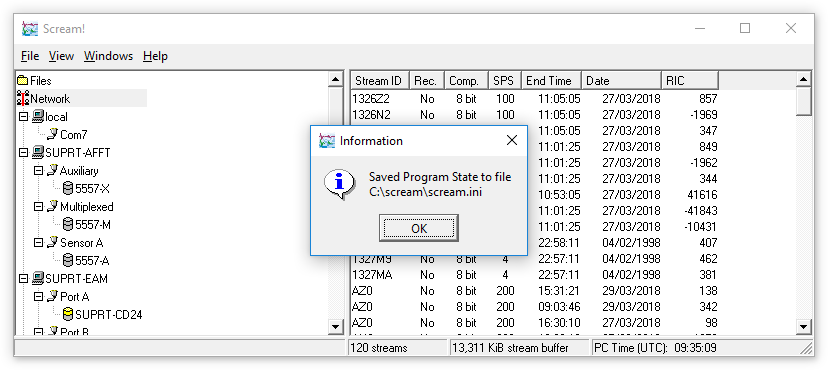
Open Scream and select . Note the location of the scream.ini file, as shown in the resulting dialogue box:
Close Scream and then open scream.ini in your favourite text editor. (Güralp recommend Notepad++Notepad++ is a free (both as in “free speech” and also as in “free beer”) and highly-recommended text-editor, source-code editor and Notepad replacement that supports several languages. It can be downloaded from The Notepad++ web site. under Windows or geditgedit is the GNU text editor. It is provided as standard in many Linux distributions. See The Gedit page on the Gnome wiki for more information. if running under Linux.)
Locate the section marked [SoftKeys]. If you have never used Scream's programmable function keys, the entries in this section will all have null right-hand sides (after the '=' signs). If this is not the case, make a note of the current values before proceeding.
Change the first three key entries to read:
[SoftKeys] F2=fishsoup F3=setenv bootargs "quiet service" F4=run nor_boot ⋮Save the file.
Identifying the COM port
If your PC/laptop has a serial port, it should be labelled as COM1 or COM2. If you are using a USB-to-serial adaptor, you need to identify which COM port is allocated to it. To to this:
-
Open Windows Device Manager, scroll down to the "Ports (COM and LPT)" sub-tree and click the right-arrow next to it (
 )
to open and expand the sub-tree. Plug in the USB-to-serial adaptor: within a
second or so, you should see an extra item appear. Note the COM port number
allocated to this new entry. In the example below, it is
COM7, labelled "USB Serial Port (COM7)".
)
to open and expand the sub-tree. Plug in the USB-to-serial adaptor: within a
second or so, you should see an extra item appear. Note the COM port number
allocated to this new entry. In the example below, it is
COM7, labelled "USB Serial Port (COM7)".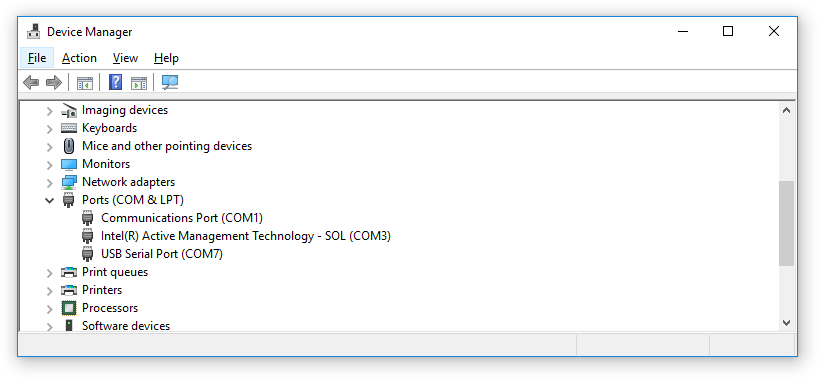
-
Plug in the USB-to-serial adaptor, wait a second and then run the command dmesg. Near the end of the output, you should see lines like
[7763072.980999] usb 1-10.1: new full-speed USB device number 105 using xhci_hcd [7763073.099117] usb 1-10.1: New USB device found, idVendor=0403, idProduct=6001, bcdDevice= 6.00 [7763073.099121] usb 1-10.1: New USB device strings: Mfr=1, Product=2, SerialNumber=3 [7763073.099122] usb 1-10.1: Product: USB-RS232 Cable [7763073.099123] usb 1-10.1: Manufacturer: FTDI [7763073.099124] usb 1-10.1: SerialNumber: FT1JN6FL [7763073.106809] ftdi_sio 1-10.1:1.0: FTDI USB Serial Device converter detected [7763073.106824] usb 1-10.1: Detected FT232RL [7763073.107206] usb 1-10.1: FTDI USB Serial Device converter now attached to ttyUSB1Note the device-name - ttyUSB1 in the example above - and add 64 to the number seen. The result is the port number as displayed in Scream.
You may have to add the user running this procedure to the dialout group before you can access a USB serial port on some Linux distributions.
Configuring the emulator
If you are using a USB-to-serial adaptor, ensure that it is plugged in.
-
Open minicom and key Ctrl + A then Z O to open the configuration menu:
Welcome to minicom 2.7.1 OPTIONS: I18n Compiled on Dec 23 2019, 02:06:26. Port /dev/ttyUSB0, 12:06:31 Press CTRL-A Z for help on special keys +-----[configuration]------+ | Filenames and paths | | File transfer protocols | | Serial port setup | | Modem and dialing | | Screen and keyboard | | Save setup as dfl | | Save setup as.. | | Exit | +--------------------------+Use the down key to move the cursor to and then key Enter. The following screen is displayed:
Welcome to minicom 2.7.1 OPTI+-----------------------------------------------------------------------+ Comp| A - Serial Device : /dev/ttyUSB0 | Port| B - Lockfile Location : /var/lock | | C - Callin Program : | Pres| D - Callout Program : | | E - Bps/Par/Bits : 115200 8N1 | | F - Hardware Flow Control : No | | G - Software Flow Control : No | | | | Change which setting? | +-----------------------------------------------------------------------+ | Screen and keyboard | | Save setup as dfl | | Save setup as.. | | Exit | +--------------------------+Use the keys A, E, F and G to select the correct serial port, as determined above, and to configure it for operation at 115200 Baud, with eight data bits, no parity bit and one stop bit. All flow control should be disabled, as shown in the screenshot above.
Key Esc Esc to return the emulator's main screen.
-
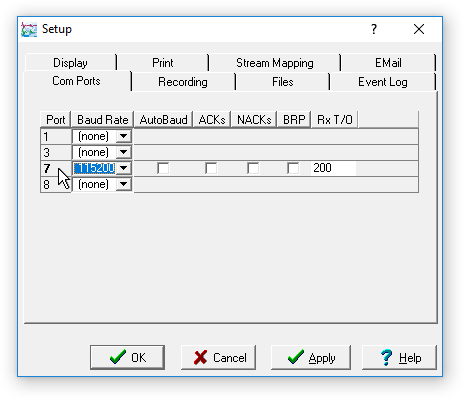
Open Scream and select from the main menu. Select the "Com Ports" tab of the dialogue. Locate the entry corresponding to the connection to your Affinity, set the Baud rate to 115,200 and clear all the check-boxes, as shown:
Now double-click the number at the left-hand end of the relevant row. Scream's Terminal Emulator window will open.
Booting into the service environment
Apply power to the Affinity. Around 15 lines of output will appear almost immediately, as shown below, ending with the line Enter enable string to access bootloader:
As soon as you see this, key f2. This will automatically type the correct "enable string", although it will not be echoed to the screen.
Wait half a second and then key f3. Wait another half second and then key f4. These two keystrokes send commands which configure the boot-loader and then instruct the Affinity to boot in service mode.
The Affinity will generate some output as it boots, ending with:
Immediately key enter and the system will print the service prompt:
Set up networking
The procedure requires access to the public Internet, so we need first to enable networking in the service environment. It is necessary to configure both the software loop-back adaptor, lo, and the physical adaptor, eth0.
To configure the loop-back adaptor, enter the following commands:
The required configuration for eth0 depends on whether you use DHCP on your local network or not.
-
If you use DHCP to configure your network, run:
ip link set eth0 up udhcpc -s /sbin/udhcpc-script -n -i eth0 -
If you are not using DHCP and need to assign your networking parameters statically, find the correct values and then run:
ip link set eth0 up ip address add dev eth0 192.0.2.2/24 ip route add default via 192.0.2.1 echo "nameserver 1.1.1.1" > /etc/resolv.confreplacing…
- 192.0.2.2/24 with the desired IP address in CIDRCIDR stands for Classless Inter- Domain Routing, notation, which has replaced the old classful-address+netmask notation since 1993. In CIDR notation, the I.P. address is followed by a solidus ('/') and one or two decimal digits. These digits specify how many bits of the I.P. address are used to determine the network address, with the remaining bits being used to determine the host address on the given network. For example, an old-style Class C address, which would have had a netmask of 255.255.255.0, is now referred to as a /24 (pronounced "slash twenty-four") address. For more information, please see Wikipedia's CIDR page. notation;
- 192.0.2.1 with the IP address of your default router; and
- 1.1.1.1 with the IP address of a suitable DNS server. Most people can use 1.1.1.1 (operated by Cloudflare) for this purpose but, if it is blocked in your jurisdiction, search the Internet for free public DNS servers for a list of other suitable addresses.
Set system date
The date must be set to something sensible because, otherwise, files will have incorrect modification times and this will cause various malfunctions. Enter the command date to check the system's idea of the current date. If the date shown as output is not correct, enter the command
replacing…
- mm with the Month (01 to 12);
- dd with the Day (01 to 31);
- HH with the Hour (00 to 23);
- MM with the Minute (00 to 59); and
- YYYY with the Year (2011 upwards)
i.e.…
Perform the reformat
Now run the following commands:
This will reformat the root, usr and var partitions and perform a preliminary reload of the Platinum operating system. When the script is complete, it will print the following banner:
Power-cycle the Affinity and allow it to boot. This will take longer than normal and there will be some unusual error messages, which can be ignored. Wait until you see the message System setup complete and then log in using the user-name root and password .
Once logged in, enter the commands
Allow the Affinity to boot again. This will, again, take longer than normal. Wait until you see the message System setup complete and log in again using the same credentials as last time.
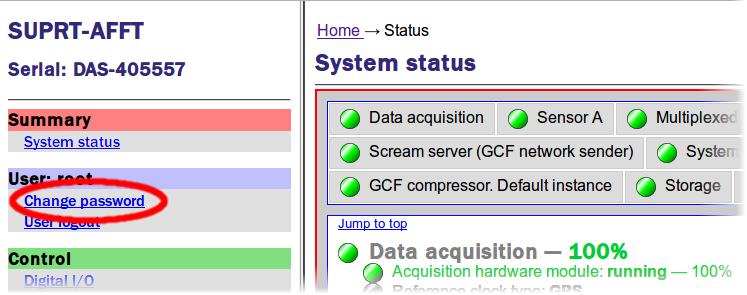
Once logged in, using either the web interface or the command line, change the root password to something secure. From the web interface, visit from the menu.
If you prefer the command line, use the command passwd and follow the prompts.
You can now proceed to load your saved configuration or, if you do not have a saved configuration, reconfigure the Affinity manually as required.
This concludes the procedure.
In case of any problems, please contact .