DIG firmware recovery for Minimus, Fortimus, Radian and Radian-string SIUs
Scope
This document applies to the following systems:
|
Minius digitisers including Radian and Radian-string SIUs. | |
|

|
Minimus+ digitisers run the same firmware as the Minimus. |
|
|
Fortimus digital accelerometers contain an integrated Minimus digitiser. |
|
|
Certimus digital seismometers contain an integrated Minimus digitiser. |
|

|
These digitisers run different firmware and cannot be recovered using the techniques in this document. |
The target system will be referred to as the Minimus throughout this document but the instructions apply equally to any of the above systems.
Introduction
This recovery procedure can be useful if the firmware has become damaged by an interrupted upgrade or an upgrade from v1 to v2 using an incorrect local file. If this procedure is not able to recover your unit, then the unit must be returned to Güralp Systems for repair. If this is the case, please contact for details and to arrange an RMA Return Material Authorisation. An RMA is permission to return goods for any reason. Our Goods-In team may refuse to accept any item received without an RMA number clearly marked on the outer packaging so, please, always ensure that you have an RMA before despatching anything to us. For more details, please see our Warranty and Repairs policy.
The Minimus' NAND flash memory contains two firmware images:
- The Factory firmware image - this is not normally used and is not affected by a normal firmware upgrade; and
- The User firmware image - this is the image used when the system is running normally. The user image is over-written during each standard firmware upgrade.
If the user firmware has become corrupt, the Minimus can be instructed to boot the factory firmware in order to allow it to boot up to the point where fresh user firmware can be installed. This is done by interrupting the U-BootU-Boot is an open-source boot-loader for embedded systems. Although it can be used as both primary and secondary boot-loader, the Minimus family uses it only as a secondary boot-loader, running after our own ROM boot code. For more information, please see Wikipedia's page on Das U-Boot. boot-loader. The latest user firmware can then be installed in the usual way, restoring normal operation. This is the basis of this boot-loader. The latest user firmware can then be installed in the usual way, restoring normal operation. This is the basis of this procedure.
Contents
Preparation
Physical access to the unit will be required.
Equipment required:
- Power supply for Minimus, with an appropriate power cable;
- Minimus Debug cable - a 14-way Lemo connector to a DE9F or USB Type A male;
- Laptop or PC with a 9-pin serial port (or a USB port used with a USB to RS232 adapter);
- Discovery software; and
- Terminal emulation software (e.g.
PuTTYPuTTY is a free (both as in “free speech” and
also as in “free beer”) and highly-recommended SSH client, telnet
client and serial terminal emulator that runs under Windows and Linux.
It should be downloaded from Simon Tatham's web-site.
(Beware of fake alternative download sites.) under Windows or minicom under Linux).
Booting
This section of the procedure powers up the Minimus and interrupts the boot sequence in order to gain access to the U-Boot command line.
-
Connect the Debug cable between the GPS port of the Minimus and the PC, using a USB to RS232 adapter if necessary.
-
Connect the power supply to the Minimus - but do not turn it on yet.
-
Start the terminal emulation software and configure it for:
- The correct COM port to match the connection to the Minimus
- 115,200 Baud operation
- 8 data bits, no parity bits and one stop bit ("8N1")
- No hardware flow control (i.e. no RTS/CTS or DTR/DSR)
- No software flow control (i.e. no XON/XOFF)
-
Turn on the power supply to the Minimus
-
Text will start to appear almost immediately. Keep a close watch for the line
Hit any key to stop autoboot:
as shown:
and immediately (within one second) type esc (or any other key). If you key this in time, you are greeted with the U-Boot command line prompt: =>
 If you miss the => prompt, simply power-cycle the Minimus and try again. It is sometimes useful to anticipate the prompt and type esc slightly early.
Loading the factory firmware
This section of the procedure uses the U-Boot command line to load the stored factory firmware instead of the corrupted system firmware.
-
Enter the command run factory
and key enter
The Minimus will boot using the factory firmware, producing lots of output:
Reloading the user firmware
This section of the procedure uses Discovery software to re-install the latest version of the system firmware.
-
Start Discovery and click

The Minimus should appear in the list of contactable devices.
-
Right-click on the Minimus in Discovery's main window and select from the context menu:

-
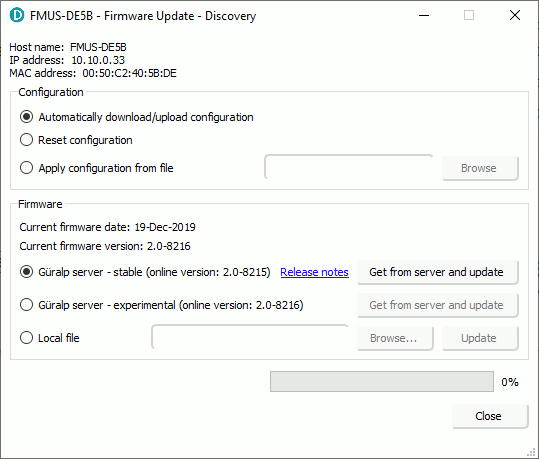
The Firmware Update window opens. You now have two options, depending on the the of problem you are solving.
-
If you are repairing corrupt firmware, select the Güralp server - stable option from the Firmware radio buttons and click
 .
.
-
If you have a corrupt boot-loader after upgrading from a v.1 build to a v.2 build using the option, you will need to obtain a special firmware image, known as a super-binary from Güralp Support - contact for details.
In this case, select the Local file option from the Firmware radio buttons and click
 to locate the super-binary in your computer's file-system.
Double-click it and then click
to locate the super-binary in your computer's file-system.
Double-click it and then click
 to send the file to the Minimus and begin the upgrade.
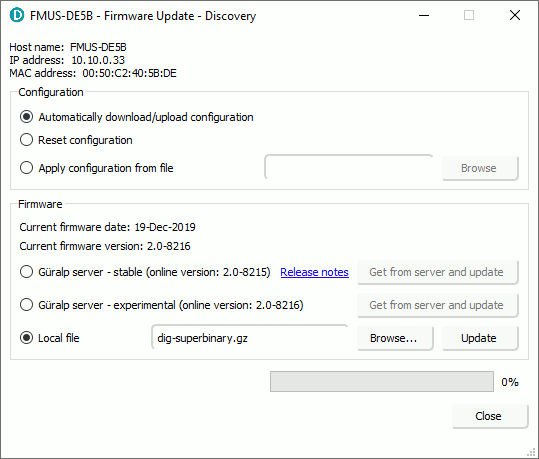
-
-
The Minimus will reboot after the upgrade has completed. Follow the prompts on screen to confirm as appropriate.
If the unit does not reboot correctly, the factory firmware is corrupt. Contact for assistance. -
Super-binaries do not always contain the very latest firmware image so, if you have used a super-binary to recover the Minimus, run a normal upgrade afterwards to load the latest firmware revision.