Chapter 3. External relay support
Additional software, available on request from support@guralp.com, can be loaded onto Platinum systems to allow the operation of remote relays. This is typically invoked by trigger action scripts. Two interfaces are available: xmlrelay, a low-level interface which allows individual relays to be turned on or off, and set_lights, a higher-level interface which controls a traffic-light-type system, keeping track of three alarm states and indicating the highest active state. This interface also allows states to be held active for configurable times after invocation. The set_lights interface uses the xmlrelay interface to interface with the relay hardware.
3.1 Hardware
The xmlrelay interface has been designed to work with a range of Teracom™ and compatible Ethernet-addressable relay units. The text here applies to the TCW181B unit, which offers eight "Form C" (also known as "single-pole, double throw" or "three-terminal Normally-open/Common/Normally-closed") relays in a DIN-rail mounted casing but a number of compatible units with different configurations are available.
The link between the Platinum system and the relay uses XML over HTTP over TCP/IP networking (with full support for routing), so the relay units can be remote from the Platinum system.
3.1.1 Configuration
The relay unit can be configured via its web interface. The easiest way is to connect it directly to a laptop via Ethernet. Its default IP address is 192.168.1.2 so you should configure the IP address of the laptop to, e.g., 192.168.1.1 so that both are on the same logical network.
Using a web browser, open http://192.168.1.2 and log in using the default credentials
Username: admin
Password: admin
The unit presents a tabbed interface and you are initially shown the "Monitoring" tab. This tab allows you to both observe the current status of the relays and also to manipulate them for testing purposes.
To proceed with the configuration, switch to the "network setup" tab.
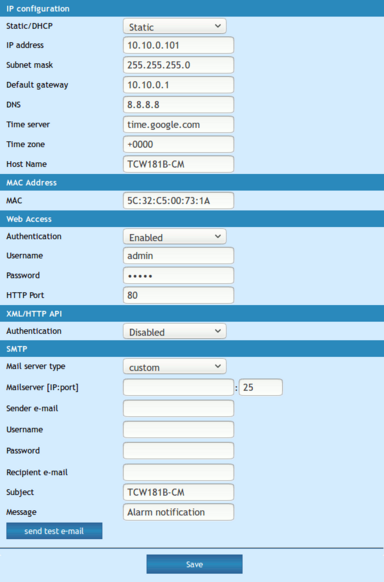
From here, you can set the unit to DHCP mode or enter a static configuration (as shown).
Note: It is strongly recommended that the Web Access Password, in the third section of this screen, is changed to something strong. Güralp recommend the use of www.random.org/passwords/.
Once all desired changes have been made, click  to store your settings. Note that, if you have changed the IP address, you will not be able to access the web interface using the old settings.
3.2 The xmlrelay interface
The xmlrelay interface is a simple, low-level command-line interface to one or more compatible relay boxes. It can be used directly from within Platinum triggering user scripts.
Note: The xmlrelay interface is the underlying interface used by the set_lights interface (see section 3.2.3).
3.2.1 Configuration
The xmlrelay interface is configured by the file, /usr/local/etc/xmlrelay.cf.
This file contains a number of sections, each of which describes a physical relay unit (which usually contains multiple relays). Sections are introduced by a section header in the form
[RelayUnitID]
where RelayUnitID is a word used to identify the relay unit. The IDs must be unique and exactly one must be Default.
Each section contains three configurable items, each in the form
KEY = VALUE
The keys, and their meanings, are given in the following table:
Key | Meaning of Value |
URL | The URL used to communicate with the relay unit, in the form http://IP_address/status.xml?a=user:pass where:
|
MIN_NUM | The number used to address the first relay in the unit. For the TCW181B, this is 1 |
MAX_NUM | The number used to address the last relay in the unit. For the TCW181B, this is 8. |
An example configuration file describing two TCW181B relay units is:
[Default]
URL = http://10.0.0.101/status.xml?a=admin:XmwxQYjX
MIN_NUM = 1
MAX_NUM = 8
[Secondary]
URL = http://10.0.0.102/status.xml?a=admin:aTWpEpwB
MIN_NUM = 1
MAX_NUM = 8
3.2.2 Operation
The xmlrelay command is not in the default search path so it must be executed using its full path, /usr/local/bin/xmlrelay.
To turn relays on, specify the ID of the relay unit, the relay number and the keyword "on". For example, the command
/usr/local/bin/xmlrelay Secondary 3 on
will turn on relay number three on the relay unit identified in the [Secondary] section of the configuration file. If you only have one relay unit, you can omit the ID, so
/usr/local/bin/xmlrelay 2 on
would turn on relay number two of the unit described in the [Default] section.
To turn a relay off, simply replace on with off in the above invocations.
Note: True and 1 are synonymous with on and false and 0 are synonymous with off in this context. Unlike the relay unit IDs, these arguments are case-insensitive.
To query the current state of a relay, use -q as the first argument, so
/usr/local/bin/xmlrelay -q 1
will query the state of the first relay on the default relay unit and
/usr/local/bin/xmlrelay -q Secondary 5
will query the state of the fifth relay on the secondary relay unit.
The result is returned via the exit status of the command, which is convenient for scripts. To make this visible, use syntax like
/usr/local/bin/xmlrelay -q 3 || echo yes
which will print "yes" if relay number 3 is turned on - and nothing otherwise.
3.2.3 The set_lights interface
The set_lights command is not in the default search path so it must be executed using its full path, /usr/local/bin/set_lights.
The set_lights interface models a system with three alert levels: green, yellow and red, where green is the lowest level and is red the highest. Each alert level can be active or inactive. Each level corresponds to a relay but only the relay corresponding to the highest active alert level will be turned on, even if lower levels are active.
When the red relay is turned off, the system checks whether the yellow or green alert level is still active and turns on the appropriate relay if so. When the yellow relay is turned off, the system checks whether the green alert level is still active and turns on the green relay if it is.
To activate an alert state, invoke the command with the name of the state. For example:
/usr/local/bin/set_lights green
To cancel a state immediately, invoke the command with the name of the state followed by the keyword "off". For example
/usr/local/bin/set_lights yellow off
To cancel a state after a delay, invoke the command with the name of the state followed by the keyword "off" and the delay, specified in seconds. For example, to turn off the red state after fifteen seconds, run
/usr/local/bin/set_lights red off 15
Note: the set_lights command returns immediately even if a delayed action is specified.
To cancel all alert levels simultaneously and immediately, run
/usr/local/bin/set_lights off