Trouble-shooting GNSS/GPS problems
Overview
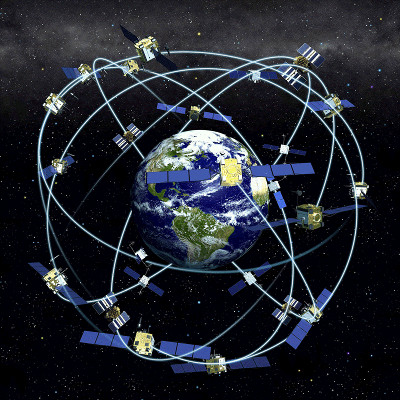
Güralp digitisers use Global Navigation Satellite Systems (GNSS) to synchronise their sample clocks. This is the most accurate time-source available other than atomic clocks which are expensive and impractical in most circumstances. Güralp GNSS receivers are available for use with the US GPS (formerly Navstar) constellation, the Russian GLONASS constellation, the Chinese BeiDou constellation and, when it becomes available in 2020, the European Galileo constellation.
For best results, Güralp GNSS receivers need to have a clear view of the sky, unobstructed by buildings and foliage. Because they are fully exposed to the elements, the receiver and associated cable are, potentially, the most vulnerable part of an installation. Damage due to animals, vandalism and electric storms have all been reported. If you have problems with GNSS synchronisation, this guide is intended to help you trouble-shoot.
The guide has been split into several pages to cover different combinations of equipment. This page covers black receivers with Lemo™ connectors when used with Minimus digitisers and Fortimus digital instruments. Other pages are available for other combinations of equipment, as detailed in the following list:
Terminology
The following terms are used throughout this document:
- SoH - State of Health. This term is used to refer to information about the status of an instrument, such as its mass positions, and information about the status of a digitiser, such as whether its sample clock is locked or not.
- GNSS - Global Navigation Satellite System. This is a generic term for any of a number of systems which use constellations of satellites, each fitted with an extremely accurate atomic clock, to provide signals to earth-based receivers. This allows the receivers to use the signal propogation delays to compute position to an accuracy of a few metres and time to an accuracy of a few microseconds.
- GPS - Global Positioning System. Although this term properly refers only to the US-operatated GNSS (formerly called "NavStar"), it is often used as a synonym for GNSS. Timing systems for Güralp digitisers were initially developed for use only with the GPS system and many of the commands and messages reflect this fact. The connectors are labelled GPS even on equipment which supports multiple GNSS constellations. Within this document, if there is any doubt, the context should make it clear to which system we refer.
- Constellation - This is the formal term for the collection of active satellites that form the space-based sector of a GNSS.
- SV - This is an abbreviation for Space Vehicle, the
formal term for a satellite in a GNSS constellation. Each
satellite in a constellation has a unique identification number,
referred to as its "SV#". These are allocated
in ranges as follows:
1 — 32 Navstar/GPS 65 — 88 GLONASS 89 — 96 GLONASS
(future extensions)301 — 336 Galileo 401 — 437 BeiDou - NMEA - This initialism for the National Marine Electronics Association is used (in this context) as an abbreviation for the NMEA 0183 standard for marine communications. It is the most common standard used for transmitting time, position and other information from GNSS receivers. It consists of a series of formatted text messages called "sentences" which provide operational and status information. The NMEA from a GNSS receiver contains information such as the time, date, location, fix status (see below), number of satellites visible and accuracy of calculations.
- PPS - An abbreviation for one-Pulse-Per-Second, this term describes a pulse train sent by the GNSS receiver to the digitiser. The leading edge of each pulse accurately identifies the start of each second. Subsequent NMEA sentences make explicit the time and date of the second thus indicated.
- FIX - When a GNSS receiver has computed a position, it is described as having obtained a "fix". When satellite visibility is limited, a first approximation can be made by assuming that the receiver is near sea-level (actually: on the surface of the WGS84 reference elipsoid). This is referred to as a two-dimensional or "2D" fix. When signals from a sufficient number of satellites are being received, a full three-dimensional fix, which includes elevation is achieved. This is known as a "3D" fix.
- GNSS power-cycling - This is a Güralp-specific firmware feature intended to reduce power consumption in power-critical applications. The user can specify a time period, n of between one and twenty-four hours. The GNSS receiver is powered up at boot and every n hours thereafter. Each time it is powered up, the system resynchronises, if necessary, and then waits until the offset and drift have fallen to acceptable levels. It then powers the receiver down again before repeating the cycle.
- Status stream - For CD24 and DM24 digitisers, along with all equipment containing them, this is a textual stream which contains state-of-health information about the digitiser, including the GNSS and sample-clock. The term is also used loosely to refer to status information available from the console of the Minimus and Fortis.
Contents
Table
of
Contents
- Overview
- Contents
- Accessing the status stream
- Interpreting the status stream
- Monitoring NMEA contents
- Configuration problems
- Diagnosis by replacement
- Further reading
Accessing the status stream
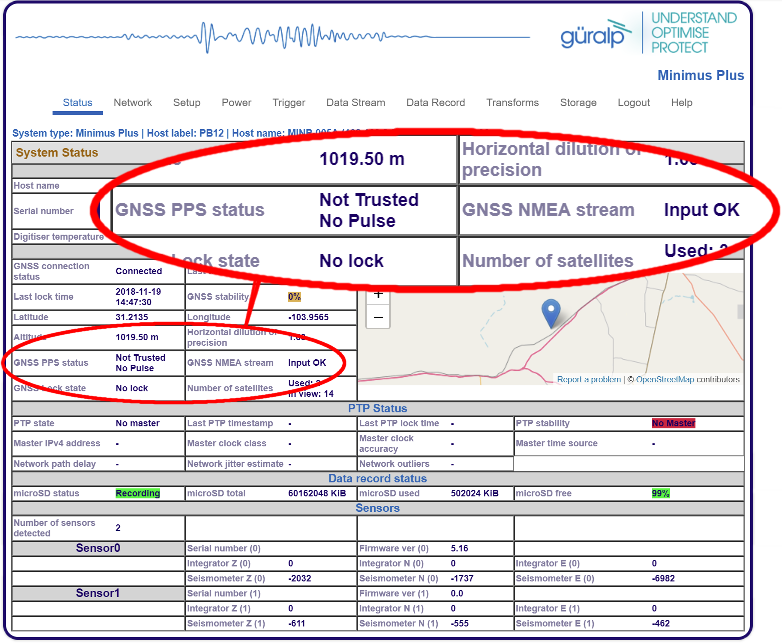
A summary of the status of the signals from the GNSS receiver is shown on the web interface of the Minimus and Fortimus. The web interface shows the PPS status and NMEA status separately:
In addition, this information is also shown on the LCD of the Fortimus, which shows a red warning when the sample clock is not locked:
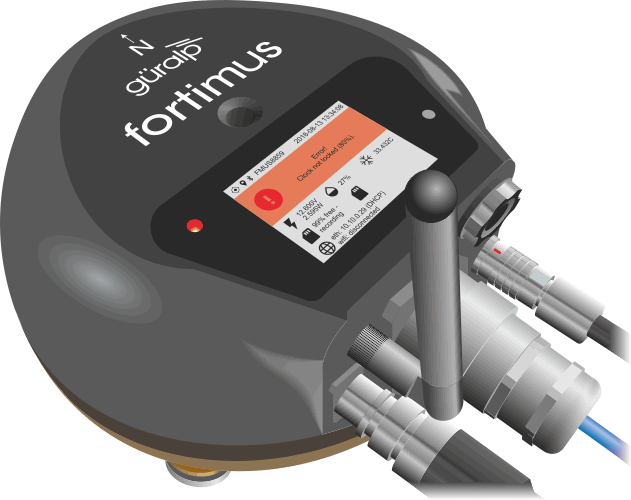
Icons at the top left-hand-side of the display provide indications about the Sample clock synchronisation status and the presence (or otherwise) of NMEA:
- Sample clock synchronisation status:
 indicates that the sample clock has been successfully synchronised. This
confirms that both NMEA and PPS are being received.
indicates that the sample clock has been successfully synchronised. This
confirms that both NMEA and PPS are being received. indicates that the sample clock has not been successfully synchronised but both
NMEA and PPS are being received. This suggests a problem with the location or
orientation of the GNSS receiver but it may also indicate a problem with, for
example, the antenna within the receiver.
indicates that the sample clock has not been successfully synchronised but both
NMEA and PPS are being received. This suggests a problem with the location or
orientation of the GNSS receiver but it may also indicate a problem with, for
example, the antenna within the receiver. indicates that the PPS data are not being received so the sample clock can not
be successfully synchronised. This could be the result of a problem with the
digitiser, the cable or the receiver, so further diagnosis is required.
indicates that the PPS data are not being received so the sample clock can not
be successfully synchronised. This could be the result of a problem with the
digitiser, the cable or the receiver, so further diagnosis is required.
- Location status:
 indicates that NMEA has been received at least once
since the digitiser was rebooted and that the location is not latitude zero
and longitude zero. This means that NMEA has been received successfully at
some point since the last reboot but not necessarily that it is currently
being received. Reboot the digitiser to check the current situation.
indicates that NMEA has been received at least once
since the digitiser was rebooted and that the location is not latitude zero
and longitude zero. This means that NMEA has been received successfully at
some point since the last reboot but not necessarily that it is currently
being received. Reboot the digitiser to check the current situation. indicates that NMEA has not been received since the digitiser was last
rebooted.
indicates that NMEA has not been received since the digitiser was last
rebooted.
For more detailed information, it is necessary to visit the digitiser's console.
To do this, locate the entry for the Minimus or Fortimus in Discovery's main
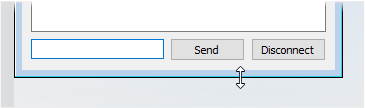
window and double-click it. This opens the Control Centre. Click
 to open the console window:
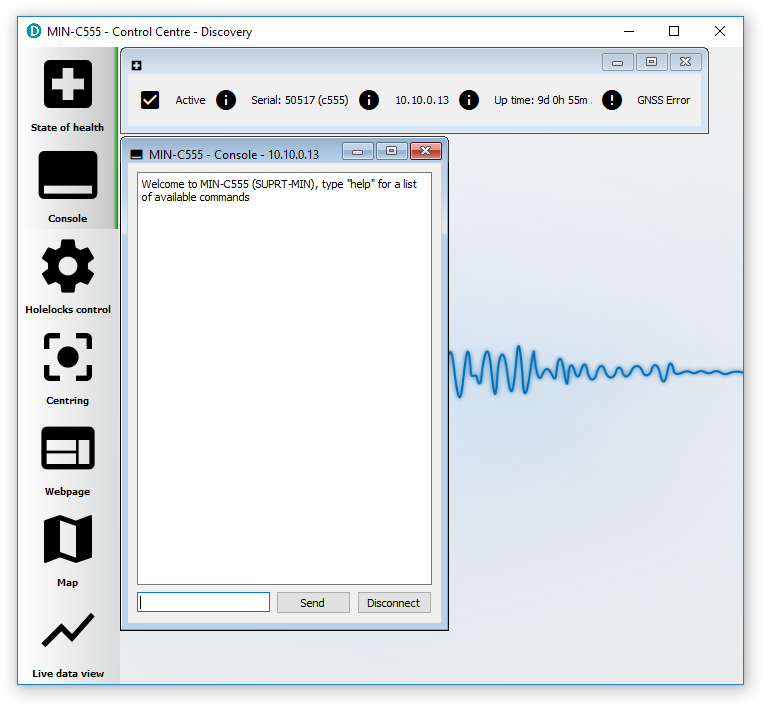
Drag the bottom of the window downwards to increase its height, if necessary:
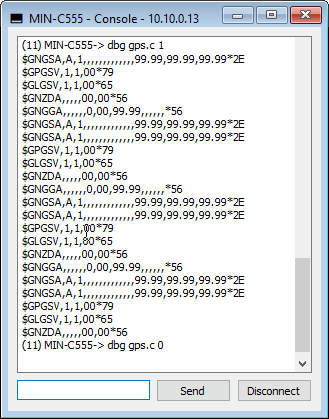
Commands are entered by typing them into the box at the bottom left-hand-side
of the console window and clicking
 . The output is displayed in the window. The
console session will time out and disconnect if left inactive for too long. In
this case, simply click
. The output is displayed in the window. The
console session will time out and disconnect if left inactive for too long. In
this case, simply click
 to restart your session.
There are six levels of debugging information that can be displayed for both NMEA and PPS. These are selected with the integers zero through five where zero means no debugging information and five is maximally verbose. To select the debugging level for NMEA, issue the command
dbg gps.c n
replacing n with the required number. For example,
dbg gps.c 5
produces highly verbose debugging output. A debug level of one dumps raw NMEA sentences to the console, as described later. Entering
dbg gps.c 0
disables the debugging output.
In a similar fashion, the command
dbg gps_pps.c n
sets the debugging level for the PPS signal to n.
The requested debugging information appears in the console window in near real time.
Other GNSS-related commands which can be entered at the console include:
- gps off - switches the GNSS receiver off
- gps on - switches the GNSS receiver on
- gps pos - displays the current GNSS position
- gps status - displays current GNSS status information
- gps leapsec - check the leap second state
Interpreting the status information
TODOMonitoring NMEA contents
If there is doubt about the actual contents of the NMEA data stream, it is possible to inspect the raw NMEA. The live NMEA stream received at a Minimus or Fortimus can be examined by setting the debug level for gps.c to 1, as described earlier:
Configuration problems
It is possible to disable synchronisation by changing configuration settings. If you suspect that this might have happened, please check the following settings:
TODODiagnosis by replacement
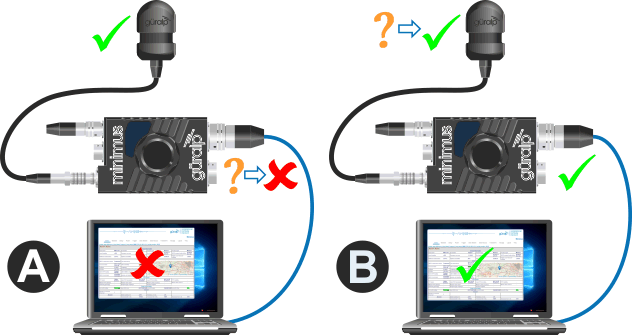
This technique is suitable if you have no test equipment but you do have another installation nearby which is working correctly or equivalent equipment which you know works correctly. In the discussion below, we shall call the installation under test A and the working system B.
Note that, because the problem could be in either the receiver or the digitiser itself, we have to consider the status of both of these components to be unknown, as indicated by the amber question-marks (?) in the diagrams below. The components of the working system, however, are all known to be good, as indicated by the green ticks (✔) in the diagrams.
The status of the complete system (as determined by inspecting the status page of the web interface) is, in each diagram below, indicated by the green tick (✔) or red cross (✘) in the centre of the laptop display.
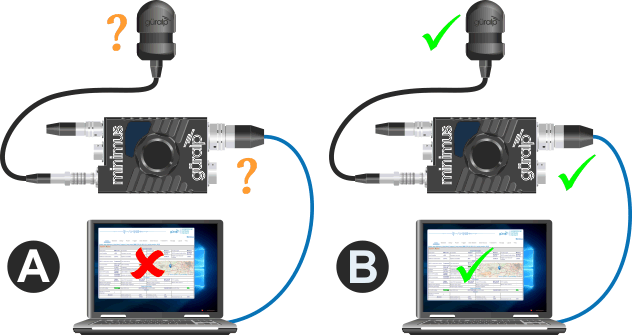
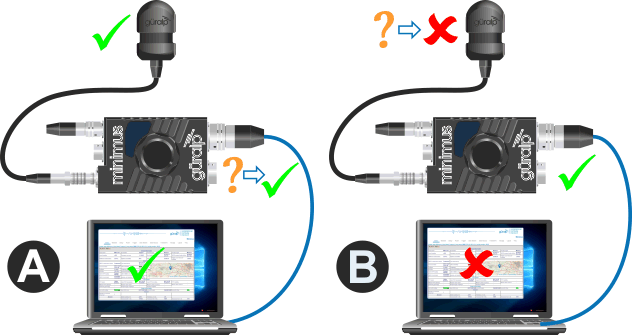
The first step is to interchange the GNSS receivers:

There are two possible outcomes: system A will start working and system B will stop working or there will be no change in symptoms.
If system A starts working
Because the only change we have made to system A is to add the known-good receiver from system B, it is clear that the receiver originally attached to system A must be faulty. We have also verified that system A's digitiser works correctly, so the status of all components is now known:
The faulty GNNS receiver (now attached to system B) should be replaced.
If there is no change
Because system B is still working, we now know that the receiver originally attached to A was not the cause of the problem. We can mark both receivers as good and restrict our investigation to system A's digitiser
The configuration of the digitiser should be checked but, if no misconfigurations are found, the digitiser will probably need returning for repair. Please contact for advice.
Further reading
- Global Navigation Satellite Systems (GNSS) overview
- A simple explanation of how GNSS works
- GPS (formerly Navstar) - the US' GNSS constellation
- The GPS home page
- GLONASS - the Russian GNSS constellation
- - the GLONASS home page (archived)
- BeiDou - the Chinese GNSS constellation
- - the BeiDou home page
- Galileo - the upcoming EU constellation
- - the Galileo home page
- NMEA overview
- A rich description of GNSS-related NMEA sentences
- The GPS week-number roll-over problem and how it affects Güralp products
- The GPS leap-second problem and how it affects Güralp products