Firmware upgrades for DM24s using Platinum - Manual method
This document is under
development. Please report any errors or problems to
.
Overview
This document describes how to upgrade the firmware of a DM24 using a
connected Platinum systemA "platinum system" is any
system running the Platinum operating system. This includes
stand-alone acquisition systems such as EAMs and NAMs, DAS units
such as the Affinity and DM24SxEAM and digital instruments with
built-in acquisition systems such as the 3TDE, 40TDE or
5TDE..
Platinum systems provide the dm24-upgrade command and
this is the recommended way of upgrading connected digitisers. There may be
times, however, when the dm24-upgrade command cannot
be used, such as when a previous firmware upgrade has failed and the DM24 will
not boot beyond the initial boot-loader menu. This procedure can be used in
those cases.
The DM24 firmware is provided as three separate
components: the boot-loader, the system code
and the DSP code. If more than one component is to be
upgraded, it is essential that the upgrades are performed
in the correct order. This document respects that order so please be sure
to follow it sequentially.
Connecting
This procedure is carried out on the command line of the Platinum system.
The command line of the Platinum system is different from
that of the DM24. The prompt should end with a #
symbol. If, instead, the prompt is simply ok, you are
in the wrong command-line environment and you should review the documentation
for your system or seek advice from
.
If it is possible to connect via the network, it is recommended that ssh or
PuTTY be used to log into the Platinum system. If a network connection is not
available, however, a serial link can be used.
If you use a serial link,
you must take care that the escape sequences used by your terminal emulator
do not clash with those used by minicom because we shall use minicom to
perform the upgrade. Minicom's sequences all begin with
ctrl + a.
Please contact
before
proceeding if in any doubt on this matter or you may cause further
corruption of the DM24 firmware.
The rest of this procedure assumes that you are familiar with connecting
and logging in to the command line.
Power-cycling
At various stages in this procedure, you will be asked to power-cycle the
DM24. There are three ways of doing this, depending on your hardware:
If you have a cylindrical system, such as a DM24SxEAM in a metal,
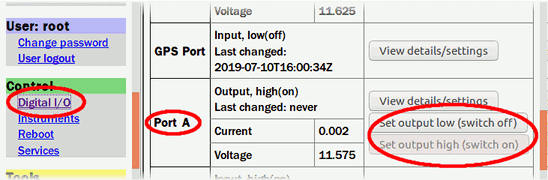
cylindrical case or a *TDE integrated instrument such as a 3TDE, you can
power-cycle the embedded DM24 using the "Digital I/O" page in the web
interface.
Select the appropriate port - normally Port_A - and set the output to
"Low" to power off. Once powered off, click "Return to details" to
proceed. Set the output to "High" to power the DM24 on again and, again,
click "Return to details" afterwards.
If you have a separate DM24 (in a peli-case or a *TD integrated
instrument) with a cable connection to the Platinum system, the simplest
method is to unplug the cable between the two for five seconds and then
plug it back in again.
If neither of these methods is possible (as in the case, for example,
of a DM24SxEAM in a black plastic peli-case) a DC power-supply with an
adjustable output is required. Power the Platinum system and the DM24
from this power supply. Start by setting the output voltage to 12 V DC
and log in to the Platinum system. Type into the console while
gradually reducing the supply voltage until the system stops responding
to your key-strokes. Wait a few seconds and then increase the voltage
by one volt. The Platinum system should boot and allow you to log in
again. Note the voltage of the power supply at this point; we shall
refer to this as the lower voltage. The DM24 requires a higher voltage to
run than does the Platinum system so only the Platinum system should be
running at this point. If you now increase the supply voltage to 12 V, the
DM24 will boot as well. To power cycle the DM24, therefore, you should
first decrease the power supply voltage to the lower voltage (as established
earlier), wait five seconds and then increase the voltage to 12 V again.
Tips
Many parts of this procedure need to be completed within a time-out period
and it can be difficult to read the instructions at the same time while still
reacting quickly enough to the prompts. For this reason, each section begins
with a detailed description of the process, including several screen-shots, so
that you can read and understand fully the process before you start. At the end
of each section, there is a link to a quick summary of the required key-strokes.
We recommend that you read each section thoroughly until you are familiar with
the various screens and prompts that you will encounter. You can then use the
summary page to refresh your memory while actually performing the procedure.
At various stages throughout this procedure, the boot-loader menu will be
displayed and you will be required to make a selection from this menu within
five seconds. If you would like more time, simply key spacebar
to increase the time-out to thirty seconds. You can do this as often as you
wish.
When selecting the directory for the file transfer, you will be required
to type /usr/share/firmware/CMG-DM24-mk3 and, if you
take too long, the system may time-out. This is especially likely if you
make a mistake typing it and need to erase your typing and start again. We
recommend copying the path into your PC's clipboard and familiarising
yourself with the keystroke necessary to paste it into your session:
typically a
middle cmouse
or
right rmouse
mouse-click or a key sequence like
ctrl + shift + v or
shift + insert.
The Procedure
1. Changing the line-speed
Firmware upgrades can fail if the line-speed of the communication link
between the Platinum system and the DM24 is too high. We recommend a
line-speed of 38,400 Baud. If the current line-speed is higher than this, it
should be reduced to avoid this problem. If it is lower than this, it should
be increased to reduce the time taken by the upgrade. The first step of the
procedure, therefore, is to set the line-speed of both the terminal emulator
and the DM24 to 38,400 Baud.
Log in to the Platinum system and run the command minicom PortA
to start the minicom terminal emulator. You should see the following screen:
Welcome to minicom 2.7
OPTIONS:
Compiled on Feb 11 2014, 15:40:29.
Port /dev/ttyS1, 16:49:26
Press CTRL-A Z for help on special keys
CTRL-A Z for help | 115200 8N1 | NOR | Minicom 2.7 | VT102 | Offline | ttyS1
If the DM24 is currently running, you will see a lot of
indecipherable characters appearing. This is normal and can be ignored.
In this example, the current line-speed is 115,200 Baud, as indicated by the
text 115200 in the status line at the bottom of the screen.
If the status line is not displayed, key ctrl + a
to make it visible.
If the current line-speed is 38,400 already, you can skip this step and jump to
Upgrading the boot-loader.
To change the line-speed, leave this screen open and power-cycle the DM24,
as described above. The following menu will be displayed:
I/OPort =$42 : RTModule no I2C ACK @ $78
MPE ARM ANS ROM PowerForth v6.30
ARM Serial BootStrap v1.100, 11 August 2003
Copyright (c) 2002-3 GSL, EDSL & MicroProcessor Engineering Ltd.
Port 0 38400 baud Port 1 4800 baud Port 2 38400 baud
Guralp Systems Ltd - ARM-BOOT v2.0 mgs 13/12/12 (Build _13)
System Code versions loaded :-
Current 0105:0000 Guralp Systems Ltd - DM+FW v.106 mgs 11/11/14 (Build 57w)
Backup 010E:0000 Guralp Systems Ltd - DM+FW v.106 mgs 11/11/14 (Build 57w)
Previous 0117:0000 Guralp Systems Ltd - DM+FW v.106 mgs 11/11/14 (Build 57w)
DSP Code :
0103:0000 dsp1090.bin loaded 2014-09-29 Default
0104:0000 dsp1090.bin loaded 2014-09-29
Command keys:
C - set real time Clock (2016 9 29 14:37:06 )
I - view/upload InfoBlock
F - run the Forth monitor
S - update System program
O - select Other system program
B - update Boot program
D - update DSP code
T - Toggle default DSP code
Q - Quit maintenance system
5 seconds to auto-start
Enter command:
CTRL-A Z for help | 115200 8N1 | NOR | Minicom 2.7 | VT102 | Offline | ttyS1
Immediately key f to select "Run the FORTH
monitor" and then key enter once or twice until
you see the ok prompt.
If you are not fast enough when you key f,
the system will begin to attempt to boot. In this case, simply power-cycle it and
start again.
Type the command 0 38400 BAUD and key
enter. The line-speed of the digitiser changes
immediately so you do not see an ok prompt this time.
You may see a few random, indecipherable characters instead.
The line-speed of the DM24 is now set to 38,400 Baud so we need to change
the line-speed of the minicom terminal emulator to match. To do this, key
ctrl + a and then p to open the "Comm Parameters"
dialogue. Key d and then enter to select 38,400
Baud.
Guralp Systems Ltd - ARM-BOOT v2.0 mgs 13/12/12 (Build _13)
System Code versions loaded :-
Current 0105:0000 Gur+---------[Comm Parameters]----------+1/11/14 (Build 57w)
Previous 010E:0000 Gur| |1/11/14 (Build 57w)
Backup 0117:0000 Gur|
DSP Code : | Speed Parity Data |
0103:0000 dsp1090.bin| A: <next> L: None S: 5 |
0104:0000 dsp1090.bin| B: <prev> M: Even T: 6 |
Command keys: | C: 9600 N: Odd U: 7 |
C - set real time Cloc| D: 38400 O: Mark V: 8 |
I - view/upload InfoBl| E: 115200 P: Space |
F - run the Forth moni| |
S - update System prog| Stopbits |
O - select Other syste| W: 1 Q: 8-N-1 |
B - update Boot progra| X: 2 R: 7-E-1 |
D - update DSP code | |
T - Toggle default DSP| |
Q - Quit maintenance s| Choice, or <Enter> to exit? |
3 seconds to auto-sta+------------------------------------+
Enter command: F
Forth Monitor
MPE ARM ANS ROM PowerForth v6.30
0 38400 BAUD x��
CTRL-A Z for help | 38400 8N1 | NOR | Minicom 2.7 | VT102 | Offline | ttyS1
Key enter
a few times until the ok prompt is displayed again.
Now type the command reboot and key
enter to restart the system.
Leave minicom running and proceed to upgrade the boot-loader.
The boot-loader is the first piece of code to run
when the DM24 first starts. It normally loads the correct system code and DSP
code and then transfers control to the system code. It does, however, control
the updating of all the parts of the firmware using the "boot-loader" menu.
Most of the rest of this procedure will involve using this menu.
The line-speed of the link between the DM24 and the
Platinum system must be no faster than 38400 Baud or you may render the
DM24 unbootable. Please ensure that you have completed the previous
section, 1. Changing the line-speed, before
following the instructions in this section
Power-cycle the DM24, as described above. The following menu will be displayed:
I/OPort =$42 : RTModule no I2C ACK @ $78
MPE ARM ANS ROM PowerForth v6.30
ARM Serial BootStrap v1.100, 11 August 2003
Copyright (c) 2002-3 GSL, EDSL & MicroProcessor Engineering Ltd.
Port 0 38400 baud Port 1 4800 baud Port 2 38400 baud
Guralp Systems Ltd - ARM-BOOT v2.0 mgs 13/12/12 (Build _13)
System Code versions loaded :-
Current 0105:0000 Guralp Systems Ltd - DM+FW v.106 mgs 11/11/14 (Build 57w)
Backup 010E:0000 Guralp Systems Ltd - DM+FW v.106 mgs 11/11/14 (Build 57w)
Previous 0117:0000 Guralp Systems Ltd - DM+FW v.106 mgs 11/11/14 (Build 57w)
DSP Code :
0103:0000 dsp1090.bin loaded 2014-09-29 Default
0104:0000 dsp1090.bin loaded 2014-09-29
Command keys:
C - set real time Clock (2016 9 29 14:37:06 )
I - view/upload InfoBlock
F - run the Forth monitor
S - update System program
O - select Other system program
B - update Boot program
D - update DSP code
T - Toggle default DSP code
Q - Quit maintenance system
5 seconds to auto-start
Enter command:
CTRL-A Z for help | 38400 8N1 | NOR | Minicom 2.7 | VT102 | Offline | ttyS1
Immediately key b.
If you are not fast enough when you key
b, the system will begin to attempt to boot.
In this case, simply power-cycle it and start again.
The following prompt is displayed:
Backup 010E:0000 Guralp Systems Ltd - DM+FW v.106 mgs 11/11/14 (Build 57w)
Previous 0117:0000 Guralp Systems Ltd - DM+FW v.106 mgs 11/11/14 (Build 57w)
DSP Code :
0103:0000 dsp1090.bin loaded 2014-09-29 Default
0104:0000 dsp1090.bin loaded 2014-09-29
Command keys:
C - set real time Clock (2016 9 29 14:37:06 )
I - view/upload InfoBlock
F - run the Forth monitor
S - update System program
O - select Other system program
B - update Boot program
D - update DSP code
T - Toggle default DSP code
Q - Quit maintenance system
5 seconds to auto-start
Enter command: B
Update Boot program:
Are you sure? Y/N:
CTRL-A Z for help | 38400 8N1 | NOR | Minicom 2.7 | VT102 | Offline | ttyS1
Key y to confirm and then x
to select the X-Modem protocol. The following is displayed:
0103:0000 dsp1090.bin loaded 2014-09-29 Default
0104:0000 dsp1090.bin loaded 2014-09-29
Command keys:
C - set real time Clock (2016 9 29 14:37:06 )
I - view/upload InfoBlock
F - run the Forth monitor
S - update System program
O - select Other system program
B - update Boot program
D - update DSP code
T - Toggle default DSP code
Q - Quit maintenance system
5 seconds to auto-start
Enter command: B
Update Boot program:
Are you sure? Y/N: Y
Select 'X' for Xmodem-128 or 'Y' for X/Ymodem-1k X
Start host's Xmodem-128 transmitter
CTRL-A Z for help | 38400 8N1 | NOR | Minicom 2.7 | VT102 | Offline | ttyS1
Key ctrl + a then s to open the "Upload" protocol selection dialogue.
Key down-arrow until xmodem is highlighted:
0103:0000 dsp1090.bin loaded 2014-09-29 Default
0104:0000 dsp1090.bin loaded+-[Upload]--+
Command keys: | zmodem |
C - set real time Clock (1998| ymodem | )
I - view/upload InfoBlock | xmodem |
F - run the Forth monitor | kermit |
S - update System program | ascii |
O - select Other system progr+-----------+
B - update Boot program
D - update DSP code
T - Toggle default DSP code
Q - Quit maintenance system
3 seconds to auto-start
Enter command: B
Update Boot program:
Are you sure? Y/N: Y
Select 'X' for Xmodem-128 or 'Y' for X/Ymodem-1k X
Start host's Xmodem-128 transmitter
CTRL-A Z for help | 38400 8N1 | NOR | Minicom 2.7 | VT102 | Offline | ttyS1
and then key enter. The file selection dialogue is displayed.
Key g to Go to a
directory and paste in (or type, if you are fast and accurate)
/usr/share/firmware/CMG-DM24mk3
0103:0000 dsp1090.bin loaded 2014-09-29 Default
01+------------------------[Select a file for upload]-------------------------+
Co|Directory: /root |
C | [..] |
I | minicom.log |
F | |
S | |
O | +-----------------------------------------+ |
B | |Goto directory: | |
D | |> /usr/share/firmware/CMG-DM24mk3 | |
T | +-----------------------------------------+ |
Q | |
3 | |
En| |
Up| ( Escape to exit, Space to tag ) |
+---------------------------------------------------------------------------+
Select 'X' for Xmodem-128 or 'Y' for X/Ymodem-1k X
St [Goto] [Prev] [Show] [Tag] [Untag] [Okay]
CTRL-A Z for help | 38400 8N1 | NOR | Minicom 2.7 | VT102 | Offline | ttyS1
and then key enter.
Scroll down the resulting list of files to dm24mk3-boot3002.img
and then key spacebar to select it. It should now
be displayed highlighted:
0103:0000 dsp1090.bin loaded 2014-09-29 Default
01+------------------------[Select a file for upload]-------------------------+
Co|Directory: /usr/share/firmware/CMG-DM24mk3 |
C | [..] |
I | dm24mk3-107b27.img |
F | dm24mk3-boot3002.img |
S |dm24mk3-dsp1091.bin |
O | |
B | |
D | |
T | |
Q | |
3 | |
En| |
Up| ( Escape to exit, Space to tag ) |
+---------------------------------------------------------------------------+
Select 'X' for Xmodem-128 or 'Y' for X/Ymodem-1k X
St [Goto] [Prev] [Show] [Tag] [Untag] [Okay]
CTRL-A Z for help | 38400 8N1 | NOR | Minicom 2.7 | VT102 | Offline | ttyS1
Key enter to start the transfer.
The xmodem upload indicator is displayed and, after a few seconds, it will start to
show the progress of the transfer:
0103:0000 dsp1090.bin loaded 2014-09-29 Default
0104:0000+-----------[xmodem upload - Press CTRL-C to quit]------------+
Command k|Sending dm24mk3-boot3002.img, 509 blocks: Give your local XMO|
C - set r|DEM receive command now. |
I - view/|Xmodem sectors/kbytes sent: 28/ 3k |
F - run t| |
S - updat| |
O - selec| |
B - updat| |
D - updat+-------------------------------------------------------------+
T - Toggle default DSP code
Q - Quit maintenance system
3 seconds to auto-start
Enter command: B
Update Boot program:
Are you sure? Y/N: Y
Select 'X' for Xmodem-128 or 'Y' for X/Ymodem-1k X
Start host's Xmodem-128 transmitter
CTRL-A Z for help | 38400 8N1 | NOR | Minicom 2.7 | VT102 | Offline | ttyS1
It takes less than a minute to transfer the boot-loader, after which the following is displayed:
0103:0000 dsp1090.bin loaded 2014-09-29 Default
0104:0000+-----------[xmodem upload - Press CTRL-C to quit]------------+
Command k|Sending dm24mk3-boot3002.img, 509 blocks: Give your local XMO|
C - set r|DEM receive command now. |
I - view/|Bytes Sent: 65152 BPS:2781 |
F - run t| |
S - updat|Transfer complete |
O - selec| |
B - updat| READY: press any key to continue... |
D - updat+-------------------------------------------------------------+
T - Toggle default DSP code
Q - Quit maintenance system
4 seconds to auto-start
Enter command: B
Update Boot program:
Are you sure? Y/N: Y
Select 'X' for Xmodem-128 or 'Y' for X/Ymodem-1k X
Start host's Xmodem-128 transmitter
CTRL-A Z for help | 38400 8N1 | NOR | Minicom 2.7 | VT102 | Offline | ttyS1
Key enter to continue. The new boot-loader
code will be programmed into the FLASH memory and you will then be prompted to
reboot the DM24:
Start host's Xmodem-128 transmitter
Upload successful
65152 Bytes received - Checking file version ...
Guralp Systems Ltd - ARM-BOOT v3.0 mgs 14/09/16 (Build _02)
'160C' Flash chip
Erasing
UnLock/Erase 0100:0000
UnLock/Erase 0100:2000
UnLock/Erase 0100:4000
UnLock/Erase 0100:6000
UnLock/Erase 0100:8000
UnLock/Erase 0100:A000
UnLock/Erase 0100:C000
UnLock/Erase 0100:E000
Programming ................
Verifying
Reboot to run NEW BootLoader Y/N?
CTRL-A Z for help | 38400 8N1 | NOR | Minicom 2.7 | VT102 | Offline | ttyS1
Key y to confirm and the DM24 will restart.
You can proceed immediately to the next section and upgrade the system code
but, if you do not manage to react in time, simply power-cycle the DM24 to
return to the boot-loader menu.
The system code is the main software that monitors
and controls the operation of the DM24, including handling time synchronisation
and the user interface.
The line-speed of the link between the DM24 and the
Platinum system must be no faster than 38400 Baud or you may render the DM24
unbootable. Please ensure that you have completed the first section, 1. Changing the line-speed, before following the
instructions in this section.
System code v.107 b27 requires
boot-loader version 3.0, build 02 or higher in order to load correctly. This
can be verified by the presence of the line
Guralp Systems Ltd - ARM-BOOT v3.0 mgs 14/09/16 (Build _02)
in the DM24's output after a power-cycle. IF you have an earlier
version or are in any doubt, upgrade the boot-loader, as described in the
previous section before continuing.
If the DM24 is currently displaying the boot-loader menu as a result of
completing the previous section, you can proceed directly. Otherwise,
power-cycle the DM24 to display the boot-loader menu.
From the boot-loader menu, take option s to
update the system code. You will be prompted to select a file transfer
protocol: key x to select the Xmodem-128 protocol.
The system will respond with the message
Start hosts' Xmodem-128 transmitter
Immediately key ctrl + a then s to open the
"Upload" protocol selection dialogue and key down-arrow
until xmodem is highlighted:
Current 0105:0000 Guralp Systems Ltd - DM+FW v.106 mgs 11/11/14 (Build 57w)
Previous 010E:0000 Guralp Systems Ltd - DM+FW v.106 mgs 11/11/14 (Build 57w)
Backup 0117:0000 Guralp Systems Ltd - DM+FW v.106 mgs 11/11/14 (Build 57w)
DSP Code :
0103:0000 dsp1090.bin loaded 2014-09-29 Default
0104:0000 dsp1090.bin loaded+-[Upload]--+
Command keys: | zmodem |
C - set real time Clock (1998| ymodem | )
I - view/upload InfoBlock | xmodem |
F - run the Forth monitor | kermit |
S - update System program | ascii |
O - select Other system progr+-----------+
B - update Boot program
D - update DSP code
T - Toggle default DSP code
Q - Quit maintenance system
3 seconds to auto-start
Enter command: S
Updating Application
Select 'X' for Xmodem-128 or 'Y' for X/Ymodem-1k X
Start host's Xmodem-128 transmitter
CTRL-A Z for help | 38400 8N1 | NOR | Minicom 2.7 | VT102 | Offline | ttyS1
and then key enter.
The file selection dialogue is displayed.
The directory displayed should be
/usr/share/firmware/CMG-DM24mk3 as selected in the
previous section but, if not, key g
and enter /usr/share/firmware/CMG-DM24mk3 to change
the current working directory. This step is described in more detail in
the previous section.
Use down-arrow to place the cursor on
dm24mk3-107b27.img and then key
spacebar to select it. It should now be displayed
highlighted:
Current 0105:0000 Guralp Systems Ltd - DM+FW v.106 mgs 11/11/14 (Build 57w)
Pr+------------------------[Select a file for upload]-------------------------+
Ba|Directory: /usr/share/firmware/CMG-DM24mk3 |
DS| [..] |
01| dm24mk3-107b27.img |
01|dm24mk3-boot3002.img |
Ch| dm24mk3-dsp1091.bin |
Co| |
C | |
I | |
F | |
S | |
O | |
B | |
D | |
T | |
Q | |
3 | |
En| |
| ( Escape to exit, Space to tag ) |
Up+---------------------------------------------------------------------------+
Select 'X' for Xmodem-128 or 'Y' for X/Ymodem-1k X
St [Goto] [Prev] [Show] [Tag] [Untag] [Okay]
CTRL-A Z for help | 38400 8N1 | NOR | Minicom 2.7 | VT102 | Offline | ttyS1
Key enter to start the transfer.
The xmodem upload indicator is displayed and, after a few seconds, it will start to
show the progress of the transfer, which takes around four minutes. When the transfer is
complete, you are prompted to press any key to continue... :
Current 0105:0000 Guralp Systems Ltd - DM+FW v.106 mgs 11/11/14 (Build 57w)
Previous 010E:0000 Guralp Systems Ltd - DM+FW v.106 mgs 11/11/14 (Build 57w)
Backup 0117:0000 Guralp Systems Ltd - DM+FW v.106 mgs 11/11/14 (Build 57w)
DSP Code :
0103:0000 dsp1091 Default
0104:0000+-----------[xmodem upload - Press CTRL-C to quit]------------+
Command k|Sending dm24mk3-107b27.img, 4193 blocks: Give your local XMOD|
C - set r|EM receive command now. |
I - view/|Bytes Sent: 536704 BPS:3128 |
F - run t| |
S - updat|Transfer complete |
O - selec| |
B - updat| READY: press any key to continue... |
D - updat+-------------------------------------------------------------+
T - Toggle default DSP code
Q - Quit maintenance system
3 seconds to auto-start
Enter command: S
Updating Application
Select 'X' for Xmodem-128 or 'Y' for X/Ymodem-1k X
Start host's Xmodem-128 transmitter
CTRL-A Z for help | 38400 8N1 | NOR | Minicom 2.7 | VT102 | Offline | ttyS1
Key enter to return to the boot-loader menu.
Proceed promptly to the next section.
If you are not fast enough to react to the menu, the
system will start programming the new system code into the FLASH memory. Do
not interrupt this process and allow the system to boot up fully before
proceeding. You can then simply power-cycle it and start again.
The DSP code is the firmware for the
Digital Signal Processor,
which is responsible for decimation, filtering and other repetitive mathematical tasks.
The line-speed of the link between the DM24 and the Platinum
system must be no faster than 38400 Baud to avoid corruption when updating the
DSP code. Please ensure that you have completed the first section, 1. Changing the line-speed, before following the
instructions in this section.
If the DM24 is currently displaying the boot-loader menu as a result of
completing the previous section, you can proceed directly. Otherwise,
power-cycle the DM24 to display the boot-loader menu.
DSP code slots
The DM24 is capable of storing two different sets of DSP code but, in practice, it
is only necessary to use one of them. The two sets are stored in two "slots", numbered
zero and one. We will use slot zero but the DM24 could be configured to use either so
we first need to ensure that slot zero is the default.
Look at the text above the boot menu where the contents of the two DSP slots are
displayed:
In the example above, note that the word Default is
shown next to the first entry. (Ignore the actual text of the entry: we are
only interested in which one is configured as the default.) This is the correct
configuration.
If, instead, the word Default is shown next to the
second entry, as in:
then slot one is selected. In this case, key t
from the boot-loader menu to Toggle the slot to zero.
Once you are sure that slot zero is the default DSP code slot, key
d at the boot-loader menu to update the DSP code.
You will be asked to specify which slot to update:
Port 0 38400 baud Port 1 38400 baud Port 2 38400 baud
Guralp Systems Ltd - ARM-BOOT v3.0 mgs 14/09/16 (Build _02)
System Code versions loaded :-
Current 0105:0000 Guralp Systems Ltd - DM+FW v.107 mgs 02/04/19 (Build _27)
Previous 010E:0000 Guralp Systems Ltd - DM+FW v.106 mgs 11/11/14 (Build 57w)
Backup 0117:0000 Guralp Systems Ltd - DM+FW v.106 mgs 11/11/14 (Build 57w)
DSP Code :
0103:0000 dsp1090.bin loaded 2014-09-29 Default
0104:0000 dsp1090.bin loaded 2014-09-29
Command keys:
C - set real time Clock (1998 1 1 04:25:09 )
I - view/upload InfoBlock
F - run the Forth monitor
S - update System program
O - select Other system program
B - update Boot program
D - update DSP code
T - Toggle default DSP code
Q - Quit maintenance system
3 seconds to auto-start
Enter command: D
Enter 0/1 to select DSP code to update
CTRL-A Z for help | 38400 8N1 | NOR | Minicom 2.7 | VT102 | Offline | ttyS1
so key 0 and enter to select slot zero.
You are next prompted to enter a Filename and Date to identify the DSP code. Type
DSP1091
and key enter to name the code. It is not
necessary to enter a date or any further text here.
We have had some reports of text entered here not being
echoed as you type. This does not cause problems: proceed as if it were being
echoed.
You will next prompted to select a file transfer protocol: key
x to select the Xmodem-128 protocol. The system
will respond with the message
Start hosts' Xmodem-128 transmitter.
Immediately key ctrl + a then s to open the
"Upload" protocol selection dialogue and key down-arrow
until xmodem is highlighted:
Previous 010E:0000 Guralp Systems Ltd - DM+FW v.106 mgs 11/11/14 (Build 57w)
Backup 0117:0000 Guralp Systems Ltd - DM+FW v.106 mgs 11/11/14 (Build 57w)
DSP Code :
0103:0000 dsp1090.bin loaded 2014-09-29 Default
0104:0000 dsp1090.bin loaded 2014-09-29
Command keys: +-[Upload]--+
C - set real time Clock (1998| zmodem | )
I - view/upload InfoBlock | ymodem |
F - run the Forth monitor | xmodem |
S - update System program | kermit |
O - select Other system progr| ascii |
B - update Boot program +-----------+
D - update DSP code
T - Toggle default DSP code
Q - Quit maintenance system
3 seconds to auto-start
Enter command: D
Enter 0/1 to select DSP code to update 0
Enter Filename/date - upto 31 characters
DSP1091
Select 'X' for Xmodem-128 or 'Y' for X/Ymodem-1k X
Start host's Xmodem-128 transmitter
CTRL-A Z for help | 38400 8N1 | NOR | Minicom 2.7 | VT102 | Offline | ttyS1
The file selection dialogue is displayed.
The directory displayed should be
/usr/share/firmware/CMG-DM24mk3 as selected in the
previous sections but, if not, key g
and enter /usr/share/firmware/CMG-DM24mk3 to change
the current working directory. This step is described in more detail in
the Upgrading the boot-loader section.
Use down-arrow to place the cursor on dm24mk3-dsp1091.bin and then key spacebar
to select it. It should now be displayed highlighted:
Current 0105:0000 Guralp Systems Ltd - DM+FW v.107 mgs 20/04/16 (Build _25)
Pr+------------------------[Select a file for upload]-------------------------+
Ba|Directory: /usr/share/firmware/CMG-DM24mk3 |
DS| [..] |
01| dm24mk3-107b27.img |
01| dm24mk3-boot3002.img |
Ch| dm24mk3-dsp1091.bin |
Co| |
C | |
I | |
F | |
S | |
O | |
B | |
D | |
T | |
Q | |
3 | |
En| |
| ( Escape to exit, Space to tag ) |
Up+---------------------------------------------------------------------------+
Select 'X' for Xmodem-128 or 'Y' for X/Ymodem-1k X
St [Goto] [Prev] [Show] [Tag] [Untag] [Okay]
CTRL-A Z for help | 38400 8N1 | NOR | Minicom 2.7 | VT102 | Offline | ttyS1
Key enter to start the transfer.
The xmodem upload indicator is displayed and, after a few seconds, it will start to
show the progress of the transfer, which takes less than a minute. When the transfer is
complete, you are prompted to press any key to continue... :
Key enter to proceed: you will be returned to
the boot-loader menu.
If you changed the Baud rate at step 1 of this process,
ignore the text in this box and continue from
If you changed the baud rate..., below.
If you did not change the Baud rate at step 1 of this process, key
enter again to leave the menu and start the
system, ignoring the Invalid command message.
The system will take longer than normal to boot because the new code has to
be programmed into FLASH memory. Do not disturb the unit while this process is
happening.
Skip now to "Tidying up", ignoring the next section
5. If you changed the baud rate...
Only carry out the instructions in this section if you
changed the Baud rate at step 1 of this process.
Key f at the boot-loader menu to select "Run
the FORTH monitor" and then key enter
once or twice until you see the ok prompt.
Type the command 0 115200 BAUD,
replacing 115200 with the desired Baud rate, then key
enter. The line-speed of the digitiser changes
immediately so you do not see an ok prompt this time.
You may see a few random, indecipherable characters instead.
The line-speed of the DM24 is now set to the desired Baud rate and we now need to change
the line-speed of the minicom terminal emulator to match. To do this, key
ctrl + A and then P to open the "Comm Parameters"
dialogue.
Some common speeds have single-letter commands to select them. To obtain a
speed which does not have an associated single-letter command, select the nearest
speed and then use a or b
to change the speed up or down until the required speed is displayed:
Desired line-speed
Keystrokes
9600
c
19200
c a
(or d b)
38400
d
19200
d a
(or e b)
115200
e
19200
e a
Key enter to select the displayed speed.
Key enter once or twice more until you see the
ok prompt and then enter the command
re-boot. Confirm by keying
y.
6. Tidying up
Allow the system to boot normally.
You will see some legible messages scrolling rapidly up the screen followed by
regular bursts of indecipherable characters. This is the GCF protocol; a binary
protocol generated by the DM24 when it is running.
␘␇␂��␖���␖�����␐␁��␓��␚������␝␞␈␅␈␆␎�␝␞␀�␆␋����␙��␒␕␁␏����␂␂␑�␁�␓�␜
␑����␋␈␌�␖������␎�␀�␌␓��␁�␑�␈␅␆␓␆␑���␓␖�␂�␅␜␀���␕␂␏���␅␀���␅␑�␁�␓�␜
��␕␘␓␉��␕�����␃␒␐␐␙�␖␚␓���␆␌��␂���␘��␉�␎␃����␄�����␙␗␎␃␉␋␆�␒␋␁␚␘␘�
␁␘�␈␐�␈�␁��␊␗�␏�␖�␝␞␒�␙␇��␇␅�␄�␆�␜␗�␜���␘␋�␜␜�␕�␇����␉␁␄␎␇␝␞␀�␌��
␉��␘␅␂���␗␚␙␆␚�␚��␌␗��␉␜�␋��␓���␐␚␃�␑␀�␎�␈␇���␘␖␜��␖␑�␄␑���␖��␉�␐�
␇�␚␋��␅␉␊␘␂�␈�␏���␗␙␉�␘␌����␆�␗␈␈␐�␒␌␊␇��␖�␀�␑␘␅␝␞␛�␖�␊␎�␃␗�␛␒��
��␋��␃␘�␀�␝␞�␑��␝␞␕␈␉+----------------------+␅␉�␄␕␁�␓���␛�␑␃␛����␑�␎␛�
��␋��␃␘�␀�␝␞�␑��␝␞␕␈␉| Leave without reset? |��␙␚�␀���␆��␚␋�␊␎␄�␅␇␕�␖�
�␑��␝␞␕␈␉��␋��␃␘�␀�␝␞| Yes No |�␃␀␁�␐�␌␀␎���������␗␂��␒��
␘�␀�␝␞�␑��␝␞␕␈␉��␋��␃+----------------------+␑␐␆␕␊�␒␇��␈��␊␁�␘����␗�␛
␌␗␙��␏�␀��␚�␝␞�␊␌␙��␖��␒␛�␚�����␂�␘��␈␕␊␘����␖␖�␃␁�␖��␙����␗��␘␛␝␞
␎␇␛���␖�␁␋␓␖␌��␑�␁��␗␝␞␝␞��␁␀␎␊␈␀␓����␛␛␀␊�␌�␎␜�␒�␝␞��␆�␕�␓�␖��␙�
�␘��␇���␖�����␏␜��␆␀␚␓␎␛���␃␉�␊␐������␗␂����␉␕��␕␏��␑␏␑␘�␊���␋␑␄␆␇
␓␘␄␎�����␓␛␂␏␝␞�␂��␘␝␞����␛␊��␏�����␙␋␝␞�␖␊␅␃���␈␘��␖��␛␂␑␘�␇��␖␈␎
␙␖�␊�␊␒␐␒�␋�␋␎��␌�����␋�␅���␉␒␖��␆���␁���␁␈␅��␉␆␌␂�␖␐��␀␀��␋��␚␙␖�
␏�␒␆��␚���␗␆��␓�␚␑␄�␎␃␝␞␊�����␖␇␖␅␋��␖���␉�␖␃␘␊�␆␜��␁␕�␕␆�␝␞�␄��␓�
CTRL-A Z for help | 38400 8N1 | NOR | Minicom 2.7 | VT102 | Offline | ttyS1
Once you see this, wait for a few seconds and then key
ctrl + a then q to exit minicom.
Key y to confirm that you wish to "leave
without reset". After a few seconds, you are returned to the command line of
the Platinum system.
This completes the loading of the DSP code and the DM24 firmware upgrade procedure.
Please contact
if you have any questions or
encounter any problems during the procedure.