Password reset for Minimus₂/Minimus Lite
Scope
This procedure applies to Minimus₂ or Minimus Lite digitisers. It does not apply to Minimus digitisers or products containing them.
|

|
This procedure only applies to these digitisers. |
|
This procedure does not apply to the Minimus digitiser, nor to Radian and Radian-string surface interface boxes. The passwords for these digitisers can be reset using the Minimus password reset procedure. | |
|

|
This procedure does not apply to the Minimus+ digitiser. The passwords for these digitisers can be reset using the Minimus password reset procedure. |
|

|
This procedure does not apply to the Fortimus digitil accelerometer. The passwords for these digitisers can be reset using the Minimus password reset procedure. |
|
|
This procedure does not apply to the Certimus digital seismometer. The passwords for these digitisers can be reset using the Minimus password reset procedure. |
Requirements
You will need:
|
|
|
|
|
|
|
|
Expert Summary
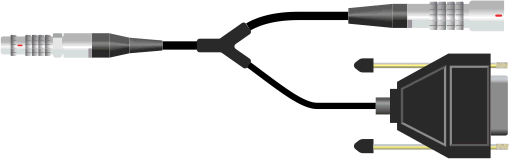
Ensure that the firmware is at the latest revision and then use the debug 'Y'-cable to connect to the console at 115200, 8N1. Issue the following commands:
If in doubt, follow the detailed instructions below.
Detailed instructions
The following procedure stores the passwords for the user and admin accounts and then reboots the system. During the subsequent initialisation, the stored passwords will take effect.
-
Start with the Minimus₂ powered up and running. You do not need network access to it.
-
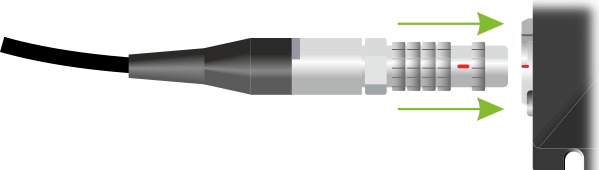
Disconnect the GNSS receiver from the Minimus₂ by grasping the sliding sheath and pulling in the direction of the cable.
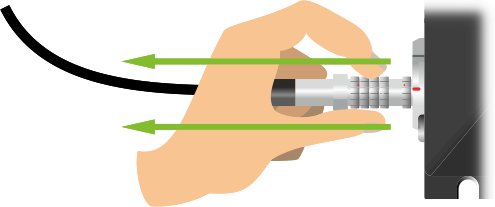
Do not twist and do not use tools.

-
Locate the male LEMO connector of the debug 'Y'-cable and plug it into the GNSS connector of the Minimus₂ by aligning the red dots and gently pushing the connector home until it clicks into place.
-
If required, connect the GNSS receiver to the other LEMO connector of the debug 'Y'-cable by aligning the red dots and gently pushing the connectors together until they click into place. This is not generally necessary: the Minimus₂ will not drift out of synchronisation if the GNSS receiver is unplugged for a few minutes.

-
Either
-
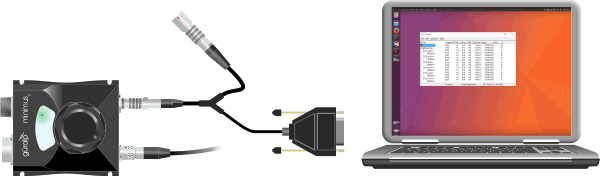
Connect the DE9f connector of the debug cable to the COM port of the PC
Or
-
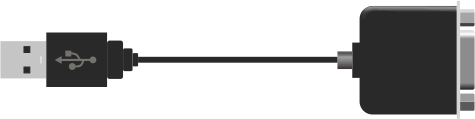
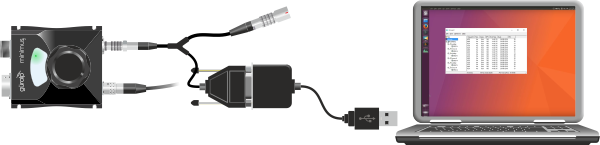
Connect the DE9f connector of the debug cable to the USB-to-serial adaptor and connect the USB-to-serial adaptor to a free USB port on the PC.
-
-
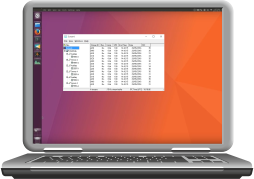
Start your terminal emulation software in the usual way.
Different emulators require different instructions. Use the radio-buttons below to select instructions which are specific to your terminal emulator:
- Scream Terminal
- PuTTY
- Minicom
If you choose to use a different emulator, you will have to adapt the instructions below to suit your chosen software.
-
Set the emulator to operate at 115,200 Baud, with eight data bits, no parity bits and one stop bit ('8N1').
-
Select from the menu and switch to the tab. Select the row corresponding to the COM port that you are using and change the to 115,200.
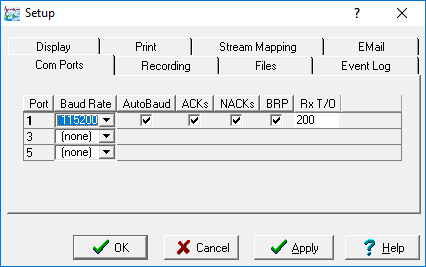
Click
 to close the dialogue.
 -
Select from the menu. In the resulting dialogue, set the Link type to Direct Serial, select the correct COM port from the drop-down menu and enter 115200 into the Baud rate box.
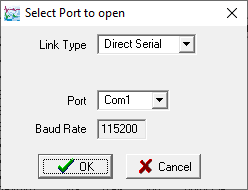
Click
to close the dialogue and open the Terminal window. -
Set the Connection type: to Ser_ial, enter the correct COM port under and type 115200 into the box.
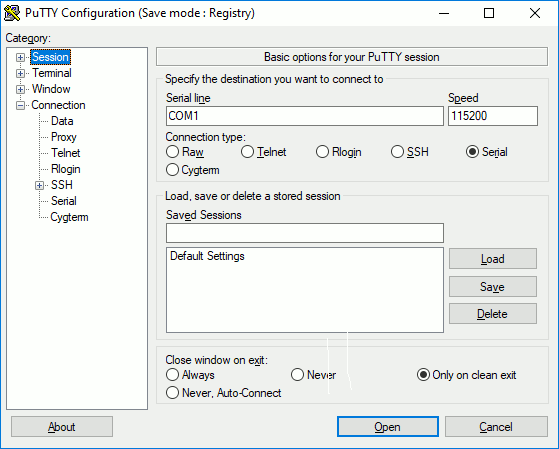
-
Select from the menu tree and check that is set to 8 and is set to 1
.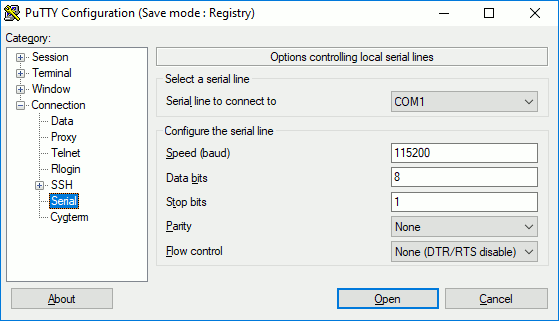
Click
 to open the terminal window.
 -
Key Ctrl + A then O and cursor down to Serial port setup. Key Enter then A and type in the name of the required serial port.
Welcome to minicom 2.7 +-----------------------------------------------------------------------+ | A - Serial Device : /dev/ttyUSB1 | | B - Lockfile Location : /var/lock | | C - Callin Program : | | D - Callout Program : | | E - Bps/Par/Bits : 9600 8N1 | | F - Hardware Flow Control : No | | G - Software Flow Control : No | | | | Change which setting? | +-----------------------------------------------------------------------+ | Screen and keyboard | | Save setup as dfl | | Save setup as.. | | Exit | +--------------------------+ CTRL-A Z for help | 9600 8N1 | NOR | Minicom 2.7 | VT102 | Offline | ttyS1 -
Key Enter to save the serial port name and then E to change the "Bps/Par/Bits" (communications parameters).
Key E Q to select 115200 Baud, 8-N-1.
Welcome to minicom 2.7 +-----------------+---------[Comm Parameters]----------+----------------+ | A - Serial De| | | | B - Lockfile Loc| Current: 115200 8N1 | | | C - Callin Pro| Speed Parity Data | | | D - Callout Pro| A: <next> L: None S: 5 | | | E - Bps/Par/B| B: <prev> M: Even T: 6 | | | F - Hardware Flo| C: 9600 N: Odd U: 7 | | | G - Software Flo| D: 38400 O: Mark V: 8 | | | | E: 115200 P: Space | | | Change which | | | +-----------------| Stopbits |----------------+ | Screen a| W: 1 Q: 8-N-1 | | Save set| X: 2 R: 7-E-1 | | Save set| | | Exit | | +---------| Choice, or <Enter> to exit? | +------------------------------------+ CTRL-A Z for help | 115200 8N1 | NOR | Minicom 2.7 | VT102 | Offline | ttyUSB1Key Enter twice, then cursor down to Exit and key Enter once more to close the configuration dialogue.
-
-
Enter the following five commands:
varuser set "Username (User)" user varuser set "Password (User)" user varuser set "Username (Admin)" admin varuser set "Password (Admin)" admin reboot -
Exit the emulator:
- Pick from the menu to exit PuTTY
- Key Ctrl + A then Q Enter to exit Minicom. Key Y Enter to confirm.
- Click the windows '⨯' icon to exit the Scream terminal.
-
Disconnect the debug cable and replace the GNSS receiver.
Conclusion
This concludes the procedure. Once the Minimus₂ has finished rebooting, you should be able to access it using the default login details.
In case of any difficulty, please contact .