A guide to securing Platinum systems
General
Change the password!
The first and most important step to securing a system is to change the default password. We have seen many instances of systems exposed to the Internet being compromised simply because the password has not been changed, and has been guessed by a dictionary attack.
On the web interface, visit the menu entry.
On the command line, either via SSH or serial port, log in as root and run the command passwd. This will prompt you to enter a new password, asking twice for confirmation, and then it will update it. This password is used for web, SSH and serial port access.
Password reset guides are available at EAM.
Firmware updates
Another important step is to keep up-to-date with the latest firmware. We have recently introduced several features to improve security, and we do release firmware updates for security fixes in the open source packages that we use. Please refer to our firmware page for the most recent release notes as well as instructions for upgrading systems which are not connected to the Internet:
Protecting instruments
There are two protocol servers running on Platinum which, by default, allow unauthenticated access to instruments in various forms.
Most importantly, the Scream server (which at present cannot be disabled) will allow any TCP client full access to an attached DM24 module. The configuration of the attached Platinum module cannot be altered, but the firmware and configuration of the DM24 can be. In addition, it is very easy for a TCP port scan to accidentally activate terminal mode on the DM24, as the protocol requires only a single byte to be transmitted to do so.
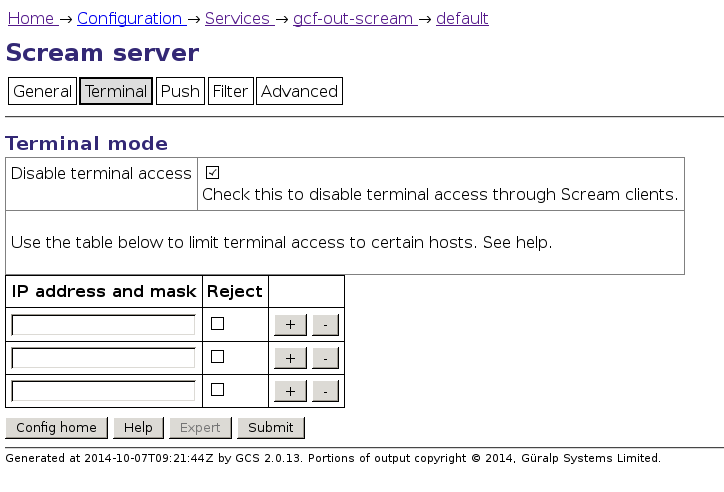
This access is enabled by default. It can be disabled in the web interface
by following
and then selecting the server in question. On the configuration screen, the
option is under the Terminal tab. Simply check the box
Disable terminal access and press
 to prevent this:

As this screen-shot implies, terminal access can also be restricted by source IP address. TCP access can also be restricted by firewall, but note that TCP access is required for the Scream protocol to work properly (even in UDP mode).
Terminal access is logged under /var/log/libterminal (and the files there can be examined with the dump-serial-log command).
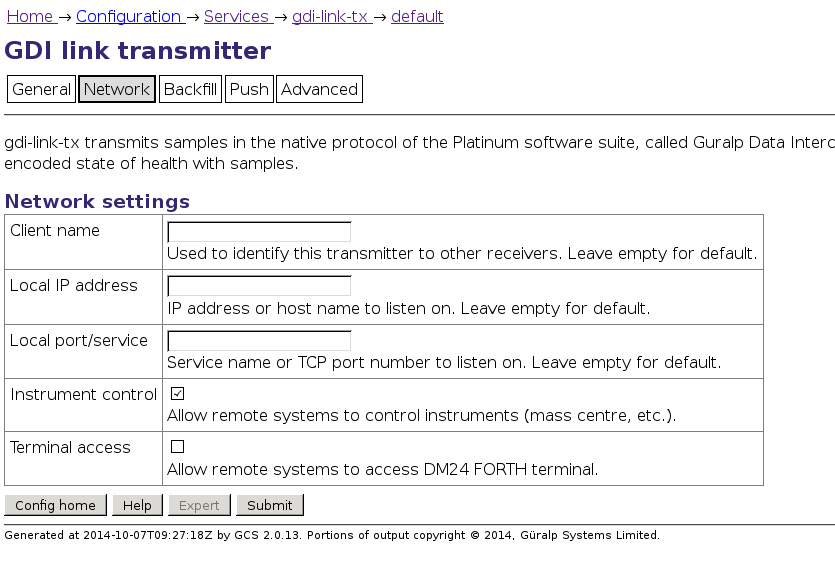
Secondly, the gdi-link server allows sensor control (lock, unlock, calibration etc.) by default. This cannot be accidentally activated; negotiation is required and the command structure is not trivial enough for accidental activation. By default, raw terminal access is disabled through gdi-link (though it could be enabled). These more secure defaults were introduced in Platinum release 13664.
On the web interface (of the sending system), this can be disabled by following and then selecting the server in question. On the Network tab the relevant option is :

Again, sensor commands are logged under
SSH
Disable SSHv1
Older Platinum systems will have shipped with SSH protocol version 1 (SSHv1) enabled. This is no longer recommended, as the protocol is not secure by today's standards. SSHv1 should be disabled.
On the command line, open the file /etc/ssh/sshd_config in either vi or nano, and find any line containing the word Protocol. If missing altogether, or commented out, then SSHv1 is already disabled. Otherwise, change the line to read Protocol 2. This ensures that only version 2 of the protocol can be used.
Using SSH keypairs
SSH keypairs can be used in lieu of passwords to authenticate users. This method is both safer (the private key contains much more "entropy" or randomness than a password does, so cannot realistically be attacked using only brute-force) and more convenient, because it does not require entry of password at every login.
In this technique, the client generates a public/private keypair. The public key is safe to distribute and does not need to be kept secret. It must be installed on each server to which access should be granted. The private key must be kept secure. Only users with access to the private key can log in to servers where the public key has been installed.
To generate an SSH keypair under Linux, run the command:
This asks for a file-name; the default it suggests is the file that the ssh command always tries to use. It may be sensible to choose another name (e.g. ~/.ssh/id_guralp). It also asks for a pass-phrase. This is used to encrypt the private key on disk in order to keep it secure. The pass-phrase can be omitted (just press enter), which is suitable for automatic scripts etc. but, for a user key, we recommended that you provide a pass-phrase.
Most Linux distributions come equipped with ssh-agent by default. This keeps an unencrypted copy of the private key in memory only, so that it cannot be stolen by access to the disk alone. The list of available keys can be inspected with:
The key must be manually added each time the session is started with:
It is possible to edit the file ~/.ssh/config in order to tell
ssh to use the private key file for a particular server. An example of such an
entry might be:
A guide for the equivalent SSH key generation for Putty under Windows may be
found with a web search:
https://www.google.com/search?q=putty+keypair+openssh.
To install the public key (which is a plain text file consisting of one long line), it must be added to the file /root/.ssh/authorized_keys.
By default, this file contains the Güralp Systems skeleton key, which allows our support team to log in without needing a password. This key can be removed at your choice, but this disables the utility of the remote-assistance tool.
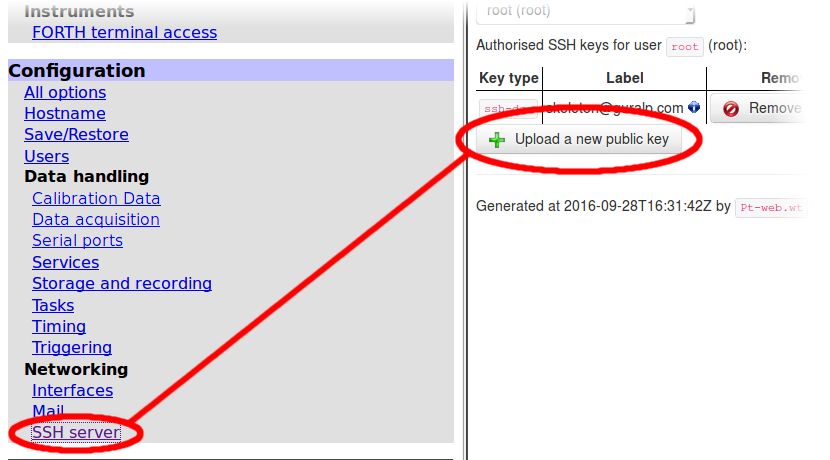
To add the key, use a web browser to visit .

In the resulting screen, click
 and use your browser's standard upload dialogue.
Disable password-based login
If SSH key-pairs are deployed and all users are trained in their use, then it is sensible to disable password-based login. This completely prevents dictionary attacks, since only the pre-authorised private key files can be used to log in.
This must be done through the command line. Open the file /etc/ssh/sshd_config in either vi or nano, and find the line containing PasswordAuthentication. If this line is not present or is commented out, then add or uncomment it. Change it to:
If the SSH private key file is lost then it will be necessary to log in via the serial port to reset this option. Alternatively, if the support skeleton key has been left in place, remote-assistance may be activated through the web interface. If you then contact , GSL support staff can re-enable password logins for you.
Web interface
When accessing the device's web interface over an unsecured channel (such as the Internet), you should use secure HTTP (HTTPS) instead of plain HTTP. This ensures the contents of any conversation are encrypted and cannot be read. HTTPS access is enabled by default and no changes are required to use it; simply change the address in your browser's address bar to use https:// instead of http://
Normally, each Platinum system uses its own self-generated, self-signed HTTPS certificate. This will cause a warning in any web browser that tries to access it, as the certificate has not been signed in advance by a known certificate authority (CA). If desired, the file:
can be edited to replace the built-in certificate with a new one. This file also contains the private key. Certificates can be obtained from a number of certification authorities: search the Internet for SSL certificate to see the selection. A simple, free service is available from letsencrypt.org and this is recommended for users without an IT department.
To enforce use of HTTPS, you should prevent HTTP access altogether using the built-in firewall. See the section on the firewall below for details.
Firewall techniques
Border firewall
The best solution to securing systems is to use a border firewall to prevent unexpected access. Such systems can be tightly controlled yet still be flexible. The following specific recommendations can be made:
-
Rate-limit inbound SSH connections from unknown addresses, or lock down completely to known sources.
-
Prevent inbound HTTP, only allowing inbound HTTPS.
-
Prevent inbound NTP.
-
Inbound UDP and TCP are required to port 1567 (default) for the Scream protocol.
-
Inbound TCP to port 1565 (default) is required to retrieve data via gdi-link.
-
Inbound TCP to port 1566 (default) is required to push data to the target system via gdi-link.
-
Do not forget to secure IPv6 with the same rules as well.
The following outgoing connections (IPv4 and IPv6) can be expected by default. Note that the server IP addresses have changed over their lifetime, so it is best to not lock down outbound connections too stringently if it can be avoided:
-
Outbound connections to ports 22 and 80 of iridium.guralp.com, for the remote assistance feature.
-
Outbound connections to port 873 of rsync.guralp.com, for firmware upgrades.
-
Outbound connections to port 80 of www.guralp.com, for periodic leap second table updates.
Before Platinum firmware release 14864, leap-second updates were downloaded from www.lwithers.me.uk
However: rather than adding this to the firewall, such system should be updated to the latest Platinum version for security reasons.
Built-in firewall
The built-in firewall uses a limited set of the Linux iptables utilities. The following two commands list the existing rules:
Starting in firmware build 14187, the following commands are also available for managing the firewall:
- firewall save
- firewall reload
- firewall clear
The save option will save any rules added or modified using the iptables/ip6tables commands to persistent configuration storage. This would normally happen as part of a clean reboot process, but not on an unexpected reboot/power outage. The reload option reloads the set of rules as last saved to persistent storage. The clear option clears all current rules, but does not immediately save this.
The firewall rules are saved under /etc/iptables.local and removing the files in that directory will remove the firewall rules on the next reboot.
Starting in firmware build 14187, the web interface has a tool to view the state of the firewall, and flush the rules if necessary. This tool is available under the menu link: simply click the button.
This example shows our recommended rules if a border firewall is not present. These can be adapted easily, and should be entered in the order they are shown. Further web searches on the iptables tool may provide additional information for further tailoring the firewall.
Always allow loopback connections: they are essential to the operation of a number of system features and present no security risk:
Enable connection tracking (this ensures outbound connections are not affected by rules further down):
Lock down SSH to known addresses:
This allows inbound SSH connections from any machine on the 192.0.2.0/24 network (an example "local" network address: substitute the address of your own network here as required) and from fe80::/64, which specifies any IPv6 "link-local" address
Lock down inbound NTP:
Lock down inbound HTTP:
If desired, specific hosts can be allowed access for HTTP using an iptables -A inbound_http command similar to that used in the SSH example.
If you are configuring a firewall on a remote system, there is an obvious danger of "locking yourself out" of the system: either immediately terminating your connection or preventing you from reconnecting after your session has ended.
One technique to mitigate this risk is, before adding the firewall rules, to create a timed process which clears all firewall rules after, say, thirty minutes. If you then configure the rules correctly - including testing that you can log out and log back in again - you can terminate the timed process before it clears the rules. If you make a mistake and cannot access the system, simply wait thirty minutes: the timed process will clear the firewall rules and you can reconnect and start again.
A timed process like this can be started with the command
which will produce output like
Note the number not in square brackets: 8177 in this example. When you are happy that your firewall rules are correct and you have tested that you can log out and log back in again, you can terminate the timed process and save the current firewall configuration with the commands
replacing 8177 with the number that you noted earlier.
For more information, first contact your local distributor or email .
