Chapter 4. Configuring networking
The network interface of the CMG-CD24-R8 is implemented using an embedded Lantronix WiPort-NR module. This module can be configured using a built-in Web server.
Before you can access the Web server, however, you will need to assign the device an IP address. This can be done using Lantronix' DeviceInstaller utility for Microsoft Windows, or using a DHCP server. You will need a PC with a network interface installed.
4.0.1 Using DeviceInstaller
Download and install the DeviceInstaller utility from the Lantronix Web site at http://www.lantronix.com/
DeviceInstaller also requires the Microsoft .NET framework to be installed. If you do not have this already, it can be downloaded from http://www.microsoft.com/
Find out the MAC address of the CD24-R8's network interface. This should be printed on a label on the case.
If the DATA or USB ports on the rear of the CD24-R8 are connected to anything, disconnect them. The network interface is disabled if a serial connection is detected on either of these ports.
Connect the CD24-R8's ETHERNET port to the the PC's network interface, either using a crossover Ethernet cable or through a network switch or hub. Using a network switch or hub, you can connect several CD24-R8s to the same PC and configure them all at the same time.
DeviceInstaller will not work through routers or across the Internet. All the devices need to be on the same network segment as the PC.
Run DeviceInstaller.
DeviceInstaller's main window has two panels, a tree on the left (with Lantronix Devices at the top) and a table on the right.
The program will automatically look for Lantronix devices on all of your computer's network interfaces. If necessary, you can narrow the selection by clicking on an entry in the tree on the left.
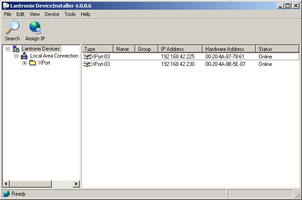
A WiPort-NR entry should appear in the table on the right, indicating that a device has been detected. If more than one WiPort-NR entry appears, DeviceInstaller has detected several devices.
For every detected device, the program shows the Hardware Address (i.e. the MAC address), and the IP address it is currently using. If your local network uses a DHCP server, the device will ask the DHCP server to assign it an address. Otherwise, a random address (APIPA) will be chosen automatically.
Automatic random addresses all begin with 169.254. The CD24-R8 will choose a different one every time it is power-cycled or rebooted.
The address of the CD24-R8 may be shown in red with the status Unreachable. If this happens, the digitiser and PC cannot communicate because they are not on the same subnet. Click Assign IP to start the IP configuration wizard.
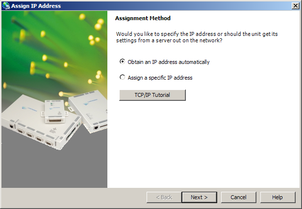
Follow the instructions in the wizard to set the IP address (or to configure DHCP if you are using a DHCP server). When you have finished, click Search to find the sensor with its new IP address.
If you want to configure the CD24-R8 to use a static IP address, use the Assign IP wizard as above, and click Search again.
Double-click on the entry which corresponds to the CD24-R8 you want to configure.
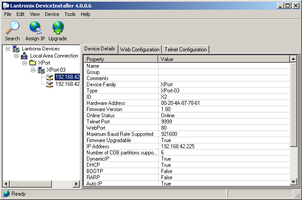
The right-hand panel will change to show the current properties of the device.
Switch to the Web Configuration tab, and click Go to open the Web configuration interface.
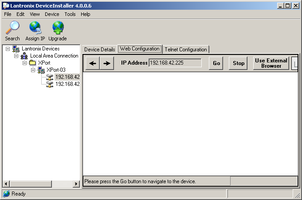
Alternatively, click Use External Browser to use your own Web browser to configure the digitiser.
Follow the steps in section 4.0.3 to configure the module using its Web interface.
4.0.2 Using DHCP
If you cannot install DeviceInstaller on your PC, or do not wish to, you can also get access to the CD24-R8 using a standard DHCP server. In most cases you will need to have administrative privileges to do this.
Install and start the DHCP service on your PC.
Connect the CD24-R8's ETHERNET port to the the PC's network interface, either using a crossover Ethernet cable or through a network switch or hub. Using a hub, you can connect several CD24-R8s to the same PC and configure them all at the same time.
DHCP will not work through routers or across the Internet. All the devices need to be on the same network segment as the PC.
Monitor the DHCP server to find out what IP address it gives to each digitiser.
To configure a device, enter its IP address into a web browser.
4.0.3 Configuration with the Web interface
Once you have access to the WiPort-NR's Web interface, you can configure it with its proper settings.
The Web page is nav id="foot">
To navigate around the Web site, click on the entries in the left-hand menu. When you have made changes to the settings on any page, save them by clicking OK before you leave the page.
The WiPort-NR has two serial channels, exposed on TCP ports 10,001 and 10,002. The channel connected to port 10,001 is unused. Channel 2 (port 10002) is connected to the CD24-R8's digital output, unless you have connected a PC or laptop via either a serial data cable to the DATA connector or a USB cable to the USB connector. If either of these connections are detected, the CD24-R8 will send data streams through that interface rather than to the WiPort-NR.
Click on Channel 2 – Serial Settings.
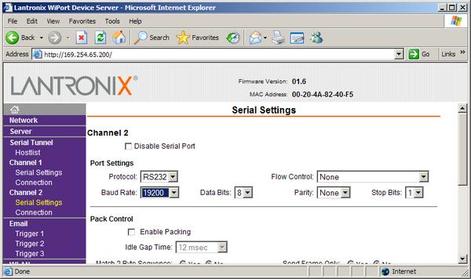
Set the Baud Rate to 115,200. This is the default baud rate for the CD24-R8's digital output. If you change the baud rate in Scream!, using an EAM or from the command line, you must come back to this page and change the Baud Rate setting. It is recommended that this setting is not changed.
The remaining settings can be left at their default values. Click OK to save your changes.
For full information on the WiPort-NR's configuration options, please refer to the WiPort-NR documentation, which is available on the Lantronix Web site at http://www.lantronix.com/
When you have finished setting up the WiPort-NR, apply the new settings by clicking Apply Settings. The WiPort-NR will re-boot with the new settings in effect.
If the WiPort-NR is using an automatically chosen random IP (beginning with 169.254), the IP address will change when you do this. You will need to go back to DeviceInstaller to find out the new IP address.