Chapter 5. Using the Multiplexor
The multiplexor module has two main functions: Firstly, it acts as an IPC connection point between the input and output modules, allowing an arbitrary number of modules of either type to be connected together; Secondly, it stores subframes on disk, allowing them to be retrieved by output modules for back-fill and retransmission purposes.
In most applications, only a single multiplexor instance is required although, if you have two completely independent data paths, it may make sense to use more than one multiplexor.
Note: each input and/or output module can only ever be connected to a single multiplexor instance.
5.1 Creating a new multiplexor instance
In the web interface, select “Configuration -> Services” from the left-hand menu or from the command line, run
gconfig
and then select “System services”.
Now choose “data-mux-cd11 -- CD1.1 multiplexor” to view a list of configured multiplexor instances. You can choose to either configure any existing instance (as described in the following section) or select “Create new service instance” to create a new one.
A form is displayed which allows you to set various parameters for the instance. The default values are suitable for most applications but each parameter is discussed in the following section. After entering the desired configuration for the instance, click  to save your changes.
This will create (if it is new) and configure the multiplexor instance. If it is not already running, you can start it by using “Control -> Services” on the web menu or by running
/etc/init.local/data-mux-cd11.0 start
from the command line.
The zero after the period in the command name determines which multiplexor instance is to be started, so the command to start a second instance would be
/etc/init.local/data-mux-cd11.1 start
5.2 Configuration options for the multiplexor
The multiplexor configuration screen has two tabs, "General" and "Subframes".
5.2.1 General tab
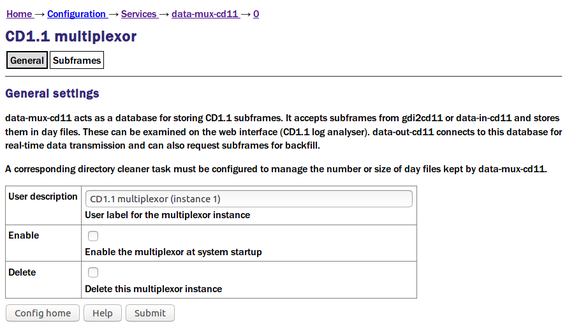
The User description is an alternative, human-readable label for this instance. It is used, for example, in log files. If you are building a complex application with several multiplexers, you should set this to something which describes the function of this particular instance. In most cases, this can be left at the default setting.
The Enable check-box controls whether this instance is to be automatically started each time the system boots or whether it should be left to be started manually.
The Delete check-box, if ticked, will cause this instance to be deleted when the form is submitted.
5.2.2 Subframes tab
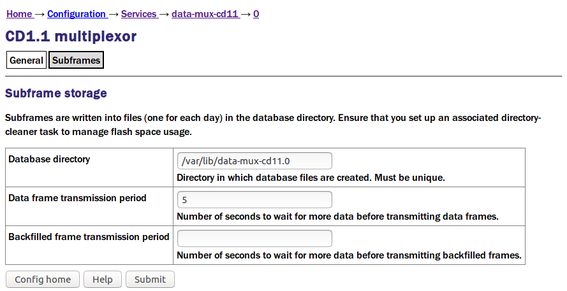
The Database directory field allows you to specify the path to a directory where the subframes are stored. A directory specified here should not be used for any other purposes and should not be shared with any other data-mux-cd11 instances. The default location, /var/lib/data-mux-cd11.n, where n is the instance identifier, will be adequate in most applications.
Caution: Large files will accumulate in this directory which, if not managed, will cause the system to run out of secondary storage (flash or hard disk space), causing the system to crash. Because of this: (a) you should ensure that you have sufficient space available to store the expected amount of data; and (b) you should configure a directory cleaner to remove unwanted files from this directory (see Section 9.1 for more details).
Note: This database may be stored on additional flash memory, if fitted: See Section 14 for more details.
The Data frame transmission period field controls the real-time data time-out described in section 3.1.1. It should be set to achieve the desired trade-off between subframe packing efficiency and data latency.
The Back-filled frame transmission period fulfils a similar function with respect to back-filled data and is also described in section 3.1.1.