Chapter 5. Installation
5.1 Permanent installations
You will need a hard, clean surface such as a concrete floor, to install the Fortis.
If you are in any doubt about how to install the sensor, you should contact Güralp Systems' Technical Support, via support@guralp.com.
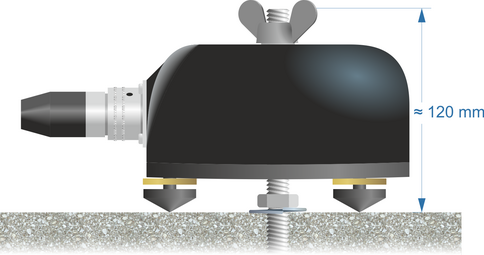
Prepare the surface by scribing an accurate N/S orientation line and installing a grouted-in fixing bolt on the line, near the middle. An anchor terminating in a 6 mm or 8 mm (¹⁄₄ or ⁵⁄₁₆ inch) threaded stud is suitable. The exposed thread should project approximately 120 mm (4½ inches) above the surface. Significant excess length should be removed.
Place the accelerometer over the fixing bolt and rotate to bring the orientation line and pointers accurately into registration with the scribed base-line.
For more accurate alignment, a long, thin rod or a length of stiff wire can be aligned with a slot machined into the base of the instrument. It can be held in place by hand or, if preferred, by inserting two 3mm screws into the threaded holes provided.
Level the sensor, using its adjustable feet, until the bubble lies entirely within the inner circle of the level indicator.
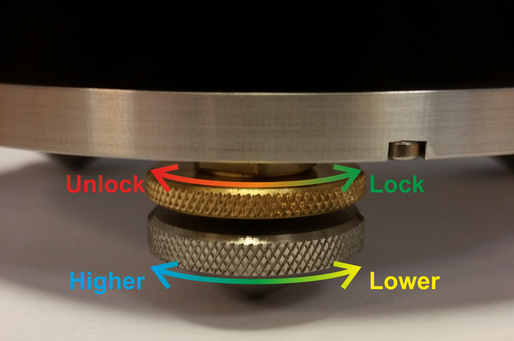
The feet are mounted on screw threads. To adjust the height of a foot, turn the brass locking nut clockwise (when viewed from above) to loosen it and rotate the entire foot so that it screws either in or out. When you are happy with the height, tighten the brass locking nut anti-clockwise (when viewed from above) to secure the foot.
Secure the instrument to the mounting stud using a wing-nut.
Caution: Hand-tighten only: do not use tools.
Connect a Güralp sensor cable between the instrument and your Güralp Affinity or other Güralp digitiser.
Alternatively: connect a Güralp “pig-tail” cable between the instrument and your own recording equipment, using the pin-out details in Section 7.
Power on the digitiser.

The instrument is now installed and transducing ground motion.
5.2 Temporary installations
The Fortis is ideal for monitoring vibrations at field sites, owing to its ruggedness, high sensitivity and ease of deployment. Temporary installations will usually be in hand-dug pits or machine-augered holes. Once a level base is made, the accelerometer can be sited there and covered with a box or bucket.
One way to produce a level base is to use a hard-setting liquid:
Prepare a quick-setting cement/sand mixture and pour it into the hole.
“Puddle” the cement by vibrating it until it is fully liquefied, allowing its surface to level out.
Follow the cement manufacturer's instructions carefully. Depending on the temperature and type of cement used, the mixture will set over the next 2 to 12 hours.
Install the sensor as above, then cover and back-fill the emplacement with soil, sand, or polystyrene beads.
Cover the hole with a turf-capped board to exclude wind noise and to provide a stable thermal environment.
If you prefer, you can use quicker-setting plaster or polyester mixtures to provide a mounting surface. However, you must take care to prevent the liquid leaking away by “proofing” the hole beforehand. Dental plaster, or similar mixtures, may need reinforcing with sacking or muslin.
5.3 Installation in Hazardous environments
The fully enclosed, aluminium case design of the Fortis makes it suitable for use in hazardous environments where electrical discharges due to the build up of static charge could lead to the ignition of flammable gasses. To ensure safe operation in these conditions, the metal case of the instrument must be electrically bonded ('earthed') to the structure on which it is mounted, forming a path to safely discharge any static charge.
Where electrical bonding ('earthing') is required during the installation of a Fortis, the central mounting hole that extends through the instrument should be used as the connection point. This is electrically connected to all other parts of the sensor case. Connection can be made by either a cable from a local earthing point terminated in an 8 mm ring tag or via the mounting bolt itself.