Chapter 5. Accessing data
The 6TD has six different transmission modes, which control whether the instrument transmits data via the serial port or network interface, stores data into its flash memory or some combination of both. Tranmission modes are described in section 6.2.5.
If you choose a transmission mode where data are transmitted in real time, you can receive the data using Güralp Systems’ free Scream! software or using a Güralp EAM, Güralp NAM or similar data acquisition system.
If you choose a transmission mode where data are stored in Flash memory, you can recover these data at a later date, using either the FireWire interface or a serial link.
Note: The FireWire interface is very much faster than the serial link: the serial link is intended for real-time data transmission. If you wish to retrieve recorded data, the serial link (and the Ethernet link, if fitted) are only really useful for small, ad-hoc transfers.
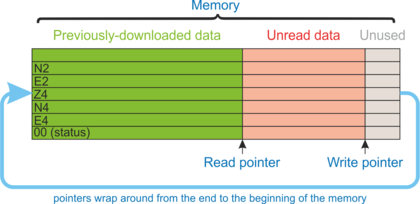
The Flash memory is used as a ring buffer. Two pointers into the memory keep track of where data were last read (the “Read Pointer”) and last written (the “Write pointer”). When either pointer reaches the end of physical memory, it wraps round back to the beginning. The behaviour of the recording system when the write pointer reaches the read pointer (i.e. when the memory becomes full of data, none of which have been downloaded) is governed by the commands RE-USE/RECYCLE and WRITE-ONCE, as described in section 6.2.6.
The rest of Chapter 5 describes:
receiving real-time data in Scream (section 5.1);
downloading data over FireWire to a hard drive (section 5.2);
reading the data from the hard drive onto a PC (section 5.3); and
downloading data over a serial port or Ethernet interface (section 5.4).
5.1 Receiving data in Scream!
Note: The Scream! software is available free of charge. Scream is available for both Windows and Linux computers. To request a copy, please send an email to scream@guralp.com stating your name, any organisational affiliation, the equipment with which you are working and the nature of your work.
There are several ways in which a 6TD instrument can connect to Scream!:
A direct serial connection can be made from the breakout box to your computer. This is the method we recommend for testing the instrument (see section 3.2).
The serial port can also be used to connect an external modem. Details of how to connect modems are available on the Güralp Systems Web site.
Data can be received from the instrument over the optional Ethernet or wireless links. Before you can do this, you will need to set up its IP address and network configuration, as described in section 4.10 (wired) or section 4.11 (wireless).
To connect to a 6TD over the network:
Run Scream!, and select Windows → Network Control from the main menu. Click on the My Client tab.
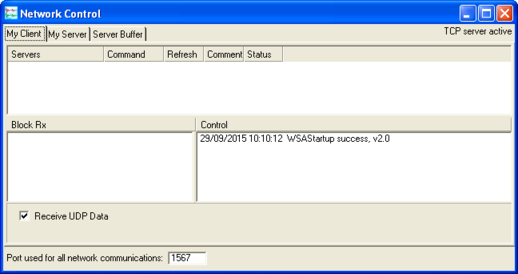
Ensure that the check-box marked “Receive UDP Data” is ticked.
Right-click in the white panel beneath Server, and select Add TCP Server….
Type the IP address of the 6TD, a colon (“:”) and the output port that you chose when configuring the network interface. If you accepted the defaults, this will be port 10,002. The entry should look like
92.168.33.2:10002
Click
 .
.After a short wait, an entry for the instrument should appear in the pane. Right-click on the entry and select Connect.
If the connection is successful, you should see blocks appearing in the Block Rx pane, and streams will appear in Scream!'s main window. Close the Network Control window.
5.2 Downloading data over FireWire
The easiest way to download data over Firewire is to connect a suitable disk to the FireWire port of the 6TD and power cycle the instrument.
Note: The 6TD requires the disk to be in DFD format. If the disk has not previously been used with a 6TD (or 3ESPCD), it must first be initialised: see section 8.8.13 for details. Once initialised the first time, it can then be reinitialised in the same way or, from within Scream, by selecting File → Reset SCSI disk... from the main menu
If you have ordered a 6TD with the powered FireWire option, you can attach the disk directly to the 6TD with no additional connections. Otherwise, you will need to connect the disk to a power source through the supplied adapter.

When the sensor restarts, it will automatically mount the disk and flush all new data to it.
If you do not want to restart the instrument, you can also flush data to disk manually:
Open the digitiser's console.
If you are using Güralp Systems' Scream! software, right-click on the digitiser's icon (once it appears) and select Terminal….
If you are using a Güralp EAM, issue the command
data-terminal
and select the digtiser from the resulting menu.
Connect a suitable disk to the FireWire port of the 6TD. Power the disk if necessary.
Issue the command FLUSH
This will download all data from the 6TD that it has not already transferred. If you want to transfer the entire contents of Flash memory, use the command FLUSHALL. For more details, see section 8.8.12.
Close the terminal session. If you are using Scream! or an EAM, the 6TD should start transmitting immediately. Otherwise, you may need to issue the command GO to start transferring data.
5.3 Reading 6TD disks
The 6TD uses a special disk format, DFD, for recording data. This format is also used by other Güralp digitisers such as the DM24.
You can read this data into a PC using Scream! or the gcfxtract utility, which are freely available from the Güralp Systems Web site.
Note: The DFD format is not the same as that used by the Güralp Systems EAM data module, which uses an ext3, ext4 or a FAT32-compatible journalling file system.
Güralp Systems can provide fully-tested disks with FireWire and USB connectors. Alternatively, a third-party FireWire disk may be used (although compatibility is not guaranteed).
To read a disk using gcfxtract:
Attach the disk to your computer. You can use FireWire, USB, or any other interface supported by your computer and the disk.
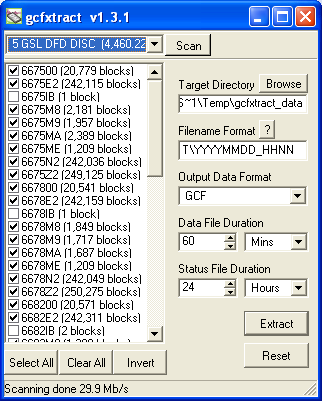
Run gcfxtract and select the required disk from the drop-down list, then click
 .
.Gcfxtract will scan the disk and display all the streams it finds in the selection area below. For each stream, the Stream ID and the number of blocks found are shown.
This operation requires roughly 12 Mb of available memory for every Gb of space on the disk. If you have a very large disk, your computer may have to use its hard disk to make enough space. This will slow down scanning considerably.
By default, all streams containing more than 100 blocks are selected for extraction. You can change which streams to extract by ticking or clearing the check box beside each stream.
You can tick or clear all of the boxes using the
 and
and  all buttons. Clicking
  ticks all un-ticked boxes, and clears all ticked boxes.
Enter a path name into the Target Directory field, or use the
 button to find a directory. This will be used as the root directory for extracted data. If it does not exist, gcfxtract will create it.
Enter a format string into the Filename Format field. The syntax is the same as the format string in Scream! and full documentation is available by pressing the
 button beside the format entry field in interactive mode.
Normally, gcfxtract outputs GCF files, to ensure all the information in the original data is retained. If you want to convert to a different format, select it from the Output Data Format drop-down box. Gcfxtract can output in most of the formats supported by Scream!.
Data are automatically placed in time order and saved in multiple files, each file containing a contiguous segment of data. By default, data streams are recorded in files sixty minutes long. To change this to some other number of minutes, alter the value in the Data File Duration box. The units (minutes by default) can be selected using the adjacent drop-down menu.
For data streams, if there is a gap in the data, gcfxtract will start a new file anyway.
Status streams are also saved in in multiple files, but have a default length of 24 hours. To change this, alter the value under Status File Duration. The units (hours by default) can be selected using the adjacent drop-down menu.
When you are happy with the settings, click
 to begin extracting the data.
Clicking
 sets a flag on the disk which marks it as empty. The next time a digitiser transfers data, it will begin at the beginning of the disk, overwriting the old data. When this happens, none of the old data can be extracted with gcfxtract or Scream!. Until then, however, you will still be able to retrieve all the data.
When you are finished, you should exit gcfxtract and then use your operating system's standard facility for un-mounting hardware (e.g. “Safely Remove Hardware” under Windows) before disconnecting the drive.
You can also read disks with Scream!. This allows you to view data in the process of being transferred, but is slightly slower, because Scream! does not read data in strict order. To read a disk with Scream!:
Attach the disk to your computer. You can use FireWire, USB, or any other interface supported by your computer and the disk.
Run Scream!, and select File → Setup… from the main menu. Select the Files tab.
Set the Base Directory, Filename Format and Data Format as described above. Also, if required, set the Post-processor and Granularity options to your preference. Consult the Scream! documentation for details.
Select the Recording tab and tick Auto Record - Enable for Data Streams and Auto Record - Enable for Status Streams. Click
 .
.Scream! will remember the recording options you set in steps 3 and 4 for later occasions.
Select File → Replay SCSI disk… from the main menu. Scream! will search for attached disks, and open a window with a list of all the streams it has found.
Select the streams you want to replay, and click
 . The disk will appear in the left-hand pane of Scream!'s main window, and the streams you have selected will start playing into the stream buffer, as well as being recorded.
When you have finished transferring the data, if you want to reset the disk, select File → Reset SCSI disk… from Scream!'s main menu. Select the disk you want to reset, and click
.
5.4 Downloading recorded data over the serial port or Ethernet interface
Note: This technique is not recommended for transferring significant quantities of data, due to the speed limitation. The FireWire interface should be used for this purpose: see section 5.2.
Start by configuring Scream to record all incoming data by visiting the “Recording” tab of the File→Setup dialogue:
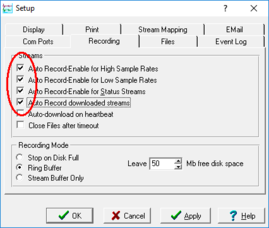
Ensure that the first four check-boxes are ticked. Next, switch to the “Files” tab and choose an appropriate base directory, file format and filename format.
Click  to save your changes and close the dialogue.
Next, open a connection to the digitiser's console. To do this using Güralp Systems' Scream! software, right-click on the digitiser's icon ( ) and select Terminal…. From a Güralp EAM, issue the command
data-terminal
and select the appropriate data source from the menu.
To simply download all data held in the Flash memory, issue the command
ALL-FLASH ALL-DATA DOWNLOAD
followed by
GO
This will initiate a complete download. The ALL-FLASH and ALL-DATA commands act as modifers to tell the system whhat to download.
If you wish to download only a subset of data, you can replace the ALL-FLASH and ALL-DATA modifiers with other modifers to select different streams and/or time periods:
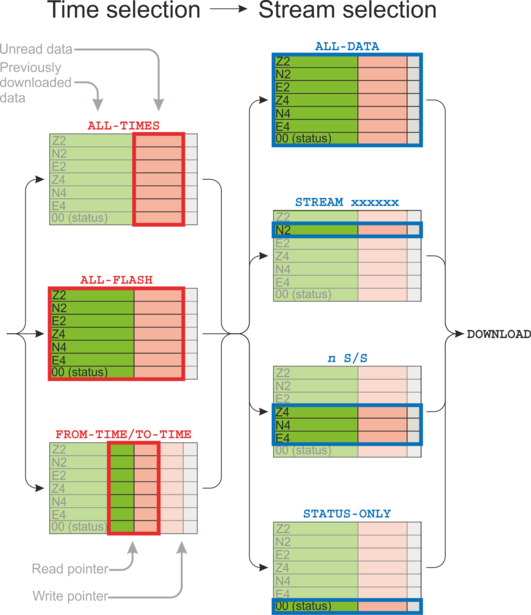
The streams to be downloaded are specified with ALL-DATA, S/S, or STATUS-ONLY.
Any desired time period can be specified with ALL-FLASH, ALL-TIMES, or FROM-TIME and/or TO-TIME.
The parameters are illustrated in the diagram below. If you miss out a parameter, DOWNLOAD will re-use the value you last specified.
Note: You can pause a download by entering terminal mode, and either restart with another GO or abort with END-DOWNLOAD.
When you complete a DOWNLOAD without specifying a time period, the CD24 adjusts the internal read pointer to mark the latest position. This is then used as the start point for the next DOWNLOAD with the command ALL-TIMES.
The various modifiers are are summarised below and described in detail in section 8.8.
TIme selection
ALL-TIMES – select all data that have not been previously downloaded
ALL-FLASH – select all recorded data
FROM-TIME / TO-TIME – select data between two user-specified times
Stream selection
ALL-DATA – select all recorded streams
STREAM xxxxxx – select only the specified stream xxxxxx
n S/S – select only streams with sample rate n
STATUS-ONLY – select only status streams (equivalent to 0 S/S)
The DOWNLOAD command returns immediately, so that you can issue more commands if required. To close the connection and begin downloading with the specified selectors, issue the GO command.
Once the GO command has been issued, the window may close, depending on which emulator you are using. On an EAM, the data-terminal (minicom) session is closed by keying  +
+ , then
  .
.