Chapter 7. Recovery Procedure
For the recovery stage, the shipping vessel will need to navigate to the location of the installed instrument.
7.1 Buoy release and winching
Once stationary at the deployment site, follow the release procedure (RESET/ARM/RELEASE) using the Applied Acoustics PAM to send the acoustic commands needed to release the pop-up buoy from the OBS. For the buoy release, the user is referred to the Operation Manual of the Applied Acoustics PAM Portable (PAM-3510-8600-6_3510) and the Quick Start Guide of the Applied Acoustics 1519 Release Beacon (REL-1519-8000-1_1519).
Once the buoy has been visually located, it will need to be brought on-board using a hook. Then, all excess rope (slack) should be pulled in. When the OBS retrieving line is pulled on-board, this should be attached to the capstan winch and the vessel should move toward this line to ensure that the OBS is pulled in a vertical direction as much as possible. The OBS unit can then be winched on board from the stern.
Caution: Since the OBS sensor hangs some distance below the frame, take care not too knock the sensor on the side of the boat or on the deck when winching on board.
7.2 Clock synchronisation
Upon recovery, the OBS digitiser clock will need to be resynchronised.
Connect the OBS and GPS to the deck control unit, and resynchronise the internal clock (follow the procedure given in Section 5.2. Monitor the status stream until a GPS lock is obtained. Look for a PHASE report and take note of it.
7.3 Data retrieval
7.3.1 Overview
During the deployment, the CD24 digitiser in the Breve OBS stores data to an internal flash memory ring-buffer. At the end of the deployment, these data need to be retrieved.
This process involved first writing data to the supplied portable hard drive and then retrieving the data from the drive to a PC. The same drive can be used to hold data from multiple Güralp Breve units simultaneously, subject to any capacity limitations.
A special format, DFD, is used on the hard drive. This format is not understood by standard PC operating systems so special software is required to read the drive. For use with the Güralp Breve, GCFXtract is recommended. This can be freely downloaded from the Güralp web site and it runs under both Windows and Linux.
7.3.2 Writing to the disk.
To extract data from the digitiser and write it to a disk, remove the instrument canister from the frame (without disconnecting it from the cable harness) and then remove the large vent bolt, exposing the digitiser's FireWire connector:
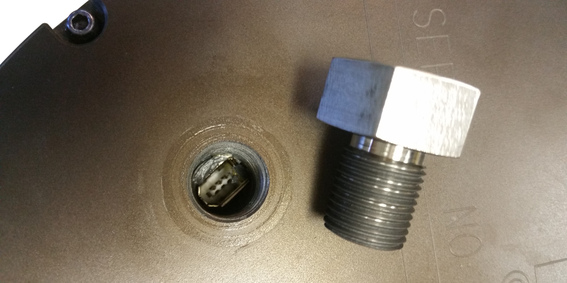
Connect the Güralp hard drive to the exposed FireWire connector. A special FireWire cable with an elongated connector is supplied for this purpose.
Connect the disk power supply unit to the disk using the integrated cable and plug the disk power supply unit into a suitable mains (line) power outlet. Note that the power LED on the disk illuminates; this is visible through the clear plastic block in the connector area.
Using Scream on the deck unit PC, right-click on the digitiser's icon (not the COM port icon) and select “Terminal…” from the context menu. A terminal window will open, connected to the digitiser's command line, which should display an “OK“ prompt. If the prompt is not displayed, key ENTER once or twice until the system responds.
Note: If the disk has not been used before, issue the command
RESET-DISK
in order to write a blank file allocation table to the disk. Note that this will effectively erase any data stored on the disk. If this is done in error and the data are required, contact Güralp technical support for assistance.
Type the command
FLUSH
and note that the activity LED on the disk illuminates; this is visible through the clear plastic block in the connector area. The digitiser will proceed to write all stored (and previously un-flushed) data to the hard drive.
Note: Replace the vent bolt immediately after data extraction to prevent ingress of dirt or contaminants.
7.3.2.1 The READ pointer
The digitiser maintains a pointer into the memory buffer that indicates the location of the last data which have been flushed to disk. This is called the READ pointer. (A WRITE pointer also exists, to tell the digitiser where new data should be stored; it is advanced after each store operation.) Each time a FLUSH operation is performed, the pointer is updated to reflect that fact that more data have been downloaded and, therefore, can be over-written if required.
Because of this, if you try and perform two FLUSH operations successively, the second will only write any data which have been stored since the first operation completed.
If it is required to take a second copy of the data, e.g. for back-up purposes, the command
FLUSHALL
can be used. This ignores the read pointer and writes all of the data from the flash memory to the disk.
7.3.3 Reading the disk
The Güralp disk should be connected to a Windows or Linux PC in order to retrieve the data stored on it. Either the FireWire or the USB connection can be used, according to which is more convenient. The PC should have GCFXtract software loaded.
Connect the disk to the PC using FireWire or USB as desired.
Connect the disk power supply unit to the disk using the integrated cable and plug the disk power supply unit into a suitable mains (line) power outlet. Note that the power LED on the disk illuminates; this is visible through the clear plastic block in the connector area.
Caution: The PC's operating system may offer to format the drive for you. Do not allow it to; this will erase data on your drive. If you do this accidentally, contact Güralp technical support for assistance.
Start the GCFXtract software on the PC. As this program requires raw disk device access, it must be run with elevated privileges. On Windows 7, Vista and above, it needs to “Run as Administrator”. On Windows XP, you need to be logged in as administrator. Under Linux, you need to run either as root or as a user with read/write permissions for raw disk devices. On most Linux systems, you can grant these permissions with the command
sudo adduser some_user_name disk
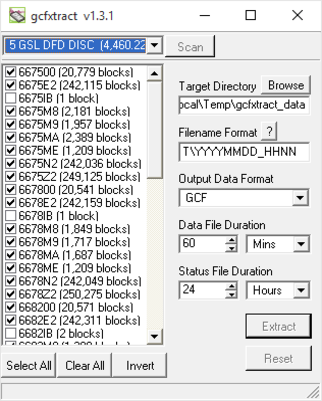
When you start up GCFXtract, the program searches all SCSI interfaces and devices for DFD-format disk drives. The ID of each disk is displayed in the drop-down list at the top of the window. Under each disk, GCFXtract lists the transfer sessions it has found on the disk. The digitiser creates a new transfer session each time it saves data to the disk. You can extract data either from a single transfer session or from the entire disk.
To extract the data from the disk:
Select the required disk or transfer session from the drop-down list, and click
 . GCFXtract will scan the disk and display all the streams it finds in the selection area below. For each stream, the Stream ID and the number of blocks found are shown. This operation requires roughly 12 Mb of available memory for every Gb of space on the disk. If you have a very large disk, your computer may have to use its hard disk to make enough space. This will slow down scanning considerably.
By default, all streams containing more than 100 blocks are selected for extraction. You can change which streams to extract by ticking or clearing the check box beside each stream. You can tick or clear all of the boxes using the and
 buttons. Clicking
  ticks all cleared boxes, and clears all ticked boxes.
Enter a path name into the Target Directory field, or use the button to find the required directory. This will be used as the root directory for extracted data. If it does not exist, GCFXtract will create it.
Enter a format string into the Filename Format field. The syntax is the same as the format string in Scream! and full documentation is available by pressing the button beside the format entry field.
Normally, gcfxtract outputs GCF files, to ensure all the meta-data in the original data are retained. If you want to convert to a different format, select it from the Output Data Format drop-down menu. GCFXtract can output in most of the formats supported by Scream!. Some formats require additional information to be specified: additional items will appear in the application's display, which will change to reflect this.
Data are automatically placed in time order and saved in multiple files, each file containing a contiguous segment of data. By default, data streams are recorded in files 60 minutes long. To change this to some other number of minutes, alter the value in the Data File Duration (mins) box. For data streams where there is a gap in the data, GCFXtract will start a new file anyway.
Status streams are also saved in multiple files, but have a default length of 24 hours. To change this, alter the value under Status File Duration (hours).
When you are happy with the settings, click to begin extracting the data.
Clicking the sets a flag on the disk which marks it as empty.
Caution: It is highly recommended that you do not reset a disk until you have verified and made back-up copies the extracted data. If you accidentally reset a disk which contains data that you still require, please contact Güralp technical support for assistance.
Note: You cannot use the reset facility to place a drive into DFD format if it is currently in a different format. This is to prevent accidental reformatting of operating system drives. To place a disk into DFD format for the first time, please use the RESET-DISK command from the digitiser's command line, as described in section 7.3.2.
The next time a digitiser performs a FLUSH operation, it will begin at the beginning of the disk, overwriting the old data. When this happens, none of the old data can be extracted with GCFXtract. Until then, however, you will still be able to retrieve all the data.
Downloaded data can be previewed using the free Scream software application. See the Scream manual, MAN-SWA-0001, for further details.
7.3.3.1 Advanced GCFXtract usage
You can set default values for each field using the following command-line options:
/o:dir : Set the Target Directory to dir.
/f:format : Set the Filename Format to format. The format string is in the same format as that for Scream! and is documented by pressing the button next to the format entry field.
/d:data-format : Set the Data Format to data-format. Possible values are gcf, miniseed (or msd), saci (Intel byte order), sac (Motorola byte order), suds (or sud), gse (or cm6), segyi (Passcal SEG-Y, Intel byte order), segy (or sgy) (Passcal SEG-Y, Motorola byte order), segys (standard SEG-Y, with shot-files), cssi (Intel byte order) and css.
/ld:duration : Set the Data File Duration to duration minutes. Alternatively, add h to the end of the duration to specify a number of hours, or d to specify a number of days.
/ls:duration : Set the Status File Duration to duration hours. Alternatively, add d to the end of the duration to specify a number of days.
/ids:list : Select only the Stream IDs starting with one of the strings in list for extraction (list is comma separated)
/t:count : Select only streams with more than count blocks.
/a : Batch transfer data from all connected disks, using settings (including stream selections) defined using the options above.