Chapter 4. Getting started
To start using the Network Trigger application, it is necessary to:
Register the software with Güralp Systems;
Configure the sources for the data streams and the location of the calibration file for the instruments in the network;
Populate and select the instruments to be used;
Configure processors (see section 4.4); and
Assign processors to instruments.
4.1 Application registration
When first used, the application will show a registration form, shown below.
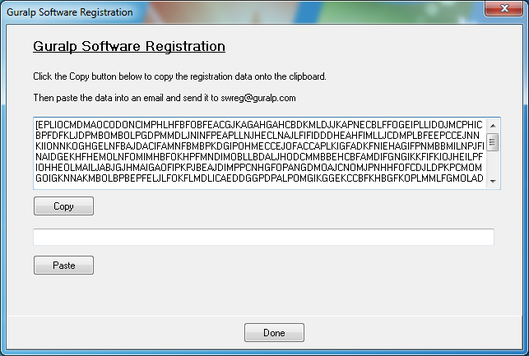
Clicking the  button will copy all of the text in the box above the button onto the Windows clipboard. Paste that into an email and send it to the software registration address: swreg@guralp.com. Güralp will generate and email a registration key which you need to copy and paste into the edit box above the Paste button. Click
  to complete the process.
4.2 Incoming data streams
Incoming data streams are configured on the Data Rx tab of the Set-up form.
To open the Set-up form, use the File→Set-up menu item on the main form. An example page is shown below.

4.2.1 Push servers
Remote servers can push GCF data to the UDP port specified on this screen as Listen on Port.
4.2.2 Pull servers
Network Trigger will attempt to pull data from each server specified in the Pull from Servers list. Each item in the list should be specified as an IP address or DNS name, followed by a colon (':') and the appropriate UDP port number. To enter a new server, simply type these details directly into the list and click  .
.
4.2.3 Calibration file (calvals)
The location of Scream!'s calibration values file (calvals.txt) must be specified in this field. This is normally either in the same directory as the Scream! executable or in the user's Scream directory.
4.3 Instrument selection
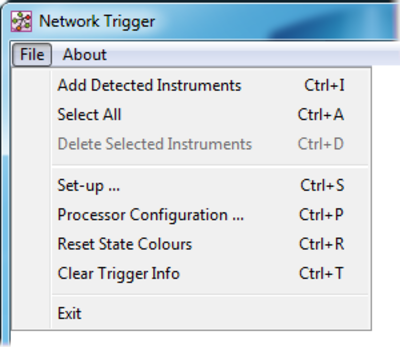
Once the network details have been entered, the Network Trigger application can populate the main grid automatically from the data servers. To enable this, select the menu item File→Add Detected Instruments (or  +
+ ) on the main form as shown below:
Instruments will automatically be added to the list on the main form as data is received.
Once the all the instruments have been added to the list, the File→Add Detected Instrument should be selected again to disable addition mode.
Instruments that do not require monitoring can be removed from the list:
To remove one instrument at a time, select the unwanted instrument and key
 .
.To remove several instruments at once, hold
 while clicking on each, then release and key .
When the list is complete, it is time to configure the processors.
4.4 Configure processors
The Network Trigger application can have multiple processors operating on the data for each instrument and trigger levels for each component can be set. (Currently PGA, PGV and SI processors are available.)
Select the File→Processor Configuration … menu item on the main form. This opens the Processor Configuration form. Processors are added by clicking the  button to the right of the form and selecting the required processor.
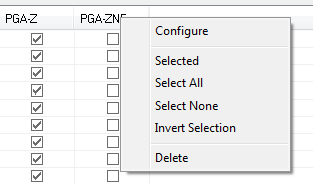
To set values for the processor, click the column-header of the grid and select Configure from the drop down menu, as shown:
The configuration form for PGA is shown below. The configuration forms for PGV and SI are similar.
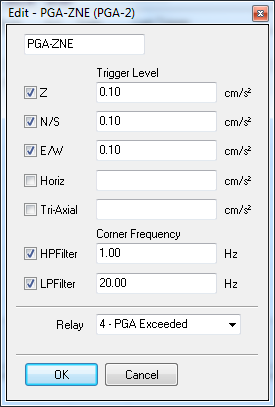
The trigger level for each component (including the calculated horizontal and triaxial components), high- and low-pass filter parameters and an associated relay can be set on this form.
Once the required processors have been configured, it is time to assign processors to the instruments.
4.5 Assign processors to instruments
Assigning processors to instruments is done on the Processor Configuration form. This form is opened using the File→Processor Configuration … menu item on the main form.
Note: If you have just finished configuring processors, this window will still be open.
The configuration form is shown below:
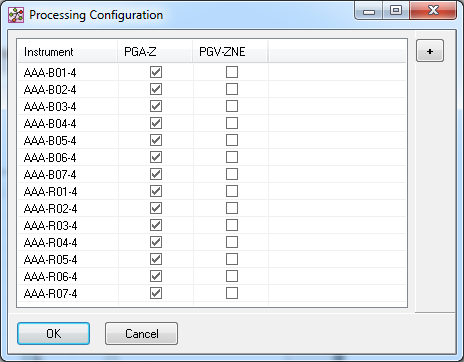
Click on a check box in the grid to select or deselect a processor for an instrument. There are short-cuts in the drop down menu to select all, to select none or to invert the current selection.
If any changes have been made, closing the form using the  button will cause the application to re-initialise all instruments and their processors.