Chapter 6. Configuration
All DCM modules feature an on-board Web server, which you can use to set up the unit. When you first connect to the module, you will be shown a menu tree in a panel on the left, with a summary of its current status on the right.
The configuration options are accessed towards the bottom of the menu tree, under Configuration. There are several pages of configuration options.
Once you have changed settings on any page, click Save changes at the bottom of the page to make the DCM apply them. If you move to a different page without clicking Save changes, your changes will be lost.
This chapter describes all the settings available to users of the DCM. The name of each setting is shown on the Web page interface, and can also be used to access the setting using the gcfgdbset command (see Section 8.2, page 117.)
For each setting, you will have the option to
enable or disable the setting (on/off, yes/no, etc);
choose from a drop-down list of options; or
enter your own information in a text box.
In each case, the Web interface describes the values the DCM will accept.
If you are using gcfgdbset, and you try to change a setting to an unsupported value, the program will report an error.
Note: The DCM is a flexible unit which can be supplied with a range of feature sets depending on your requirements. A stand-alone DCM unit normally has most of these options available to the user. However, some of the settings described below may not be relevant to your installation, and thus will not be available. If you are unsure which packages you will need, contact Güralp Systems.
A DCM may be supplied which supports multiple instances of a particular service (e.g. several CD1.1 transmitters.) In this case, each instance will have its own configuration page, which will appear as described below for that service. Users of installations which include several types of DCM or AM (Authentication Module) will find that each unit offers a different range of configuration options, according to its specialization as a component in the system.
6.1 General
This page contains settings which help you identify the DCM.
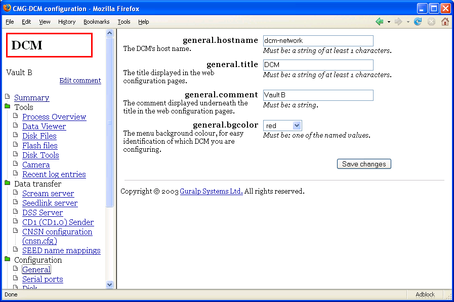
general.hostname : This is the host name the DCM will use to identify itself on the network. It is normally the first part of the module's fully-qualified domain name. For example, a DCM at myinst.bignet.org would have its host name set to myinst.
general.title : This is the title displayed inside the coloured border at the top of the left-hand menu.
general.comment : This is an optional comment displayed beneath the title in the left-hand menu.
general.bgcolor : Select a value from the drop-down box to choose the colour of the title border. For example, you might choose to assign a particular colour to all DCMs at one location.
If you change general.title, general.comment, or general.bgcolor, the left-hand menu will not change in your browser when you Save changes. You will need to reload the page, or open it in a new browser window.
6.2 Serial ports
Clicking on Configuration – Serial ports displays the serial port table.
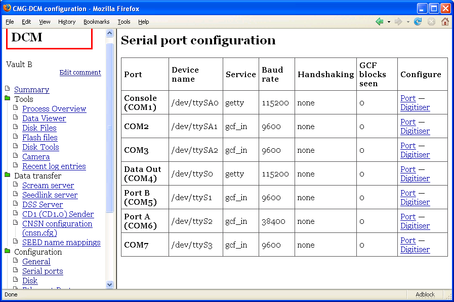
Every serial port on the DCM's internal board is listed in this table.
Port : This column shows the DCM's name for each port. A stand-alone DCM has three RS232 serial ports brought out on 10-pin mil-spec connectors, labelled PORT A, PORT B and DATA OUT.
The labelling is provided for convenience; you can change it if it does not match your site requirements. Each port may be used for communication in either or both directions.
Note that the standard DCM does not expose the Console (COM1), COM2 or COM3 ports. The external ports begin at COM4.
Device name : This column gives the Linux device name for each port. You may need this if you want to write your own scripts.
Service : The service currently running on the port (by default, getty.)
Baud rate : The current baud rate of the port (by default, 115200.)
Handshaking : The handshaking protocol currently being used on the port, if any (by default, none).
GCF blocks seen : The number of GCF blocks which have been received on this port. This will only be non-zero for ports set to gcf_in.
Configure : This column contains links allowing you to configure each port, and the digitizer attached to it (if there is one.)
Configure – Port
When you click on a Configure – Port link, the port's configuration page is displayed.
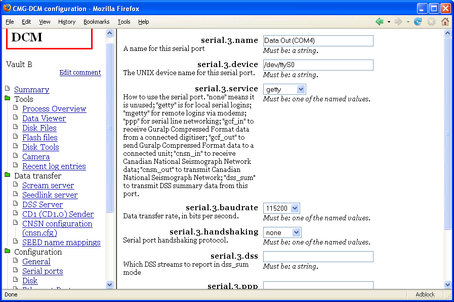
Each serial port has its own configuration screen, with a number of options beginning serial.x (where x is the internal number of the serial port). The configuration options for all the ports are as follows:
serial.x.name : The name of this serial port, as shown in the serial port table.
serial.x.device : The pathname of the Linux device corresponding to this serial port. You should not need to change this option.
serial.x.service : How the DCM will use each serial port. There are five options:
getty : The port will listen for logins from a connected computer. Once logged in, the user will have direct command-line access to the DCM's Linux operating system.
mgetty : The port will listen for logins over a connected serial modem. Again, a logged-in user will be presented with the DCM's Linux command line.
mgetty-r : The port will listen for logins over a connected serial modem which is operating in raw mode (i.e. which does not support the standard AT modem commands.) This option in runs the Linux command mgetty -r. A port running the mgetty-r service will also listen for incoming PPP frames, and if it detects one will configure the PPP link according to the /etc/mgetty+sendfax/login.config file (see Section 6.11, page 100.)
ppp : The port will provide a PPP link to a connected computer. Once set up on the computer, the DCM will appear as if on a local TCP/IP network. You can then log in to it using ssh or use its Web-based administration system, as well as receiving data.
Before a PPP link will function, you will need to specify the PPP options and (if using CHAP) provide a chap-secrets file. This can be done through the DCM configuration interface: see see Section 6.11, page 100. Also see the Linux manual page for pppd(8) for an explanation of how PPP is implemented.
gcf_in : The port will receive data from a GCF-compatible digitizer.
gcf_out : The port will send GCF data directly to the connected device as it is received. A number of programs are available for PCs which handle incoming GCF data streams, such as Scream!, Antelope, and Earthworm. The DCM transparently merges all incoming data streams, so if you are using Scream!, you can also configure and control attached digitizers using its own interface.
cnsn_in : The module will use this port to receive raw data using the CNSN protocols. If you use this service, there must be exactly one cnsn_in and one cnsn_out port.
cnsn_out : The module will this port to transmit authenticated data using the CNSN protocols. If you use this service, there must be exactly one cnsn_in and one cnsn_out port.
dss_sum : The port will transmit DSS summary data. Which data is transmitted depends on the value of serial.x.dss, below.
serial.x.baudrate : This option alters the speed of communication across each serial link, in bits per second.
For ports connected to digitizers, you should ensure that the baud rate is high enough to allow all the data to be transmitted at the rates you have chosen. As an example, for three streams transmitting at 100 Hz, a rate of 9600 baud is usually sufficient. Modern modems can normally operate at rates up to 57600 baud (~56 kbits/s), although the telephone or transmission lines may not support such a high rate. The same is true of radio telemetry links.
The DCM's serial ports operate using frames of 8 data bits, no parity bits, and one stop bit.
serial.x.handshaking : The flow-control (handshaking) protocol used across each serial link. There are three options:
off : Transmit data across the serial link without handshaking, i.e. assume that the link is always ready to send or receive data.
rts/cts : Use the Ready To Send/Clear To Send handshaking method, where two separate lines within the serial cable are used to control the flow of data. This is the most reliable method since accomplished in hardware, but is not feasible for long-distance or complex connections.
xon/xoff : Send the two special characters ^Q (17) and ^S (19) as part of the data stream to request that data transfer be started and stopped. This method requires only a single connection, but assumes that the special characters will be received correctly every time.
serial.x.dss : If you have set the serial.x.service option to dss_sum, this option lists the DSS data types that will be transmitted. If the port is not running the dss_sum service, this setting will be ignored.
serial.x.ppp : If you have set the serial.x.service option to ppp, the DCM will use the standard Linux command pppd to manage the PPP service for this port. The serial.x.ppp option allows you to add command-line options to pppd which are specific to this port. The command-line options are fully described in the Linux documentation for pppd.
If the port is not running the ppp service, this setting will be ignored.
Any options which apply to all serial ports running the ppp service should be placed in the /etc/ppp/options file instead (see Section 6.11, page 100.
serial.x.ack_nak_timeout : If you have set the serial.x.service option to gcf_out, this option sets the length of time, in milliseconds, that the DCM will wait for a response to each GCF block sent from this port, before giving up and sending the next one.
This option has the same effect as the MS-GAP command on a DM24.
If the port is not running the gcf_out service, this setting will be ignored.
Configure – Digitizer
Clicking on Configure – Digitizer opens a page allowing you to reconfigure the digitizer attached to the port, if there is one.
When the page loads, the DCM attempts to retrieve the current configuration of the digitizer attached to that port. This will take a few seconds, after which the message Configuration successfully retrieved from attached instrument should appear together with a form detailing the available settings.
If the DCM cannot find a digitizer attached to the port, it will give the message Unable to retrieve configuration from attached instrument. In this case you should
check that an instrument is connected to the port you clicked, and that it is powered up;
check that the baud rate of the serial port (see Section 6.2, page 82) matches the output baud rate of the digitizer; and
check that the DCM is running the gcf_in service on the port.
For a full description of the digitizer settings you can change, see Chapter 7, page 105.
6.3 Disk
On this page you can set how the DCM uses its hard disk, and what data it records.

If you want to check that the hard disk is working, explore its contents, or format it, you should use the Tools – Disk tools page instead.
At the top of the window are two sets of options, disk.recordas... and disk.recordfrom....
Data recording formats: disk.recordas
The disk.recordas section tells the DCM which formats to record data on the disk.You can record simultaneously from any number of ports and in any number of formats. If you record in several formats simultaneously, you should make sure that you have the capacity to store all the data the DCM will produce, or the bandwidth to transfer it.
For example, if you set all the disk.recordfrom options to yes, disk.recordas.gcf to yes, and the other formats to no, the DCM will record GCF data from all serial ports on the disk. This is the default behaviour.
Files are not immediately written to the disk, but into Flash memory; the options disk.usagemode and disk.writeinterval, below, control how often the DCM flushes new data to the disk, and what it will do if the disk becomes full.
disk.recordas.gcf : Set this to yes to have the DCM record Güralp Compressed Format data files. We recommend that you leave this option set to yes, because Güralp Systems digitizers output natively in this format. If you record in a different format, and do not keep the original GCF data, information will be lost.
disk.recordas.miniseed : Set this to yes to have the DCM record files in miniSEED format.
MiniSEED uses the FSDN SEED channel naming convention. Before enabling this option, you will need to tell the DCM which data streams to output, and what SEED channel codes to use for each one. This is done on the Data transfer – SEED name mappings page: see Section 5.7, page 75.
disk.recordas.seed : Set this to yes to have the DCM record full SEED volumes on the hard disk.
This option will have no effect until you create a SEED recorder configuration file. See Section 6.4, page 91, for information on these options.
disk.recordas.sac : Set this to yes to have the DCM record files in SAC format.
disk.recordas.ascii : Set this to yes to have the DCM record files in ASCII format. Enabling this option produces very large files, and is not supported in the default distribution. If you need ASCII output, you must install the asciirecorder package from the Linux command line, using the command
ipkg install asciirecorder
The ASCII files have a simple format. After a header line, each line contains two decimal numbers separated by a tab.
The first number is the UNIX time of the sample (i.e. the number of seconds since 00:00:00 UTC on January 1, 1970). The second is the absolute sample value at that time. Samples are not guaranteed to be present in time order.
Data sources: disk.recordfrom
Each serial port has an option in the disk.recordfrom section which enables recording from that port. If you set the disk.record.from option for a port to yes, the DCM will record all the data coming from the port on the disk.
disk.recordfrom.serial.n : Each of these options refers to a serial port on the DCM by its number. Select yes to have the DCM record data coming into this port.
disk.recordfrom.log : Set this to yes to make the DCM record its own system log onto the disk. The system log is split up into time blocks in the same way as the other data (see disk.recordinterval, below.)
Status blocks from digitizers are part of the GCF data, not part of the log. To record these, you need to enable disk.recordas.gcf. If you also enable disk.recordsplit (see below), each status stream will be recorded in its own file.
disk.recordfrom.coalesce : The DM24 digitizer can be configured to produce GCF blocks more quickly than normal. This may be done, for example, to reduce the latency in data transmission. Blocks produced this way may not all be full, so space will be wasted. You may also experience problems with recording bandwidth.
Enabling this option makes the DCM build full GCF blocks from the data it receives (a process known as re-blocking) before saving it to disk. You should only need to enable this option if you are using the low latency features of the DM24 digitizer. It is disabled by default.
Other disk options
disk.power : To save power, the on-board hard disk can be set to power up only when required. If power consumption is an issue and you expect the hard disk to be used only occasionally, you should set this option to automatic. Otherwise, setting it to always-on will ensure that the hard disk is always ready to receive data. If you intend to operate an internal disk continuously, you should take care not to let it overheat, since the interior of the DCM is well insulated.
disk.usagemode : This setting varies the way the DCM uses its hard disk storage once it has been filled up.
The use-once option causes the DCM to stop recording data to the hard disk, and discard any new data that arrives. It may still send new data over the network, if you have so configured it, but the hard disk will be untouched once full. Thus the start point of the stored data is known, but the end point depends on the disk capacity. This is most useful for installations where you are expecting to replace the hard disk periodically, or where you need to take time-synchronized readings at several sites.
The recycle option causes the DCM to delete the oldest data files on the hard disk to make space for incoming data. This way, the end point of the stored data is known (it always includes the most recent block of data), but the start point depends on the disk capacity.
disk.recordinterval : The DCM writes all the data streams it has been instructed to record into a file in its Flash memory. With the default setting active, the system starts a new file every 3 hours, alternating between the two Flash memory banks (see Section 8.1, page 116.) The 3-hour interval is called a watch.
For those formats which can only deal with single streams, the DCM opens a file for each stream, starting a new set of files every watch.
You can make watches shorter by setting disk.recordinterval, which is expressed in seconds. The options are
10800 seconds, or 3 hours;
3600 seconds, or 1 hour;
1800 seconds, or 30 minutes.
The recording interval needs to be chosen with care, bearing in mind how you will use the DCM.
If files are larger than 25% of the Flash memory capacity, the DCM may encounter problems, because the disk manager only starts transferring files when the Flash memory is over 75% full.
If a large file fills up the Flash memory before it is finished, the DCM's watchdog process may force a reboot.
In any case, files recorded by the DCM must never exceed 16 Mb owing to internal limitations.
Each recording process keeps files open in Flash memory whilst it is writing to them. For MiniSEED and SAC files, and also for GCF files if the disk.recordsplit option is active (see below), a file is opened for every stream the DCM encounters.
The Linux operating system enforces a limit of 1024 files which can be open at once.
You will only approach this limit if you are running several recording processes on a large number of streams. If you do, you may find that decreasing disk.recordinterval helps.
The Flash filesystem can store up to 262144 files. It is unlikely you will approach this limit under normal conditions.
Files are given names in the format
yyyyjjjThhmmss-wwwww-WWWWW-ssssssss.eee
where yyyy is the current year, jjj is the day of the year, hhmmss is the start time of the watch, wwwww is the watch number, WWWWW is the number of watches, ssssssss is an 8-digit serial number (for uniqueness), and eee is an appropriate file extension for the format used.
For file types which do not support multiple streams, and also for GCF files if disk.recordsplit is enabled (see below), the Stream ID SSSSS is also included. This produces names in the format
yyyyjjjThhmmss-wwwww-WWWWW-ssssssss-SSSSS.eee
disk.recordsplit : By default, GCF files saved to Flash memory contain all the GCF blocks which have been received on the active ports.
Setting disk.recordsplit to yes instructs the DCM to look through the incoming GCF data and save a separate file for each incoming stream.
If you enable disk.recordsplit, you should make sure the DCM does not produce too many files: see above for details.
disk.heater : A heater is provided in the internal enclosure of the DCM to bring the on-board hard disk up to operating temperature when required. If you are using an on-board hard disk, you should set this option to automatic and choose a suitable operating temperature below. If you are not using an internal hard disk, you should disable the heater by setting this option to off.
disk.temperature : The minimum operating temperature of the on-board hard disk, in degrees Celsius. If you have set the internal heating to automatic, you should enter a suitable operating temperature here. The hard disk will not function properly below 0°C. With the heater active, the DCM is designed to operate in ambient temperatures up to 40 degrees below zero.
6.4 SEED recorder
The DCM can compile full SEED volumes in real time. To enable this, select yes for the disk.recordas.seed option under Configuration – Disk (see above.)
A configuration file, /etc/seed.cfg, is provided allowing you to provide technical information about the streams to be recorded in SEED format. The DCM will only write SEED volumes for streams mentioned in this file.
Clicking SEED configuration brings up a page in the work area which enables you to edit the file and its attributes directly.
The Web interface does not check that the content of the files will be understood. You should ensure that the file is valid before committing any changes.
The format of the file is as follows:
HPA1Z2:::::CMG-3_120S_50HZ:CMG-DM24mk3:V9.800E-01:1.6E-07:46
HPA1N2:::::CMG-3_120S_50HZ:CMG-DM24mk3:V9.400E-1:1.6E-07:46
HPA1E2:::::CMG-3_120S_50HZ:CMG-DM24mk3:V1.050E00:1.6E-07:46
Each line represents an incoming stream from the digitizer; the fields are separated by colons, and are in turn:
the digitizer's stream ID;
a SEED network name for the array (or leave blank to have the DCM generate one automatically);
a SEED station name for the station (or leave blank to have the DCM generate one automatically);
a SEED location name for the instrument (or leave blank to have the DCM generate one automatically);
a SEED channel name for the stream (or leave blank to have the DCM generate one automatically);
a case-sensitive code for the sensor type (see Section 10.1, page 130);
a case-sensitive code for the digitizer type (see Section 10.2, page 131)
the sensitivity of the sensor, prefixed with a V for a sensitivity in V/m/s, or A for a sensitivity in V/m/s2 (in the example, around 1 V/m/s).
Note that the unit follows directly after the sensitivity, with no colon.
The sensitivity is given on the sensor's calibration sheet. The sensitivity of a sensor integrated with a digitizer is quoted as a single-ended sensitivity, whilst stand-alone digitizers are provided with their differential sensitivity. A differential sensitivity is quoted as, e.g. 2 × 3000 V/m/s. In this file, you should use the doubled value, i.e. 6000 V/m/s, for a stand-alone digitizer. For integrated digitizers, you should use the single-ended value quoted.
the sensitivity of the digitizer, in volts per count (here 1.6 × 10⁻⁷ V/count = 0.16 μV/count). This is given on the digitizer's calibration sheet.
the decimation sequence code. This is an integer between 0 and 239 which describes the sequence of filters in use by the digitizer. If you have a recent digitizer (with firmware newer than version 0.91) this information is included in the incoming GCF streams, so you can leave this field blank. The codes corresponding to each possible decimation sequence are available from the support section of the Güralp Systems Web-site.
When you have finished editing the file, clicking Save changes will write the changes to disk. The changes will not take effect, however, until the SEED service is restarted.
To restart the SEED recorder, browse to the Tools – Process Overview page and find the entry for the seedrecorder process. Click the Restart link in this entry.
6.5 Ethernet port
The Configuration – Ethernet Port page contains the configuration settings for the DCM's network interface.
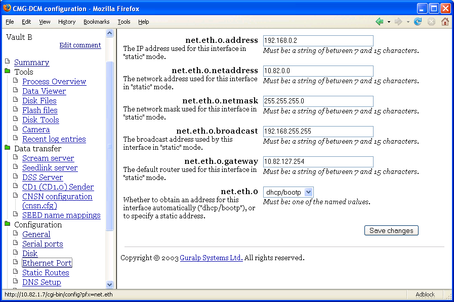
The settings described below begin net.eth.0 because they refer to the first Ethernet interface. If there are several Ethernet interfaces on your DCM, there will be an Ethernet Port page for each one.
net.eth.0 : If you know the IP address the DCM is going to use over this interface, you should set this option to static and fill in the details below. Alternatively, you can select dhcp/bootp and have the DCM automatically request an address over the network. If you choose the dhcp/bootp option, you should ensure that a gateway computer exists on your network that can receive these requests, and that the DNS (nameserver) entry for the DCM is kept current. You can then ignore the remaining settings on this page.
net.eth.0.address : If the above option is set to static, you should fill in the IP address of the interface in this box. Valid IP addresses consist of four numbers between 0 and 255, separated by periods. If you intend to attach the DCM to a private network, you should use an IP address in one of the private ranges (10.b.c.d; 172.16-31.c.d; 192.168.c.d) to avoid clashing with addresses on the wider Internet.
If the net.eth.0 option is set to dhcp/bootp, this configuration setting has no effect.
If you are configuring the DCM over an SSH connection, changing any of the remaining options will cause you to lose contact with it. You will have to log in to the DCM again (using the same IP address) to continue configuring.
net.eth.0.broadcast : The broadcast IP address used by the interface. This can often be derived from the IP address by replacing numbers at the end with 255.
net.eth.0.gateway : The IP address of the gateway machine (router) on your network.
net.eth.0.netmask : The network mask to use for the IP interface. A DCM with an IP address in the domain 192.168.1.x would normally use a netmask of 255.255.255.0.
net.eth.0.netaddress : The network address of the DCM. A DCM with an IP address in the domain 192.168.1.x would normally use a network address of 192.168.1.0.
6.6 Static routes
In addition to the standard IP routeing mechanisms, you can define up to 4 additional static routes from the DCM to other parts of the network.
These routes are set on the Configuration – Static Routes page.
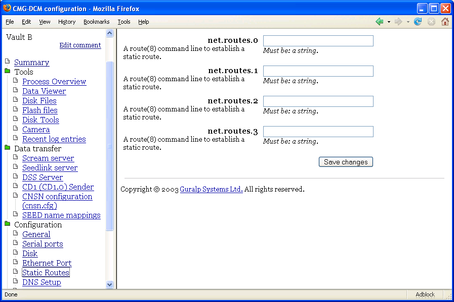
The routes are specified as arguments to the standard Unix route command. For example, if you wanted the DCM to route traffic to and from IP addresses beginning 192.168.0. over the eth0 interface, you would include the line
add -net 192.168.0.0 netmask 255.255.255.0 dev eth0
in the list.
For more information on the route command, please see its Linux manual page.
6.7 DNS setup
The settings on the Configuration – DNS setup refer to the Domain Name Service (DNS) used by the DCM, which translates numeric IP addresses into names.
It is not essential that you set up DNS for the DCM to work, or to update the software.
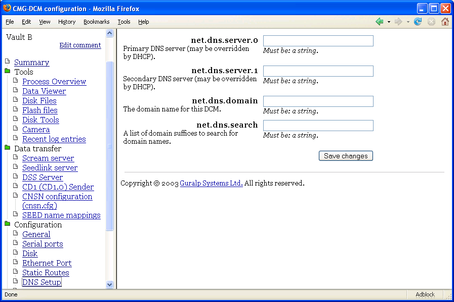
net.dns.domain : The name of the domain containing the module. For example, a DCM at myinst.bignet.org would have its domain set to bignet.org.
The rest of the settings on this page determine how the DCM determines the addresses of other hosts on the network from their host names.
net.dns.search : If the DCM encounters an unqualified hostname in any of its configuration settings, or in a command, it will look for that name in each of the domains specified here in turn. You should give the domains to search in their correct order, separated by commas. The DCM's own domain (as given in the net.dns.domain setting) will always be searched first, so you need not specify it here.
net.dns.server.0 : The IP address of the primary nameserver used to resolve host names. If you are using dhcp/bootp, the DNS service is negotiated automatically, and so this setting may be ignored.
net.dns.server.1 : The IP address of the secondary nameserver. Again, you may be able to ignore this setting if you are using dhcp/bootp.
6.8 Incoming mail setup
This page enables you to set up the DCM to retrieve e-mail from a POP3 or IMAP server on the network, either unencrypted or secured using TLS (transport-layer security.)
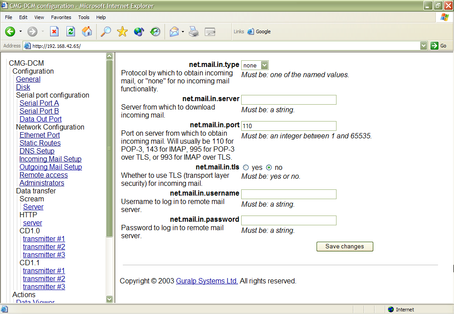
If you do not need the DCM to be able to fetch mail, select None from the net.mail.in.type drop-down menu and ignore the remaining settings.
Not all DCMs have mail capabilities installed.
net.mail.in.password : The password needed to log in to the mail server.
net.mail.in.port : The number of the port to connect to on the mail server. This generally depends on the protocol used to retrieve mail:
For pop3 mail, this port will normally be 110, or 995 for secure POP3 over TLS (transport-layer security).
For imap mail, this port will normally be 143, or 993 for secure IMAP over TLS.
net.mail.in.server : The hostname or IP address of the mail server.
net.mail.in.tls : Select yes to encrypt the incoming mail channel with TLS, no to leave communications unencrypted.
net.mail.in.type : Select pop-3 or imap to use that protocol to retrieve mail from the server. If you do not need the DCM to be able to receive mail, select None.
net.mail.in.username : The username needed to log in to the mail server.
6.9 Outgoing mail setup
This page enables you to send mail from the DCM using the SMTP protocol. Both authenticated (i.e. sending a username to the server) and unauthenticated SMTP are supported, as is encryption using TLS (transport-layer security.)
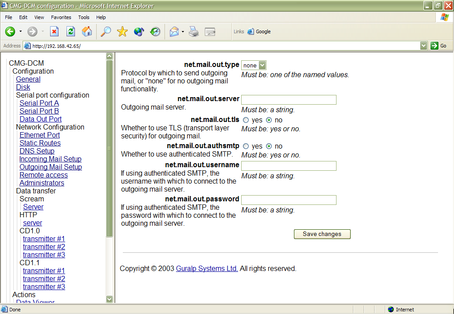
If you do not need the DCM to be able to send mail, select None from the net.mail.out.type drop-down menu and ignore the remaining settings.
Not all DCMs have mail capabilities installed.
net.mail.out.authsmtp : Select yes and give a username and password in the fields below to use authenticated SMTP for outgoing mail.
net.mail.out.password : The password needed to log in to the outgoing mail server, if using authenticated SMTP.
net.mail.out.server : The hostname or IP address of the outgoing mail server.
net.mail.out.tls : Select yes to encrypt the outgoing mail channel with TLS, no to leave communications unencrypted.
net.mail.out.type : Select smtp to use that protocol to send mail to the server. Currently only SMTP is supported. If you do not need the DCM to be able to send mail, select None.
net.mail.out.username : The username needed to log in to the outgoing mail server, if using authenticated SMTP.
6.10 Remote access
The settings on this page determines which ways you can use to access the DCM over a TCP/IP network.
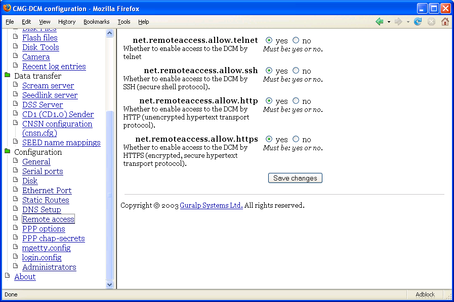
If all these methods are disabled, you may still be able to connect to the DCM over a serial link using getty (see serial.x.service, above), or over a direct modem connection. Your settings will come into effect as soon as you click Save settings, so you should ensure that you have a backup means of communication with the DCM before disabling these methods.
net.remoteaccess.allow.telnet : Select yes to allow telnet clients to log in to the DCM's Linux operating system, or no to disallow connections over telnet. Select no to disable it. By default, this method is disabled for security reasons.
net.remoteaccess.allow.ssh : Select yes to allow SSH clients to log in to the DCM's Linux operating system, or no to disallow connections over SSH. By default, this method is enabled.
net.remoteaccess.allow.http : Select yes to allow access to the Web-based administration system by unencrypted HTTP. (A username and password will still be required, but they are sent over the network insecurely.) Select no to disable it. By default, this method is disabled for security reasons.
net.remoteaccess.allow.https : Select yes to allow access to the Web-based administration system by HTTPS (secure HTTP), or no to disable it. By default, this method is enabled.
6.11 PPP
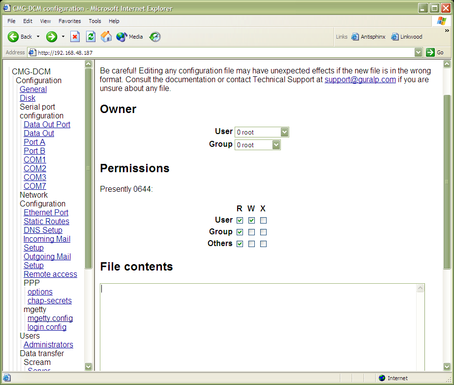
These pages allow you to alter the PPP configuration files, /etc/ppp/options and /etc/ppp/chap-secrets.
These two files are required by the Linux PPP server, and affect all ppp services on the DCM. Separate PPP options for each port may be specified under Serial port configuration; see above.
The /etc/ppp/chap-secrets file is only necessary if you are using CHAP to authenticate PPP connections.
Clicking on either of these entries brings up a page in the work area which enables you to edit the file and its attributes directly, including
the ownership of the file;
the permissions (read, write, or execute) of the file for its own user, its own group, and all others; and
the content of the file.
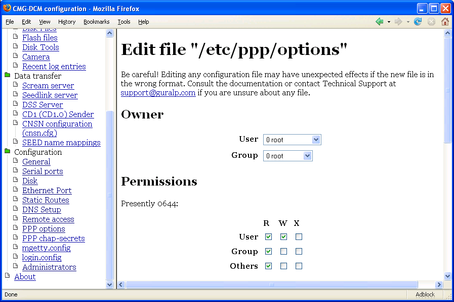
The Web interface does not check that the content of the files will be understood. You should ensure that the file is valid before committing any changes, referring to the Linux manual page for pppd(8) if you are unsure.
When you have finished editing a file, clicking Save changes will write the changes to disk. The changes will not take effect, however, until the PPP services are restarted. You can restart all running PPP services by clicking Restart PPP; whilst this occurs, the network will be briefly unavailable.
The file /etc/ppp/options sets the default options for the PPP daemon. These will be applied to all PPP connections and to any of the serial ports which are running the ppp service. The file is treated as a list of words, each either an option or an argument to a previous option. For a list of the available options, and a full explanation of the format of the /etc/ppp/options file, see the Linux manual page for pppd(8).
You can specify additional options for each serial port separately using the serial.x.ppp configuration option, which can be found on the Serial port configuration page for that port.
The file /etc/ppp/chap-secrets contains secrets for pppd to use when it authenticates itself to other systems, and also when it authenticates other systems to itself. Each line in a secrets file contains (at least) the name of a client, the name of the server, and a secret specific to that particular combination of client and server.
For a full explanation of the format and usage of the /etc/ppp/chap-secrets file, see the Linux manual page for pppd(8).
6.12 mgetty configuration
The next two entries in the menu allow you to alter the mgetty configuration files, /etc/mgetty+sendfax/mgetty.config and /etc/mgetty+sendfax/login.config.
Clicking on either of these entries brings up a page in the work area which enables you to edit the file and its attributes directly, in the same manner as the PPP configuration files above.
The Web interface does not check that the content of the files will be understood. You should ensure that the file is valid before committing any changes, referring to the Linux manual page for mgetty(8) if you are unsure.
When you have finished editing a file, clicking Save changes will write the changes to disk. The changes will not take effect, however, until all mgetty services are restarted. You can restart all running mgetty services by clicking Restart mgetty; whilst this occurs, the network will be briefly unavailable.
The file /etc/mgetty+sendfax/mgetty.config is the main configuration file for mgetty.
For full details on the format of the file and the options available, see the explanatory comments within the file, or the Linux info documentation for mgetty.
Normal user logins are handled by the program /bin/login. However, you may want to run a different program to handle logins by certain users. You can do this by editing the file /etc/mgetty+sendfax/login.config.
For full details on the format of the file, see the explanatory comments within the file, or the Linux info documentation for mgetty.
6.13 Administrators
This page allows you to add new users to the DCM, and change the passwords of existing users.
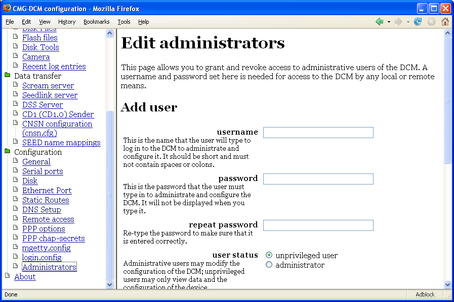
Users of the DCM can be one of two kinds.
Unprivileged users can log in or view the Web interface of the DCM, including its current configuration, but cannot change any of the options, nor configure any instruments attached to the DCM
Administrators may change settings or configure attached digitizers as they please.
You may want to give different users separate accounts for tracking or other purposes, or to allow users to set their own preferences when logging in. Alternatively, you may prefer to restrict access only to those with administrative requirements, by removing any unprivileged user accounts. If you want to access the DCM by any means, locally or remotely, you must have a username and password on the list given here.
If this is the first time you have logged in to the DCM, there will be a single user, root, whose password is factory-set. To add a new user, fill in their username and password in the top two boxes of the page. Repeat the password in the next box, to ensure it is entered correctly (since it will not be visible on screen), and click on Add user. A username may not contain spaces or colons.
You should be shown an acknowledgement screen, indicating that the new user account has been created. The user will be able to log in with that username and password by any of the methods currently available to the device, and from any location. More complex access controls cannot be performed through the Web administration system, although you can of course use the features of the DCM's underlying Linux operating system to implement them if required.
To remove a user account, choose their username from the drop-down box below Existing accounts and click Delete user. If you delete your own account, you will no longer be able to log in to the DCM, although you may finish what you are doing in the current session.
You can also change the password for any account, for example if you believe it to have been compromised, or if you are assigning it to a new person. To do this, choose their username from the same drop-down box and repeat the new password in the two boxes at the bottom of the page. Again, the password will not be visible on screen. Click Change password to make the change.