Chapter 13. Building Networks
13.1 GDI-link
The GDI-link protocol provides the most efficient means of exchanging data between two systems running Platinum firmware. GDI is the native data format of the central data multiplexer, the gdi-base module, and GDI-link allows highly efficient, low latency data exchange between two such multiplexers without the overhead of any additional protocol conversion. State of health information is attached to samples before transmission.
GDI links have transmitters, which send data, and receivers which receive it. These terms do not refer to the direction of initiation of the network connection: a receiver can initiate a connection to a transmitter and vice versa.
A single GDI-link receiver can accept data from multiple transmitters and a single transmitter can send data to multiple receivers, allowing maximum flexibility in configuring seismic networks.
Caution: The GDI link transmitter generates back-fill files which it does not delete. If ignored, these files will accumulate and eventually fill the file system. It is necessary to configure a directory cleaner to remove these files. See section 13.1.1.3 for details.
13.1.1 The GDI-link transmitter
To configure a GDI-link transmitter via the web interface select:
Configuration → Services → GDI
or
Configuration → All options → System services → GDI
Now select “gdi-link-tx - GDI link transmitter”. The screen shows a list of all GDI link transmitter instances that have been configured on the acquisition module.
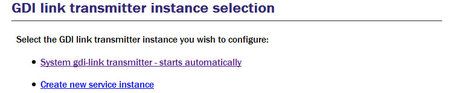
In most circumstances you will only need a single GDI link transmitter but this screen allows you to create more if desired.
To configure the transmitter, click on the link corresponding to the required instance.
13.1.1.1 Configurable parameters in simple mode
The configurable parameters for the GDI link transmitter have four tabbed pages in simple mode: General, Network, Backfill and Push.
General
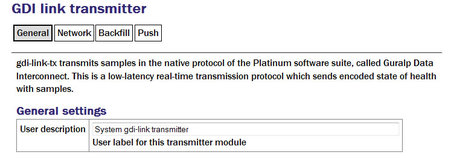
User description: Can be changed if desired. This may be useful if you have multiple instances. This description is seen when viewing running services or configuring instances. It is not seen by the clients.
Subsequent instances can be enabled or disabled with a check-box but this is absent from the page for the default instance because the default instance is always enabled.
Network
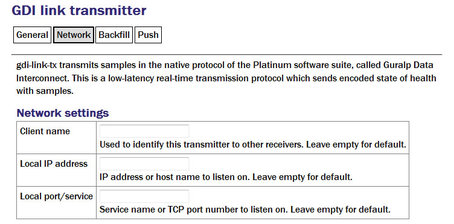
Client name: Set to the instance name as seen by the client. A suitable default is used if this field is left blank.
Local IP address: If the acquisition module has multiple network addresses, it can be restricted to listen for incoming connections on only one of them by entering its address here. If left blank, the transmitter will listen on all available instances.
Local port/service: The default service (port) for the transmitter is 1565 but an alternative port can be entered here if required.
Back-fill
Back-fill is the process whereby missing data are recovered.
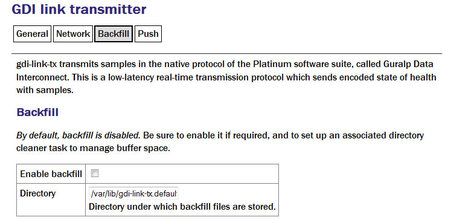
Enable backfill: If selected enables the back-fill transmission.
Directory: The default directory for back-fill data.
Caution: Unless, managed, back-fill files will accumulate ultil they fill the disk, which will disable the system. It is essential to configure a directory-cleaner instance to manage these files: see section 13.1.1.3 for details.
Push
The push tab contains a table within which you can configure the GDI link clients to which this transmitter should send data.
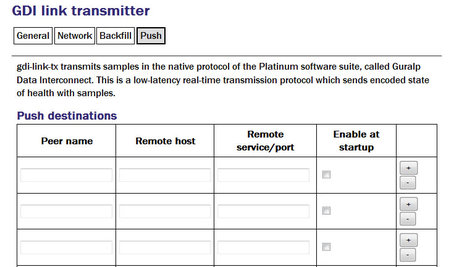
For each client, you should set:
Peer name: Should match the server name configured in the client (receiver) at the remote end of the link
Remote host: The DNS name or IP address of the GDI link client
Remote service/port: The default is 1566 but, if you have configured a different port on the GDI link client, you should enter the same port here.
Enable at startup Controls whether the service enables at startup.
Clicking the  button on any row will open a new row. In the same way, rows can be deleted by clicking the corresponding
  button.
13.1.1.2 Additional options available in expert mode
The following additional configuration parameters are available by clicking the “Expert” button at the bottom of the form and selecting the 'Advanced' tab.
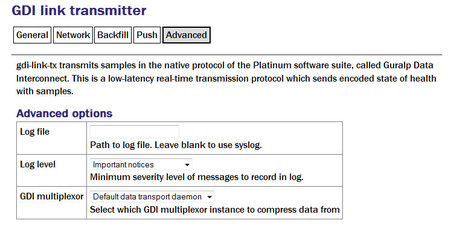
Log file: It may sometimes be desirable, for debugging purposes, to separate log messages for this transmitter from the standard system log. The text field can be populated with a path name which will then be used for dedicated logging. If left blank, logging occurs (via the standard Linux syslog facility) to /var/log/messages.
Log level: The drop-down menu controls the level of detail present in log messages, whether to syslog or to a dedicated log file. Not all of the standard syslog logging levels are available. The menu offers a choice (in order of decreasing detail) of:
Debugging information;
Informational messages;
Important notices; or
Warnings
GDI multiplexer: In most configurations, all data for all transmitters is taken from a single multiplexor, as described in section 6.1. For more complex configurations, it is possible to configure multiple multiplexers, each with their own set of input and output services. In these situations, the drop-down menu can be used to select a multiplexer instance with which to associate this transmitter. The menu offers a list of currently configured multiplexers.
13.1.1.3 Managing back-fill files
Unless, managed, back-fill files will accumulate ultil they fill the disk, which will disable the system. It is essential to configure a directory-cleaner instance to manage these files. One directory cleaner instance is required for each gdi-link-tx instance.
Instructions for creating a new directory cleaner instance are in section 14.5.1. Configure the parameters are follows:
Directory: this should be the location of the back-fill directory for the gdi-link-tx instance. The first instance uses the directory /var/lib/gdi-link-tx.default by default but, if you have changed this, you should specify the new location here.
File sorting: set to “Lexical”.
Maximum used space or Maximum number of files: use either or both of these to limit how much back-fill is retained. The gdi-link-tx back-fill process generates one file per hour so setting Maximum number of files to 24, for example, will guarantee 24 hours of back-fill.
Note: The size of the back-fill files varies with data compressibility. If you specify a large number of files to be retained, you should monitor operation for several hours and then check that the configured number of files multiplied by their average size does not exceed the free space on the disk.
13.1.2 The GDI link receiver
To configure a GDI link receiver via the web interface select:
Configuration → Services → GDI
or
Configuration → All options → System services → GSI
Now select “gdi-link-rx - GDI link receiver”.
The screen shows a list of all GDI link receiver instances that have been configured on the acquisition module.
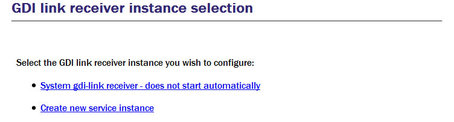
In most cases, you will only need a single instance and you can enable and reconfigure the Default Instance for your requirements.
13.1.2.1 Configurable parameters in simple mode
The configurable parameters for the GDI link receiver have three tabbed pages in simple mode: General, Network and Servers.
General
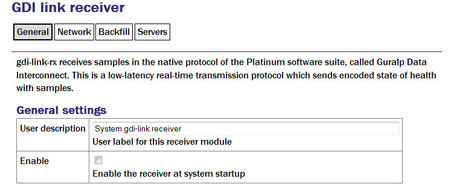
User description: Enter a descriptive name for the instance: this is useful if you are configuring multiple instances but, in most cases, this can be set to the hostname of the acquisition module.
Enable: Enables the receiver at system startup if selected.
Network
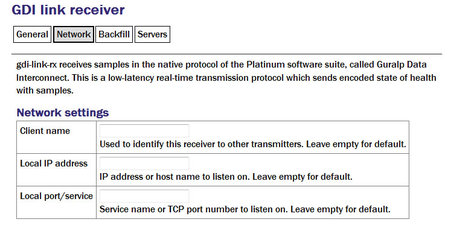
Client name: Optional name visible from the GDI link server.
Local IP address: If the GSL-EAM has multiple network addresses, you can limit the GDI link receiver to use only one of them by entering it in this field. If left blank, the receiver will listen on all configured addresses.
Local port/service: The default GDI link port is 1566 but this can be over-ridden if desired - you would want to do this if you had multiple instances running on the same address by entering a port name or number.
Back-fill
Back-fill is the process whereby missing data are recovered. It can be disabled if desired but, in most cases, you should leave this enabled.
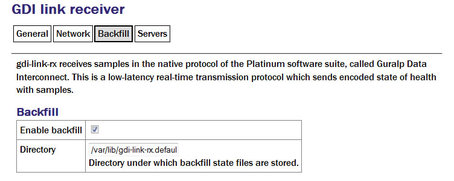
Enable backfill: If selected enables the back-fill transmission.
Directory: The default directory for back-fill data.
Servers
The servers tab contains a table within which you can configure the GDI link servers to which this receiver should listen.
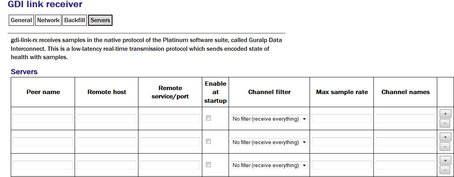
For each client, you should set:
Peer name: Should match the server name configured in the client (receiver) at the remote end of the link
Remote host: The DNS name or IP address of the GDI link server
Remote service/port: The default is 1566 but, if you have configured a different port on the GDI link client, you should enter the same port here.
Enable at startup: Controls whether the service is enabled at start-up.
Channel filtering: The drop down has three options: No filtering, By sample rate or By channel names.
Max sample rate: Enter the maximum sample rate you with to receive from the client
Channel name: Enter the channels names for the data streams you wish to receive.
Clicking the button on any row will open a new row. In the same way, rows can be deleted by clicking the corresponding button.
13.1.2.2 Configurable parameters in expert mode
The following additional configuration parameters are available by clicking the “Expert” button at the bottom of the form and selecting the 'Advanced' tab.
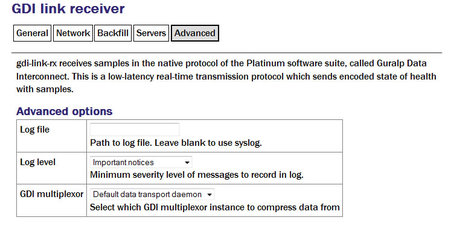
Log file: It may sometimes be desirable, for debugging purposes, to separate log messages for this transmitter from the standard system log. The text field can be populated with a path name which will then be used for dedicated logging. If left blank, logging occurs (via the standard Linux syslog facility) to /var/log/messages.
Log level: The drop-down menu controls the level of detail present in log messages, whether to syslog or to a dedicated log file. Not all of the standard syslog logging levels are available. The menu offers a choice (in order of decreasing detail) of:
Debugging information
Informational message
Important notices
Warnings
GDI multiplexer: In most configurations, all data for all transmitters is taken from a single multiplexor, as described in section 6.1. For more complex configurations, it is possible to configure multiple multiplexers, each with their own set of input and output services. In these situations, the drop-down menu can be used to select a multiplexer instance with which to associate this transmitter. The menu offers a list of currently configured multiplexers.
13.2 Güralp Secure TCP Multiplexer
The Güralp Secure TCP Multiplexer (GSTM) is a method by which TCP connections can be tunnelled in both directions over a single TCP connection. It is an essential tool in situations where local network service providers cannot provide fixed (static) IP addresses.
For example, in an installation involving a single, central data collection point and multiple, remote sensor sites it is sometimes impractical for the sensor sites to be allocated static IP addresses. The use of GSTM allows the remote sites each to initiate a single GSTM TCP connection to the central site. Once established, further TCP connections can be initiated in either direction: their packets are tunnelled over the GSTM link.
If no sites in an array can be assigned fixed IPs, including the central data collection point, a GSL-EAM or GSL-NAM can be installed anywhere that has a fixed IP address and used as a communications hub. All sites initiate GSTM connections to the hub, which can then act as a communications router, forwarding individual connections as required.
The initial link is established from a GSTM client to a GSTM server.
13.2.1 The GSTM Client
To configure a GSTM client from the web interface, select:
Configuration → Services → Network
or
Configuration → All options → System services → Network
Now select “gstm-client - Güralp secure TCP multiplexor client”.
The screen shows a list of all GSTM client instances that have been configured on the acquisition module. To create or edit a GSTM client click the appropriate link.
13.2.1.1 Configurable parameters
The configurable parameters for the GSTM client have three tabbed pages: General, Server and Link.
General tab
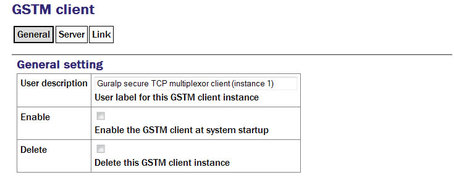
User description: Allows you to enter a mnemonic description of this instance, which may be useful if you intend to run multiple instances.
Enable: Causes this service to start automatically when the system is re-booted. If this check-box is cleared, the service will need to be started manually (from the “Control” → “Services” menu)
Delete: Causes the configuration for this instance to be removed from the system when the form is submitted.
Server tab
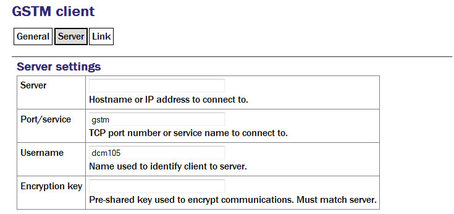
Server: The client will automatically connect to the GSTM server specified by a DNS name or IP address entered into the “Server” field.
Port/service: The connection to the server will be made using the TCP port specified by a service name or number in the “Port/service” field.
Username: The client identifies itself to the server using a username: this can usefully be set to the hostname of the acquisition module.
Note: The username is the means by which the server refers to this client.
Encryption key: GSTM communication is encrypted using TLS. Each end of any GSTM link needs to be configured with the same pre-shared key. If the server has already been configured, the server administrator will give you a value for the “Encryption Key” field; Otherwise, enter a random string into this field and let the person administering the server know what you have used. A command-line tool, gstm-genpsk, is provided to generate suitable random strings.
Link tab
Watchdog interval: If a configured link carries no traffic for an extended period, the client will send “watchdog” packets to the server. This serves two functions: it reassures the client that the link is still usable and it defeats any “automatic disconnect on idle” mechanisms which may be active on some links. The time, in seconds, between such watchdog probes can be configured by entering a value in the “Watchdog interval” field.
Restart interval: If the GSTM link fails for any reason, it is automatically restarted. There may be situations where the link cannot be restarted so, to prevent almost continuous restart attempts and consequent processor thrashing, a time delay is implemented between a link failure and a restart attempt. This defaults to thirty seconds but a different value can be configured if desired by entering it in the “Restart interval” field.
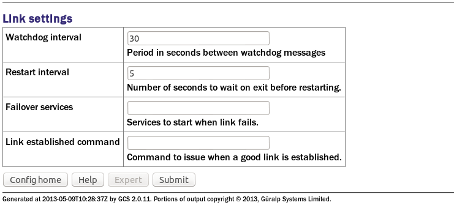
Failover services: If the watchdog packets do not elicit a response from the server, the link is assumed to have failed and, optionally, an additional service can be started in response. This will typically be another GSTM client in order to establish a back-up link. The GSTM client to be started should be identified here by its service descriptor, which takes the form gstm-client.n where n is an integer: 0 denotes the first configured client instance, 1 the second and so on.
Link established command: When the GSTM link is established or re-established, it is possible to run an arbitrary command. Any text entered in the “Link established command” field is passed to the Linux shell for execution, so this can be a single command or the path to a shell script to execute multiple commands. Please contact Güralp support if you need assistance with this feature.
13.2.2 The GSTM Server
GSTM clients initiate connections to GSTM servers.
To configure a GSTM server from the web interface, select:
Configuration → All options → System services → Network
or
Configuration → Services → Network
Now select “Güralp secure TCP multiplexor server”.
The resulting screen shows a list of all GSTM server instances that have been configured on the acquisition module. To create or edit a GSTM server click the appropriate link.
13.2.2.1 Configurable parameters in simple mode
The configurable parameters for the GSTM server have four tabbed pages in simple mode: General, Server, Clients and Forwards.
General tab
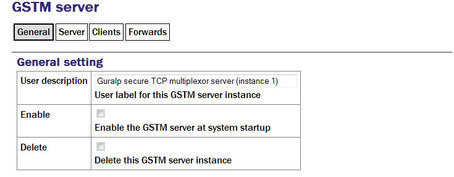
User description: Enter meaningful names here to help distinguish if several instances are to be created.
Enable: Causes this service to start automatically when the system is re-booted. If this check-box is cleared, the service will need to be started manually (from the “Control” → “Services” menu)
Delete: Causes the configuration for this instance to be removed from the system when the form is submitted.
Server tab
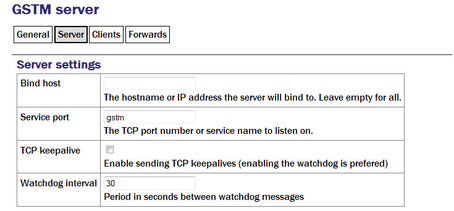
Bind host: If the acquisition module has multiple IP addresses, the GSTM server can be constrained to listen on only one of them by entering its address in the field. If this field is left empty, the server will listen on all available IP addresses.
“Bind host” Enter the service name or port number on which you want the server instance to listen. If you are configuring multiple server instances, each needs a unique service/port. The service name to port number mapping is stored in the standard Linux file /etc/services, which can be edited from the command line.
TCP keepalive: The server is capable of generating TCP keep-alive packets in order to defeat any automatic “disconnect on idle” mechanisms which may be present on the link. Tick the check-box to enable this feature.
Watchdog interval: Like the GSTM client, the GSTM server also generates watchdog packets to monitor for link failure. These may also be more effective at maintaining a link than TCP keep-alives because some network devices automatically block and/or spoof keep-alive packets. Watchdog packets are sent after a certain amount of time when the link appears to be idle and at regular intervals thereafter until traffic is detected. This time interval can be configured by entering an integer value, in seconds, in the field.
Clients tab

A single GSTM server instance can accept simultaneous connections from multiple clients. For each client enter:
Client name: Should contain the username, as configured in the GSTM client.
Encryption key: Should match that configured in the client (see the notes about the client configuration in section 13.2.1 for more information).
Startup command: The GSTM server can run an arbitrary command when a client successfully initiates communication. Any text entered into this column is passed to the Linux shell for execution. The path to a shell script can be entered here if it is required to run multiple commands. Contact Güralp support if you need assistance with this feature.
Clicking the button on any row will open a new row. In the same way, rows can be deleted by clicking the corresponding button.
Forwards tab
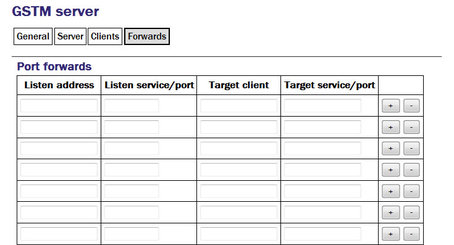
An active GSTM link can forward arbitrary TCP connections to the clients from any host that can access the server. For each desired port forward, enter the following information:
Listen address: By default, the port-forward will listen for incoming connections on all available interfaces. If this field is populated with an IP address, the port-forward will only listen for connections addressed to that address. This option is only useful on systems with multiple IP addresses.
Listen service/port: The port-forward will listen for incoming connections addressed to this port and forward those connections across the network to the client and port specified in the subsequent fields. The port can be specified as either a name or a number. The mapping from port names to port numbers is configured by the conventional Linux file /etc/services which can be edited from the command line if required.
Target client: Connections accepted by the port-forward will be forwarded to the client identified by the contents of this field. The field should be populated with the Username that was configured on the “Server” tab of the GSTM client (as described in section 13.2.1.1).
Note: The client is specified by Username rather than I.P. address, as might be expected. This is to support clients that might be connecting from dynamic I.P. addresses.
Target service/port: Connections accepted by the port-forward will be forwarded to this port on the remote client. The port can be specified as either a name or a number. The mapping from port names to port numbers is configured by the conventional Linux file /etc/services which can be edited from the command line if required.
Clicking the button on any row will open a new row. In the same way, rows can be deleted by clicking the corresponding button.