Chapter 4. Platinum Overview
4.1 Introduction
All key acquisition module configuration and control tasks can be carried out either from the web interface or from the command line.
The web interface presents some additional options not available from the command line. Some of these are merely short-cuts into the main configuration system while others offer additional monitoring and diagnostic facilities. Configuration of attached digitisers can be carried out using the web interface but not from the command line (although access to the digitiser's command line is available).
The command-line interface also supports a number of advanced facilities which are not available via the main configuration system: these are mostly diagnostic tools which are not required for normal operation.
4.2 Using the web interface
The web interface is split into two frames:
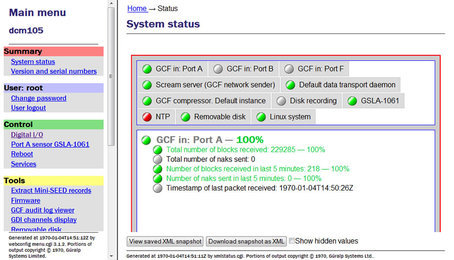
The left-hand frame contains the system ID above a menu while the main frame displays sub-menus, input forms and display screens.
4.2.1 Navigation aides
To help with navigation, the main frame displays a series of links indicating the current position in the configuration-system hierarchy:

These links are commonly known as a “bread-crumb trail”. The “Home” link will return the user to the system home page shown above.
4.2.2 Display options and form submission
Many web forms display a series of buttons at the bottom of the form:

The  button returns you to the configuration homepage. This page can also be accessed using the All options link in the main menu.
The  button displays on-line help in blue, interleaved with the form fields.
The  button changes the display mode to show extra form fields that do not normally need to be changed. These 'expert' settings are all described in the relevant section of the manual for that screen. When in expert mode, the button changes to
  so that the display can be returned to the default mode.
The  button sends the updated settings to the acquisition modules. In many cases, the changes are accepted immediately; some, however, require a reboot of the modules or attached device.
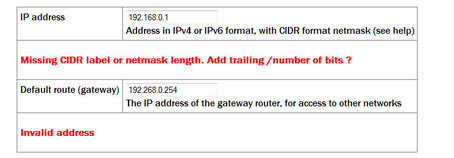
User input to the forms is validated after submission. Where invalid parameters have been detected, an error message is displayed in red below the appropriate field:
On pages where there are tabbed pages, the number of errors is displayed on the first tabbed screen:

Throughout the remainder of this manual, screen-shots of the configuration system's web interface will normally omit the left-hand pane, as in the two illustrations above.
4.2.3 Navigation instructions in the manual
In this manual, instructions on how to reach a particular screen are displayed like this:
Configuration → Interfaces → eth0 - Primary wired network interface
In this example, to reach the page indicated, scroll to the “Configuration” section of the main menu then click on the “Interfaces” link". From the list that appears in the main frame, click on the “eth0 - Primary wired network interface” link.
In some cases there are two possible paths to a particular screen. Both are shown in the manual.
4.3 Using the command-line configuration system
All of the configuration facilities available under the “All options” item (in the main menu of the web interface) are also available from a text-based GUI tool called gconfig (Güralp Configurator). This can be accessed either by using a serial link or, over the network, by using ssh.
Connection via a serial link is discussed in section 3.3 and connecting over Ethernet is described in section 3.2. The use of ssh is covered in section 3.2.5.
4.3.1 Using graphical interfaces from the command line
Some Platinum applications use a system called “ncurses”, which allows graphical interfaces to be implemented on text-only terminals. This requires the applications to know the type of terminal from which they are being accessed. The terminal type is stored in an environment variable called TERM, which is queried with the command
eam999 ~ # echo $TERM
vt100
eam999 ~ #
(note the use of the $ sign when accessing the value of this variable) and set with the command
eam999 ~ #: export TERM=vt100
No spaces should be used around the '=' sign.
Platinum is aware of around thirty different terminal types and uses the “terminfo” system to support them (so you can add your own types, if you need). Files describing each terminal type are stored under the directory (folder) /usr/share/terminfo in sub-directories named after the initial letter of the terminal name.
Some settings for specific applications are given in the following table.
Emulator in use | TERM setting |
ssh under Unix | No action required - the ssh protocol sets the TERM environment variable automatically. |
PuTTY (in ssh mode) under Windows | No action required - the ssh protocol sets the TERM environment variable automatically. PuTTY will default to xterm emulation, allowing the mouse to be used within gconfig. |
Minicom under Unix | Minicom emulates a vt100-style terminal and automatically maps the keystrokes and display sequences for the actual terminal you are using, so the default TERM setting of vt100 is correct. |
HyperTerminal under Windows | Using the File menu option “Settings”, ensure that the terminal type is set to VT100. HyperTerminal will then emulate a vt100 style terminal, which will match the default TERM=vt100 on the acquisition module. |
Scream | Scream versions before 4.5 did not support the required screen-drawing control codes so an upgrade to version 4.5 or later is recommended. |
These settings will provide the best results for the listed applications. Note that, when connecting with SSH from an xterm window, for example, use of the mouse for menu navigation is supported.
4.3.2 Using gconfig
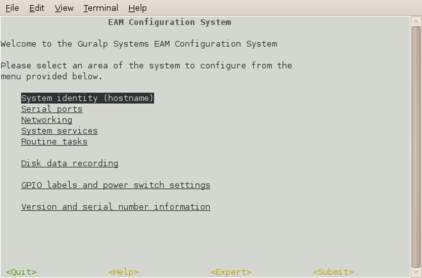
When you enter the gconfig command, the initial screen looks like this:
The gconfig interface can be navigated entirely using the keyboard but, if you use xterm (or your terminal emulator supports an “xterm” mode) you can use your mouse to select menu items, input fields and items from drop-down menus. The scroll-wheel is not currently supported, so you need to use the keyboard to access second and subsequent pages of multi-page forms.
The gconfig interface displays menus and forms. The screen-shot above is an example of a menu. The following table shows the navigation keys that are available for use with menus:
Keystroke | Used for... |
| Cursor to next item |
| Cursor to previous item |
| Select item under cursor |
| Move to the next page of a multi-page menu |
| Move to the previous page of a multi-page menu |
| Go to the home menu or, if there already, exit gconfig. |
The four words enclosed in chevrons at the bottom of screen act as push-buttons:

They are always present at the bottom of each gconfig screen, although they change slightly according to the context. To invoke the action associated with any of them, move the cursor to it and press  .
.
In the example, all options other than  are disabled and this is indicated by the colour coding. If you select an item from a menu which leads to a sub-menu, the option changes to
  and invoking it will then take you back to the top-level menu.
Selecting a menu item will lead you either to another menu or to a form. Forms are composed of text entry fields, check boxes or drop down menus (all described below).
To move between fields, use the  ,
,  or
or  keys.
keys.
4.3.3 Text entry fields
Text-entry fields are those into which the operator can type textual parameters. Text-entry fields are identified by surrounding braces: [ and ]
To edit the contents of a text-entry field, move the cursor on the field and start typing. Characters typed are always inserted at the current cursor position i.e. existing characters are never over-typed. The whole field is shown with a black background, as seen below, and the cursor is identifiable as a pale block.

The  and
and  keys move the cursor within the field and the
  key deletes characters to the left of the cursor.
4.3.4 Check-boxes
Check-boxes offer the operator a “yes/no” choice. Check-boxes are identified by surrounding guillemots: '{' and '}'.
To change the setting of a check-box, move the cursor on the field and use the  key to toggle between selected and not selected.
When the value is “yes”, “enabled” or otherwise selected, the field is shown with an 'X' in it:

When the value is “no”, “disabled” or otherwise de-selected, the field is shown as blank:

4.3.5 Drop-down menus
Drop-down menus are where the operator must choose one option from a list. Drop-down menus are identified by surrounding chevrons: '<' and '>'.

To change the setting of a drop-down menu field move the cursor on the field and activate the menu by using the key.
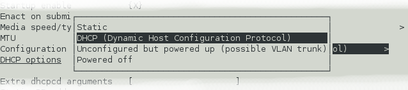
While the menu is active, you can move between options using the the , , , and keys: the currently selected option is shown highlighted. When the desired option is selected, press the key again to confirm the choice and de-activate the menu.
4.3.6 Using forms
Most of the configuration forms have on-line help available. This can be turned on for the current page by using the  button displayed at the bottom of the form. The help text will appear in blue, interleaved with the form itself. Help can also be activated using the
  key.
key.
Many of the configuration forms have two modes, “simple” and “expert”. They display, by default, only the parameters most likely to be used. For example, the network interface form does not normally display IP aliasing parameters. When access is required to these additional features, they can be displayed by using the  button displayed at the bottom of the form. They can be hidden again by using the
  button. It is also possible to toggle between simple and expert mode using the
  key.
key.
Some forms are too large to fit in a single page. In this case, an indicator appears at the top right of the screen. For example, the network interface configuration form, in expert mode, takes three pages to display:

To move to subsequent pages, you can use either the  or the
  key.
key.
To return to previous pages, you can use  or
or  .
.
When all required fields have been set to the desired values, the changes can be enacted by using the  button or the
  key.
key.
It is possible to leave any form by using the button ( or the  key) but, if you have made changes to the contents of any fields, the system will warn you that you will lose your changes if you continue.
It offers an opportunity to return to the form:
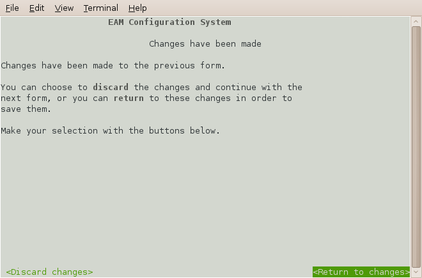
Select  to ignore any parameters that you have altered and continue to the home menu or select
  to review the form and, if desired, submit it before navigating away from it.
The following table provides a summary of all keystrokes that can be used when filling or navigating forms:
Keystrokes used in forms | |
Keystroke | Used for... |
| Cursor to next field or, if in an activated drop-down menu field, next item in drop-down menu |
| Cursor to next field or if in a text field move edit cursor one character to the right |
| Cursor to previous field or, if in an activated drop-down menu field, previous item in drop-down |
| Cursor to previous field or if in a text field move edit cursor one character to the left |
| Activate or deactivate list field or bottom-line button |
| Toggle check-box |
| Go to the home menu or, if there already, exit gconfig. |
| Display help text |
| Show “expert mode” fields |
| Submit the current form |
| Move to the next page of a multi-page form |
| Move to the previous page of a multi-page form |
4.4 Configuration Management
Platinum has a comprehensive configuration management system that allows both complete configurations and individual classes of configuration information, such as data processing and networking, to be saved individually and merged during restoration.
Note: This system does not save the configuration of any attached ADC modules (DM24 or CD24). Only the Platinum configuration is stored.
This feature can be very useful when multiple acquisition modules are to be configured for a project. In a typical array with a central communications hub, only two data processing configurations need be created: one for the hub and one for an array element. The latter can then be copied from acquisition module to acquisition module, avoiding having to configure each unit individually. Network configurations need be created for each element of the array and for the hub but these can all be created and stored on a single acquisition module. If the complete set of stored configurations is then copied to each machine and to any “hot spares”, then every acquisition module becomes rapidly interchangeable: all that is required to deploy a unit is to restore the correct data processing configuration (hub or element) and then restore the appropriate network configuration.
Configuration files can also be backed up and stored on different sites to provide a disaster management resource.
Arbitrary pairs of stored configurations may be compared to reveal what changed between them.
Note: It is recommended that configuration backups are only restored onto acquisition units with hardware and firmware revision identical to those on the unit on which it was saved. Failure to adhere to this policy could result in unexpected behaviour or, in extreme cases, an unusable system.
Note: Libraries of stored configurations should be updated after each firmware upgrade.
4.4.1 Automatic saving of configurations
The system checks every hour for configuration changes and, if any have been made in the preceding hour, an automatic configuration backup is performed. This provides a useful audit trail and a convenient means to return to previous configurations.
Automatically saved configurations can be distinguished from manually saved configuration by inspecting the file-names displayed on the Configuration Save/Restore web page. Automatically saved configurations have file-names of the the form
auto-nnnnnnnn-hostname
where nnnnnnnn is an automatically incremented sequence number and hostname is the host-name of the acquisition unit. Configurations saved manually can have arbitrary names; the name is chosen by the user when the configuration is saved. The default file-name is generated from the date, time and hostname, in the form
YYYY-MM-DD_hhmm_hostname
4.4.2 Saving a configuration
To save a configuration backup from the web interface, select:
Configuration → Save/Restore
The following screen is displayed:
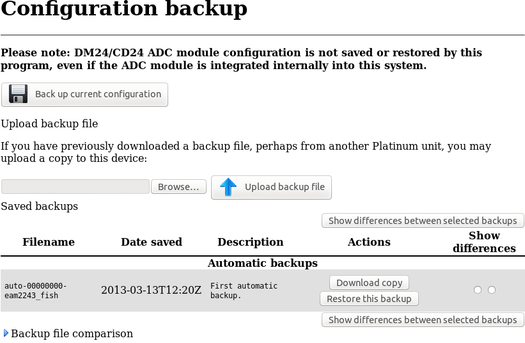
This screen offers a back-up button, an upload facility and a list of stored configurations, each with a download button and a restore button.
Clicking the back-up button displays the following pop-up window:
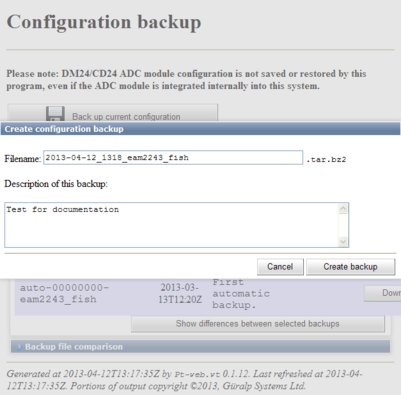
A default file-name is suggested but this can be over-written if desired. You can also enter a description of the back-up, which will be displayed in the list of stored configurations. Click  to save the current configuration to the internal storage. The new stored configuration will appear in the list of stored configurations.
To save a configuration backup from the command line, enter
config-backup --backup --comment 'user description' file
or, in abbreviated form
config-backup -b -C 'user description' file
replacing user description with your own description of the backup, within single quotation marks ('). The configuration will be saved to the file specified by file.
4.4.3 Downloading a saved configuration
Using the web interface, choose the required configuration from the list of saved backups and click the associated  button. The backup will be downloaded using your browser's normal download mechanism.
Saved configurations can also be downloaded using file transfer tools like scp and sftp. Manually saved configuration backups can be found in /var/lib/config-backup and automatically saved configuration backups can be found in /var/lib/config-backup.auto.
4.4.4 Uploading a saved configuration
Backups that have been saved to a PC can be restored to any acquisition module – not just the one from which it was originally downloaded. This provides a useful mechanism for maintaining a centralised configuration library.
To upload a previously stored configuration backup, click the  button. Your operating system's standard file selection dialogue will open. Navigate to the required file and select it, then click the
  button. The uploaded configuration will then appear in the list of saved backups and can be restored, if required, as described in the following section.
Saved configurations can also be uploaded using file transfer tools like scp and sftp. They should be copied to /var/lib/config-backup.
4.4.5 Restoring a configuration
The same screen in the web interface is also used for restoring a configuration. Simply select the required saved configuration from the list of saved backups and click on the  button.
The following screen will be displayed:
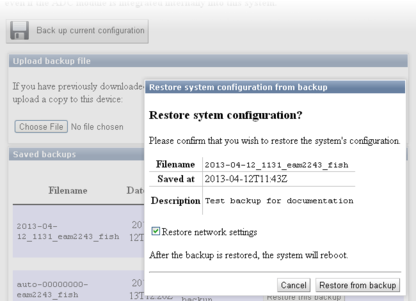
The date and time at which the backup was saved is shown; in the example above, this is the 12th of April, 2013 at 11:43. The file name and description of the backup are also given.
The “Restore network settings” check-box allows you to choose whether or not to restore the network configuration or not. You should select this if, for example, you are configuring a spare unit to replace an existing system that has been damaged. You should leave it unselected if, for example, you are cloning a configuration across an array of systems (where each would need their own, unique, network settings).
If you are happy that you wish to proceed, click  . The backup will be restored and the system will then automatically reboot so that the restored configuration can take effect.
Note: If you you are working on a remote system and have selected “Restore network settings”, this action may sever your communication link. Ensure that you understand the consequences before proceeding.
To restore a configuration backup from the command line, enter
config-backup --restore path-to-file
or, in abbreviated form
config-backup -r path-to-file
replacing path-to-file with the full path (directories plus file-name) of the previously saved configuration backup file.
If you wish to avoid overwriting the network settings, use
config-backup --restore --no-network path-to-file
or, in abbreviated form
config-backup -r -N path-to-file
The system will automatically reboot after restoring the configuration so that the new settings can take effect. If you don't require the system to automatically reboot, add --no-reboot or -R to the options, as in
config-backup --restore --no-reboot path-to-file
or, in abbreviated form
config-backup -r -R path-to-file
4.4.6 Comparing configurations
If more than one saved configuration backup is present on a system, any two can be compared to show the differences. This is useful both to understand what changes have been made to a system and also to compare two different systems. To compare two systems, save a configuration backup on one, download it to a PC, upload it to the second system (without restoring it) and then use the comparison feature to reveal the differences between the two.
Each stored configuration is displayed with two radio-buttons next to it, as shown below:
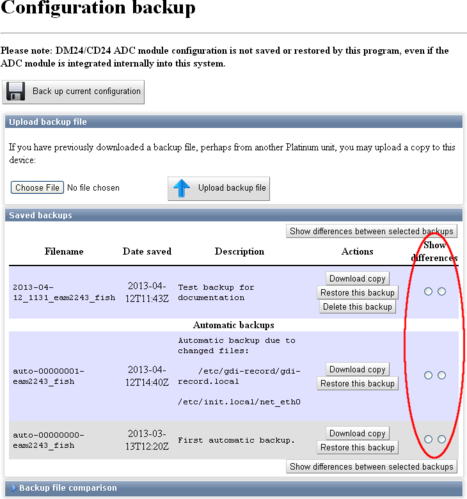
To compare two saved configuration backups, select the left-hand-side radio-button next to one of them and the right-hand-side radio-button next to the other, and then click  .
.
The differences are displayed in Linux diff format, with colour-coding used to identify any lines that belong to one file but not the other. Detailed explanation of the possible entries is beyond the scope of this document. A simple introduction to the output from the diff command is available at http://lowfatlinux.com/linux-compare-files-diff.html.
To compare two saved configuration backups from the command line, enter the command
config-backup --diff path-to-file1 path-to-file2
or, in abbreviated form
config-backup -d path-to-file1 path-to-file2
replacing path-to-file1 and path-to-file2 with the full paths (directories plus file-name) of the previously saved configuration backup files to be compared.
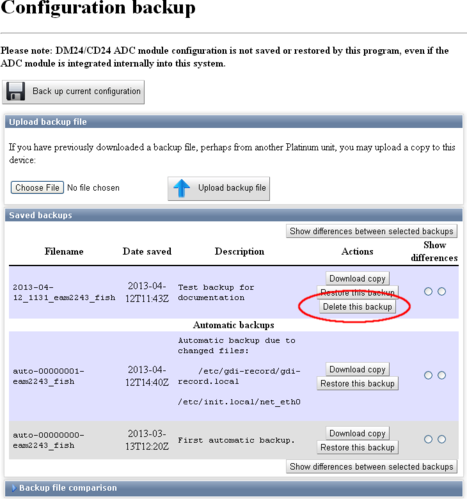
4.4.7 Deleting saved configurations
It is possible to delete configuration backups that have been manually saved as well as those that have been uploaded. Automatic configuration backups cannot be deleted: the system will retain the last fifty stored backups and delete any older ones, using the directory cleaner (see section 14.5.1).
To delete a stored configuration backup, simply click the  button next to the unwanted backup, as highlighted in the screen-shot below.
Stored configuration backups can be deleted from the command line by simply deleting the relevant file in /var/lib/config-backup (for user-generated backups) and /var/lib/config-backup.auto for automatically saved configuration backups. For example, the command
rm /var/lib/config-backup/2013-04-12_1131_MyEAM.tar.bz2
will delete a backup performed at 11:31 UTC on the 12th of April, 2013 on a system called “MyEAM”.
It is possible to examine the comments embedded in a manually saved configuration backup file using the command
config-backup --examine path-to-file
or, in abbreviated form,
config-backup -x path-to-file
Either of the commands will display the comments which were entered by the user (in the “Description” field of the web interface or using --comment from the command line) when the backup was created.
4.4.8 Transferring backups between systems
If the command-line program, config-backup, is invoked in save or restore mode without a filename argument, standard input or standard output is used, as appropriate. This allows the command to be used in pipe-lines, as in the following examples.
A configuration file can be created on a Platinum system and immediately copied to a linux PC (without being saved on the Platinum system) with a single command:
ssh root@platinum config-backup --backup > local.backup
where platinum is the hostname of the CMG-EAM or other Platinum system.
Likewise, the configuration of a running system can be copied to another with commands like:
(from a Linux PC):
ssh root@platinum1 config-backup --backup | \
ssh root@platinum2 config-backup --restore --no-network
(from the target system):
ssh root@source config-backup -b | config-backup -rN
where source is the hostname of the system to be cloned. The argument -N prevents the network configuration on the target machine from being over-written.
4.4.9 Technical details
Stored configuration backups are gzipped tar volumes containing all configuration files from the host system. They are each around 33 kilobytes in size.
Automatically-saved configurations are stored in the directory /var/lib/config-backup.auto and a system-supplied directory-cleaner instance deletes all but the most recent fifty files. Manually saved configuration backups are stored in /var/lib/config-backup.
The command-line interface, config-backup, displays full usage details if invoked with --help:
Program usage:
config-backup --backup [options] [filename]
config-backup --restore [options] [filename]
config-backup --examine [options] [filename]
config-backup --diff filename1 filename2
Options:
-h, --help Display this screen.
-V, --version Display program version number.
-b, --backup Perform a configuration backup.
-r, --restore Restore configuration from a backup.
-x, --examine Examine a backup file (prints comment).
-d, --diff Compare differences between 2 backups.
-q, --quiet Inhibit progress messages.
-s, --syslog Log to syslog rather than screen.
Backup options:
-C, --comment <text> Comment for this backup.
Restore options:
-R, --no-reboot Do not reboot after a restore.
-N, --no-network Do not restore network settings
(hostname, IP addresses).