Chapter 2. First Steps
The CMG-EAM can be configured and monitored either over an Ethernet network or via a serial (RS232) line. Network access is preferred. The configuration interface as accessible using a web browser or, in character mode, using ssh or over a serial connection from a terminal emulator.
All models are fitted with at least one network port which can be automatically configured using DHCP. If DHCP is not available, serial access is required in order to set up the network parameters.
The CMG-EAM has four serial ports, any of which can be configured for this purpose, although the 'D' connector located under the lid is a dedicated console port.
The CMG-DCM has three serial ports: the port labelled “DATA OUT” is normally used for console access and a combined serial and power cable is provided for this purpose.
The hardware fitted to CMG-NAMs varies but one serial port will usually be designated as the console port.
2.1 Connecting to the Serial Port
The CMG-EAM's console port is a 9-pin 'D' connector (with DCE wiring) located under its lid. It can be connected via a serial (RS232) modem cable (i.e. pins 2 (RxD), 3 (TxD) and 5 (ground) connected straight through) to a serial terminal or to a PC running either Scream! or terminal emulation software. The default settings for this port are as follows:
38,400 baud;
8 data bits, no parity, 1 stop bit (8N1); and
No flow control.
These settings are not configurable, preventing accidental lock-out due to inadvertent changing of the port settings.
The CMG-DCM does not have a dedicated console port: the “DATA OUT” port is normally used for console access. A combined power and serial cable is provided with both CMG-EAMs and CMG-DCMs for connection to this port.
The “DATA OUT” port can be connected to a serial terminal or PC running either Scream! or terminal emulation software. The default settings for this port are as follows:
115,200 baud;
8 data bits, no parity, 1 stop bit (8N1); and
No flow control.
Note: these settings can be changed and, indeed, the port re-configured for a different purpose, preventing console access.
Once connected, press the <Enter> key until you see the login prompt.
Note: If a terminal session has just been closed, it can take up to 10 seconds for a new session to start.
eam999 login: root
Password: rootme
eam999 ~ #
The output may vary slightly due to the configuration of the unit. In particular, the hostname (eam999 in this example) will be different.
Some applications on the CMG-EAM use a system called “ncurses”, which allows graphical interfaces to be implemented on text-only terminals. This requires the applications to know the type of terminal from which they are being accessed. The terminal type is stored in an environment variable called TERM, which is queried with the command
eam999 ~ # echo $TERM
vt100
eam999 ~ #
(note the use of the $ sign when accessing the value of this variable) and set with the command
eam999 ~ #: export TERM=vt100
No spaces should be used around the '=' sign.
The CMG-EAM is aware of around thirty different terminal types and uses the “terminfo” system to support them (so you can add your own types, if you need). Files describing each terminal type are stored under the directory (folder) /usr/share/terminfo in sub-directories named after the initial letter of the terminal name.
Some settings for specific applications are:
SSH under Unix, or puTTY under Windows (running in SSH mode): no action required - the SSH protocol sets the TERM environment variable automatically.
Minicom under Unix: no change. Minicom emulates a vt100-style terminal and automatically maps the keystrokes and display sequences for the actual terminal you are using, so the default TERM setting of vt100 is correct.
HyperTerminal under Windows: choose the File menu option “Settings”, and ensure that the terminal type is set to VT100. HyperTerminal will then emulate a vt100-style terminal, which will match the default TERM of vt100 on the CMG-EAM.
These settings will provide the best results for the listed applications. Note that when connecting with SSH from, for example, an xterm window, use of the mouse for menu navigation is supported.
2.2 Connecting to the network port
To use the network port, you must first set up a network address. Some networks use the Dynamic Host Configuration Protocol (DHCP) to automatically assign network addresses; others need manual configuration (normally referred to as “static” addressing). Before you can access the CMG-EAM over a network, you must set (for static addresses) or discover (if you use DHCP) its IP address.
2.2.1 DHCP-assigned addresses
If your network uses DHCP to assign addresses, connect the CMG-EAM to the network and reboot it by turning the power off and on again Your network administrator may then be able to tell you the address that has been assigned to the CMG-EAM but, if not, you can connect via a serial port and issue the ip command:
eam999 ~ # ip addr show eth0
2: eth0: <BROADCAST,MULTICAST,UP,LOWER_UP> mtu 1500 qdisc pfifo_fast qlen 1000
link/ether 00:50:c2:40:54:75 brd ff:ff:ff:ff:ff:ff
inet 192.168.0.101/24 brd 192.168.1.255 scope global eth0
inet6 fe80::250:c2ff:fe40:5475/64 scope link
valid_lft forever preferred_lft forever
eam999 ~ #
The key things to look for here are the adapter status and the IP address. The first line of the output should contain the word UP, confirming that the adaptor has been enabled. The IP address that has been assigned is shown on the line beginning inet - in this case, it is 192.168.0.101 (with a netmask of 24-bits indicated by /24).
Note: With an IP version 6 network, the IP address will be on a line beginning inet6. In practice, most networks today are still IPv4, as in the above example.
Note: If you are setting up a unit in the laboratory for subsequent deployment in the field, you can set up the final network address using the web interface and over-ride it with a temporary, static network address using the command line. The web-configured address will take effect when the unit is next rebooted.
2.2.2 Assigning a static IP address
If the network you are connecting to does not use DHCP, you must first connect via a serial port in order to configure a static IP address. Connect the CMG-EAM to the network and power-cycle it before proceeding: its network interface will not be enabled unless it sees a network at boot.
Once logged in, issue the following command:
eam999 ~ # ip addr add 192.168.0.1/24 dev eth0
You can change the IP address to anything you wish. It must be specified in CIDR format where the actual address is followed by the number of bits of the network mask. The above example uses 192.168.0.1 with a netmask of 255.255.255.0 (24 bits of network address). A PC connected to this network could communicate with the CMG-EAM if it was configured to use an IP address of (for example) 192.168.0.2 with a matching netmask of 255.255.255.0.
If you wish to connect to the CMG-EAM from a PC, they must either both have the same network address (usually the first three numbers of the IP address) or be able to connect to each other via routers. In the latter case, you will need to tell the CMG-EAM the address of its default router. Issue the command:
eam999 ~ # ip route add default via 192.168.0.254
substituting the address of your network's default router in place of the address shown.
Note: Both the static IP address and any route configured in this way are temporary and will persist only until the CMG-EAM is rebooted or powered off. Refer to section 6.1 on page 55 for information about configuring permanent static IP addresses and routes.
2.2.3 Connecting to the web interface
The CMG-EAM provides a web (HTTP) interface which is intended to be used for most configuration and control tasks. This is the recommended way of controlling the CMG-EAM.
Once the IP address of the CMG-EAM has been set or determined, you can connect to its web-server. Simply type http:// followed by the IP address of the unit into your web browser's address bar (e.g. http://192.168.0.1/ ). You should be prompted for a user-name and password. The user-name is root and the initial password, as shipped, is rootme (the same as on the command line).
If you are connecting to the CMG-EAM over a network that you consider insecure, it is recommended that you use the HTTPS (secure HTTP) protocol, which uses TLS to encrypt the link. Simply change the http:// prefix to https:// in the browser's address bar. Most browsers will complain that the certificate cannot be verified: This is not a problem: simply press the “accept” button to proceed. The link will then be encrypted and nobody will be able to “sniff the wire” in an attempt to discover passwords and other data.
Once connected and logged in, you will be presented with the main summary screen. This contains general information about the status and health of the CMG-EAM:
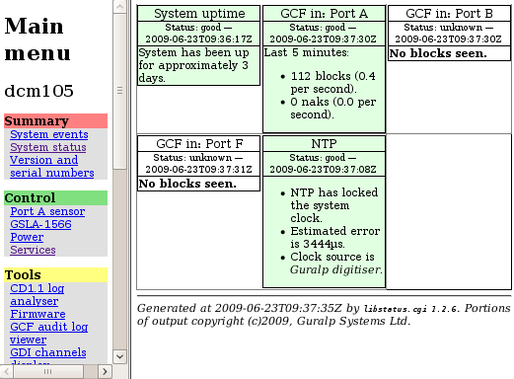
The exact contents and layout of this screen will vary depending on the configuration of both the EAM and of any attached hardware.
If the browser fails to connect, the most likely explanation is that the machine running the browser does not have working network communications to and from the CMG-EAM. This can be verified by “pinging” the IP address of the browser from the command line of the CMG_CMG-EAM:
eam999 ~ # ping -c3 192.168.0.2
PING 192.168.0.2 (192.168.0.2): 56 data bytes
64 bytes from 192.168.0.2: seq=0 ttl=63 time=2.284 ms
64 bytes from 192.168.0.2: seq=1 ttl=63 time=1.129 ms
64 bytes from 192.168.0.2: seq=2 ttl=63 time=1.944 ms
--- 192.168.42.1 ping statistics ---
3 packets transmitted, 3 packets received, 0% packet loss
round-trip min/avg/max = 1.129/1.785/2.284 ms
eam999 ~ #
To resolve this class of problem, ensure that the cables are functioning (which can be verified by checking the diagnostic lights on most switches/hubs) and double-check that the PC and CMG-EAM are on the same subnet (which means the netmasks must match and the first sections – as defined by the netmask - of the IP addresses must match). The website http://en.wikipedia.org/wiki/IP_address has some useful information for those for whom sub-networking is unfamiliar.
2.2.4 Connecting using SSH
SSH (secure shell) is the most flexible way to control a CMG-EAM, but it is less friendly than using the web interface. It is possible to configure more advanced operations using SSH but the majority of control and configuration tasks can be achieved most easily through the web interface.
SSH is shipped as standard with most Linux distributions and is available for Windows as part of PuTTY, available for free from http://www.chiark.greenend.org.uk/~sgtatham/putty/
The next section will discuss the use of the ssh command-line utility; PuTTY-specific details are provided in the section after.
2.2.4.1 SSH connections using the ssh program
To use SSH, you must know or discover the IP address of the unit, as described in the previous section. Once you have the IP address, issue the SSH command on the PC you are using:
mypc$ ssh root@192.168.0.1
Replace 192.168.0.1 with the IP address of the CMG-EAM.
The first time you use SSH to connect to a host, you will be asked to verify the “host key”. This can be ignored the first time but, if you are ever asked this again, it means that either the host key of the CMG-EAM has changed – perhaps because of a firmware upgrade – or there is a network address conflict or, worse, a security problem on your network.
user@mypc:~$ ssh root@192.168.0.1
The authenticity of host '192.168.0.1 (192.168.0.1)' can't be established.
RSA key fingerprint is 62:a6:70:29:d4:1a:db:5a:75:6e:96:13:54:f5:a9:d9.
Are you sure you want to continue connecting (yes/no)? yes
Warning: Permanently added '192.168.0.1' (RSA) to the list of known hosts.
root@192.168.0.1's password:
eam999 ~ #
You will be prompted for a password; the default password is rootme. Note that no characters will be echoed to the screen as you type the password.
Once connected, you will be presented with a shell prompt which is ready to accept commands.
When you are finished with your SSH session and want to disconnect, enter “exit” at the command line, or type a <Ctrl>D character. There are a number of escape sequences for controlling the session, all of which begin with a tilde ('~') so, if you need to send a tilde character to the CMG-EAM, type two tildes consecutively. For more information, see the section on “Escape Characters” in the SSH manual page at http://man-wiki.net/index.php/1:ssh
Note: If you plan to use ssh regularly to communicate with a CMG-EAM, you can configure the system to bypass the password prompt from a list of pre-authorised computer/user combinations. This involves generating a unique key-pair (for the user and PC which will access the CMG-EAM) and then copying the public half of the key-pair to the CMG-EAM. This is documented at http://suso.org/docs/shell/ssh.sdf
2.2.4.2 SSH connections using PuTTY
To use PuTTY, you must know or discover the IP address of the unit, as described in the previous section. Once you have the IP address, start PuTTY by choosing it from the “Start” menu or double-clicking on its icon. You will be presented with the following screen:
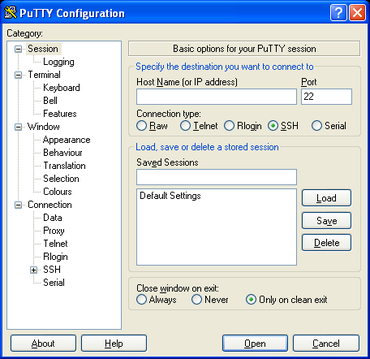
Enter the IP address of the CMG-EAM into the “Host Name (or IP address)” box, check that “SSH” is selected as the “Connection type” and then click the  button.
The first time you use SSH to connect to a host, you will be asked to verify the “host key”:
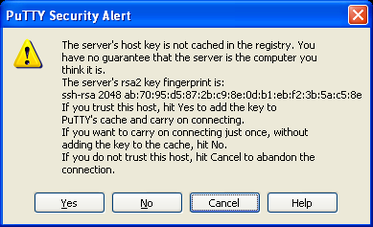
This can be ignored the first time (simply click  to dismiss the dialogue) but, if you are ever asked this again, it means that either the host key of the CMG-EAM has changed – perhaps because of a firmware upgrade – or there is a network address conflict or, worse, a security problem on your network.
You will now be prompted for a login name: the default is root. - type this at the prompt and hit <enter>. You will next be prompted for a password; the default password is rootme. Note that no characters will be echoed to the screen as you type the password.
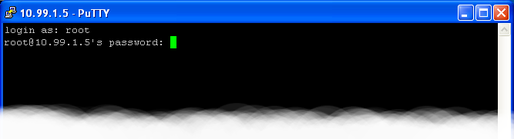
Once connected, you will be presented with a shell prompt which is ready to accept commands. The shell prompt contains the CMG-EAM's serial number.
When you are finished with your SSH session and want to disconnect, type “exit” at the command line, or  +
+ .
.
Note: If you plan to use ssh regularly to communicate with a CMG-EAM, you can configure the system to bypass the password prompt from a list of pre-authorised computer/user combinations. This involves generating a unique key-pair (for the user and PC which will access the CMG-EAM) and then copying the public half of the key-pair to the CMG-EAM. This is implemented using the PuTTYgen and Pageant programs: see section 6.5 on page 67 and the help facility within PuTTY for more information.
2.3 Changing the password
Access to a Platinum system is password-protected. As shipped, the user name is root and the password is rootme. The same password is used for both login and web authorisation. In the majority of cases, there is no need to alter the password from the default setting.
Where security is a concern - for example, where systems may be left connected to the internet for any significant period - you may wish to change the password. In this case, you should also use secure HTTP to access the web interface rather than the more common http. To do this, prefix the URL to the device with the https: protocol specifier rather than http:. For example, if you can access your system as http://192.168.0.1, you can also use https://192.168.0.1 and this will prevent your new password from being retrieved by eavesdroppers.
There is much information available on-line for choosing a strong password, for example: http://tinyurl.com/strongpws.
Selecting “Passwords” from the “Tools” menu takes you to a screen from which you can change the password used for both command-line access and for the web interface.
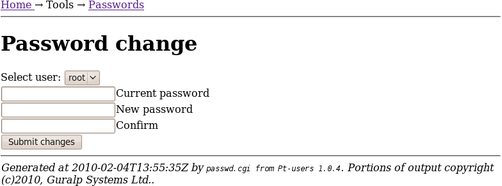
Currently, the only user configured on a CMG-EAM is root. The password is changed immediately but the built-in web-server can continue to use the old password for some time after a change. If this is a problem, the web service can be restarted from the Services page (see section 13.2.4) by clicking the “Restart” button for the “httpd” service.
To change the password from the command line, issue the command passwd: You will be prompted twice for the desired new password:
eam2010 ~ # passwd
New password:
Repeat:
Password changed.
eam2010 ~ #
Note: There is no way to recover a lost password and it is very awkward (although not impossible) to regain access to a system without a password. Despite much conventional wisdom, you may be safer writing the password down and storing it in a physically secure place rather than risk forgetting it.
If you do lose your password, please contact Güralp Systems' technical support team for advice.