Chapter 4. Firmware Upgrades
Platinum firmware is regularly updated to provide extra features, improve performance and, occasionally, to correct errors. The upgrade process is fast, simple and can be carried out remotely using either the web or command-line interface.
Note: This procedure does not upgrade the firmware of connected or embedded digitisers, which should be upgraded using the data-terminal command as documented in section 13.2.2.2 on page 177.
4.1 Determining the current firmware level
From the web interface, select “Version and serial numbers” from the “Summary” section of the left-hand-pane menu.

The same information can be obtained at the command line by using gconfig and selecting “Version and serial number information”. If you just want quick access to the software build number, this is contained in the file /etc/build.version, which can be read with the command:
eam2243 ~ # cat /etc/build.version
# Overall build version
BUILD_LABEL="platinum-stable"
BUILD_VERSION="3012"
eam2243 ~ #
The version, in this case, can be seen to be 3012.
4.2 Upgrade Methods
In order to be upgraded, the unit needs access to the latest version of the firmware. If an internet connection is available, Güralp Systems Ltd's software repository can be used. This is described in section 4.2.1.
If a number of units share a common network but that network is not connected to the internet, you can make you own copy of the software repository on a PC or laptop, which can be connected the network either permanently or temporarily, and use that as the upgrade source. This is described in section 4.2.2.
If one or more units to be upgraded but internet access is not available, the new firmware can be copied to a USB storage device, such as a memory stick, and the upgrade performed from that. This is described in section 4.2.3.
4.2.1 Upgrading via the internet
In order to upgrade over the internet from Güralp Systems Ltd's software repository, the unit must have its networking properly configured. In particular, a DNS (Domain Name Service) server and a default gateway (or defined route) must both be configured. It is advisable to check these before proceeding.
To check for correct configuration of both of these items, issue the command:
ping -c3 rsync.guralp.com
This will send three “echo request” packets to the GSL upgrade server and listen for responses. If both the DNS server and the correct gateway (router) are configured, the output will look like this:
eam2010 ~ # ping -c3 rsync.guralp.com
PING rsync.guralp.com (80.68.92.160): 56 data bytes
64 bytes from 80.68.92.160: seq=0 ttl=55 time=58.280 ms
64 bytes from 80.68.92.160: seq=1 ttl=55 time=66.845 ms
64 bytes from 80.68.92.160: seq=2 ttl=55 time=56.413 ms
--- rsync.guralp.com ping statistics ---
3 packets transmitted, 3 packets received, 0% packet loss
round-trip min/avg/max = 56.413/60.512/66.845 ms
eam2010 ~ #
If the DNS server is correctly configured but the gateway is not correctly configured, the output will look like this:
eam2010 ~ # ping -c3 rsync.guralp.com
PING rsync.guralp.com (80.68.92.160): 56 data bytes
ping: sendto: Network is unreachable
eam2010 ~ #
If you are using DHCP, it is advisable to correct this problem by reconfiguring the DHCP server to supply the correct route. If you are using static addressing, enter the address of the internet gateway router in the “Default route (gateway)” field of the network interface configuration form. See section 6.1.2 no page 58 for more details.
If the DNS server is not configured correctly (or at all), the output will look like this:
eam2010 ~ # ping -c3 rsync.guralp.com
ping: bad address 'rsync.guralp.com'
eam2010 ~ #
If you are using DHCP, it is advisable to correct this problem by reconfiguring the DHCP server to supply the correct name-server details. If you are using static addressing, enter the address of a suitable DNS server in the “Nameserver” field of the network interface configuration form (only available in expert mode). See section 6.1.2 no page 58 for more details.
Once the network has been checked, you can proceed to upgrade the unit by following the instructions in section 4.3.
4.2.2 Upgrading from a local mirror
Setting up a mirror involves three steps:
Downloading the mirror content;
Setting up a local rsync server; and
Configuring the client EAMs to use the new server.
The procedure differs depending on the operating system of the local mirror server.
4.2.2.1 Instructions for Linux/Unix computers
Downloading the mirror content
The mirror can occupy a significant amount of disk space, depending on the which architectures you need to support. See the sections for each architecture (below) for the current space requirements. You should pick a disk partition with ample space in which to store your own copy. In order to simplify the download, we recommend that you start with an empty directory each time. If you wish to make a fresh copy after a new firmware release, it is much easier to create this in an empty directory than to "update" an existing mirror. You can keep multiple, simultaneous versions of the firmware if you wish and tell each EAM which version to use when upgrading.
The server on which you create the mirror should have access to the internet during the download step but does not need internet access while it is acting as an upgrade server. It does, of course, need to be accessible by your networked EAMs. It is possible to create the mirror content on a removable disk attached to an internet-connected computer and then move the disk to a different computer when it is to be served.
Create the mirror directory and use the cd command to make it your current directory. As root, enter one or more of the following command sequences to download the mirror content. Each sequence downloads the files for a particular architecture. If you know, for example, that you will never want to upgrade a CMG-NAM64, you can omit the commands for this architecture.
Note: Be careful not to omit the final ‘.’ or the space before it in the rsync commands below.
CMG-DCMs
This architecture currently requires around 50MB of disk space for the mirror.
GSLSRC=rsync.guralp.com/platinum-stable/CMG-DCM-mk2x
rsync -EgHloprtv --exclude resolv.conf rsync://$GSLSRC .
CMG-EAMs
This architecture currently requires around 54MB of disk space for the mirror.
GSLSRC=rsync.guralp.com/platinum-stable/CMG-DCM-mk4
rsync -EgHloprtv --exclude resolv.conf rsync://$GSLSRC .
CMG-NAMs
This architecture currently requires around 94MB of disk space for the mirror.
GSLSRC=rsync.guralp.com/platinum-stable/CMG-NAM
rsync -EgHloprtv --exclude resolv.conf rsync://$GSLSRC .
CMG-NAM64s
This architecture currently requires around 125MB of disk space for the mirror.
GSLSRC=rsync.guralp.com/platinum-stable/CMG-NAM64
rsync -EgHloprtv --exclude resolv.conf rsync://$GSLSRC .
Setting up a local rsync server
Your local rsync server is configured by creating the file /etc/rsyncd.conf. If the serving host already runs an rsync server, you should modify this file (basically, add an extra module) in order to allow access from the EAMs to the mirror directory: we assume that you have the knowledge to do this without further assistance. This section covers setting up a new, dedicated rsync server.
You will need to choose a TCP port number which will not conflict with another service on your network. The port number should be greater than 1024 in order to avoid additional complexity. Consult your network administrator for an available port or simply try 61616 and, if you get an error saying that the port is in use when you attempt to start the server, choose a different random number in the range 49152 - 65535. 61616 will be used in the following example and should be replaced with the port number you have chosen or been allocated. If there are firewalls between your server and the EAMs, you will need to open channels through them for this port.
You will also need to choose a module name for the server. This can be any descriptive string but, for simplicity, it is best to stick to numbers, lower-case letters and hyphens (-). The name platinum-local-mirror has been used in the following example and should be replaced with the module name you have chosen.
Create the file /etc/rsyncd.conf with the following contents:
port = 61616
[platinum-local-mirror]
path = /path/to/your/local/mirror/directory
comment = GSL-EAM firmware
numeric ids = yes
log file = /path/to/writeable/log/file
timeout = 600
hosts allow = *
Consult the manual page for rsyncd.conf(5) for details of further options that you can use in this file, including security improvements that you may wish to put in place. This is available on-line at http://man-wiki.net/index.php/5:rsyncd.conf.
Once the /etc/rsyncd.conf file is ready, you can start the rsync server with the command
sudo rsync --daemon
If you want to run the rsync server permanently, it is possible to start it via inetd, xinetd or an rc script. Consult the manual page for rsyncd.conf(5) for further details.
Configuring the upgrade system to use the new server
The standard upgrade source must be over-ridden: on each unit to be upgraded, create the file /etc/conf.d/upgrade.local with the following content:
RSYNC_HOST="address.of.my.server"
RSYNC_PORT="61616"
RSYNC_MODULE="platinum-local-mirror"
replacing:
address.of.my.server with the DNS name or IP address of the mirror server;
61616 with the port number you chose earlier; and
platinum-local-mirror with the module name you chose earlier;
The EAMs can now be updated from the mirror by following the instructions in section 4.3. Note that the files /etc/conf.d/upgrade.local on each EAM will not be disturbed by the upgrade process and, so, only need to be created once.
4.2.2.2 Instructions for Windows computers
The procedure for building a mirror site on a windows computer is essentially the same as for Linux/Unix, although the rsync program (and the cygwin library needed to run it) typically need to be installed and additional steps are required to run rsync as a service (or daemon, in Linux terminology). Instructions for setting up rsync in daemon mode under Windows are available on-line from http://www.samba.org/rsync/nt.html.
Once rsync is running as a daemon, you can follow the Unix/Linux instructions for setting up the mirror and client EAMs. Remember to retain the lines
use chroot = false
strict modes = false
at the top of /etc/rsyncd.conf on the server.
If you use Windows Firewall, you may need to configure it to allow incoming access to the port number that you have chosen.
4.2.3 Upgrading from a USB storage device
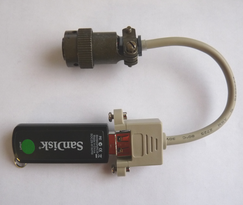 For situations where it is either impossible or undesirable to upgrade over a network, Güralp Systems Ltd can supply the latest Platinum firmware on a USB memory stick, along with an appropriate adaptor cable, part number CAS-DCM-0038.
The adapter cable is required when upgrading the firmware of a CMG-DCM, a CMG-EAM and most CMG-DAS units but not when upgrading a CMG-NAM.
You will need both physical access and command-line access to the device being upgraded. Command-line access may be via ssh or a serial connection.
If you are upgrading a CMG-DCM, CMG-DAS or CMG-EAM, connect the adapter cable to the USB socket of the unit and plug the firmware pod into the adapter cable;
If you are upgrading a CMG-NAM, plug the firmware pod directly into a USB socket on the unit. Please note that, depending on the internal cable layout of your NAM, it may be necessary to connect the firmware pod to a USB port on the back of the device (near the network socket) rather than to one on its front panel.
The upgrade procedure consists of either three or four steps:
CMG-EAM hardware only: power up the USB ports;
Connect the firmware pod;
Mount the filesystem; then
Run the upgrade.
Each of these steps is now described in detail:
Power up the USB ports
This step only needs to be carried out on CMG-EAM hardware. The hardware for CMG-DCMs, CMG-NAMs and CMG-DAS units do not have control over the 5V USB supply and, on these units, power is always provided to the USB ports.
Depending on the revision of CMG-EAM firmware installed before the upgrade, there are three possible commands for powering up the USB ports.
Note: Using the wrong command is completely harmless and merely results in an error message, so it is easiest - and perfectly safe - to simply enter all three commands at the terminal
echo 1 > /sys/class/gpio/USBpowerB/level
ioline -L USBA_power -o 1
ioline -L USBB_power -o 1
Connect the firmware pod
If you are upgrading a CMG-EAM, CMG-DAS or CMG-DCM, the supplied cable (CAS-DCM-0038) should be attached to the 6-pin mil-spec USB connector of the module. The firmware pod is then connected to the end of this cable.
A CMG-NAM unit has standard USB sockets and these can be used to directly connect the firmware pod. Please note that, depending on internal cable layout, it may be necessary to connect the firmware pod to a USB socket on the back of the device (near the network socket) rather than to one on its front panel.
Once connected, it will take a few seconds for the device to be scanned and registered by the operating system. You can confirm this by looking for USB mass storage registration entries in the system logfile, /var/log/messages.
Mount the filesystem
Once the firmware pod is conected and registered, the filesystem should be mounted by entering the following command:
mount -t ext2 -o ro /dev/disk/by-label/Pt-firmware /mnt
Run upgrade script
Once the filesystem is mounted, you can run the upgrade script. This is not the same script that is used for network upgrades but it takes the same optional arguments. These arguments are documented in section 4.3, which should be read before proceeding.
Once you have decided which argument, if any, you wish to use, run the script with the command:
/mnt/upgrade optional_argument
Note: Some early Platinum releases only had ext3 filesystem support. If this is the case, the above command will result in an "Invalid argument" error message. If this occurs, simply change ext2 in the above command to ext3.
Ensure there are no error messages and then reboot the device. Once the unit has rebooted, the upgrade process is then complete.
4.3 Upgrade Types
There are three different types of upgrade, each of which is described below. When upgrading via the web interface the desired type is selected by pressing the appropriate button. When upgrading directly from the command line or from a USB storage device, the required type is selected by the use or omission of command-line arguments.
4.3.1 Standard upgrade
The standard upgrade brings the firmware to the latest revision while respecting and preserving all configuration settings.
Technical Note: All files on the hard drive are left untouched, as are any files in the directories /home, /root, /var and /usr/local. In addition, any file with an extension of .local will be preserved: this is the mechanism by which most configuration settings are safeguarded.
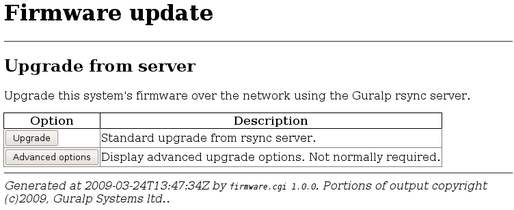
Press the “upgrade” button and watch the screen for any error messages.
To perform the same upgrade from the command line, simply enter the command
eam999 ~ # upgrade
with no arguments, watch the screen for any error messages and then reboot to complete the process.
4.3.2 Upgrade and restore defaults
The standard upgrade respects and preserves user configuration settings. In some circumstances it may be necessary to overwrite these settings and return all configuration settings to their factory defaults. The unit is not completely restored to factory condition: this allows for the possibility of implementing customisations and user-developed scripts which persist across upgrades.
Technical Note: All files on the hard drive are left untouched, as are any files in the directories /home, /root, /var and /usr/local. Files with the extension .local are deleted.
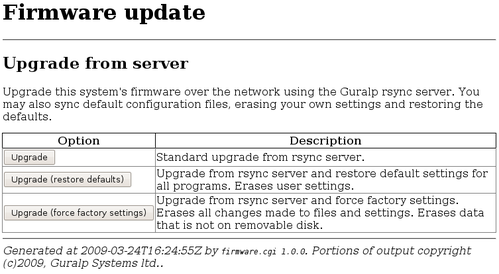
The first button, “Upgrade”, does exactly the same as the similar button on the previous screen. The “Upgrade (restore defaults)” button performs the action described in this section.
To perform this action from the command line, invoke the upgrade script with the argument --restore-defaults:
eam999 ~ # upgrade --restore-defaults
Watch the screen for any error messages and then reboot the unit to complete the process.
4.3.3 Upgrade and force factory defaults
The third upgrade option effectively wipes everything other than the hard drive while installing the new revision, leaving the unit as it would be delivered. Avoid using this option if you have made any customisations to your unit or installed any scripts. If in doubt, please consult Güralp Systems Ltd technical support for advice before proceeding. Conversely, if you have made changes which you believe have adversely affected the unit but are having trouble undoing them, this option lets you start with a clean slate.
To invoke this option from the web interface, select “Firmware” from the “Tools” menu but then press the “Advanced options” button. From the resulting screen, press the “Upgrade (force factory settings)” button. Watch the screen for any error messages and then reboot the unit to complete the process.
To perform this action from the command line, invoke the upgrade script with the argument --force-factory-settings:
eam999 ~ # upgrade --force-factory-settings
Watch the screen for any error messages and then reboot the unit to complete the process.
4.4 Upgrade logs
The upgrade process stores all progress and error messages in the file /var/log/upgrade.log. If you suspect that there has been a problem with an upgrade or you wish to have full details of what has changed, you can inspect this file by issuing the command
eam999 ~ # less /var/log/upgrade.log
You can scroll forward through the file simply by pressing the  key. For more control, you can move forward and backwards, line by line, with the
  and
and  keys or, page by page, with the
  and
and  keys.
keys.
The  key should be used to return to the command line.
If you wish to obtain a copy of this log file, it can be copied from the system to an external computer either via the serial port (see section 10.3.1.3 on page 124) or over the network (see section 10.3.1.2 on page 120).