Chapter 4. Getting Started
4.1 Introduction
The Güralp Affinity can be configured and monitored either over an Ethernet network or via a serial (RS232) line.
If using a network, the Affinity can be accessed using a web browser or, in character mode, using ssh. Instructions for connecting to the network port are given in section 4.2.
If you prefer to use serial communications, the module can be accessed using a terminal emulator. Instructions for connecting via the serial port are given in section 4.3.
Note: We recommend use of the web interface over a network for general configuration and operation.
4.2 Connecting to the network port
To use the network port, you must first set up a network address. Some networks need manual configuration (normally referred to as “static” addressing); others use the Dynamic Host Configuration Protocol (DHCP) to allow a DHCP server to automatically assign network addresses. If no DHCP server is present, many systems will fall back to a randomly-generated “link-local” address (known by Microsoft as Automatic Private IP Addressing, or APIPA). Before you can access an Affinity over a network, you must set (for static addresses) or discover (if you use DHCP) its IP address.
Note: If you are setting up a unit in the laboratory for subsequent deployment in the field, you can set up the final network address using the web interface but then over-ride it with a temporary, static network address using the command line. The web-configured address will take effect when the unit is next rebooted.
4.2.1 DHCP-assigned addresses
The Affinity is supplied configured for DHCP. If your network uses DHCP to assign addresses, simply connect the Affinity to the network and wait a few minutes for the process to complete. Your network administrator should then be able to tell you the address that has been assigned. If your Affinity has an LCD status display, the assigned address will be displayed in it. The LCD display shows lots of information so you may have to wait a short time until the IP address scrolls into view.
When using DHCP, it is recommended that the DHCP administrator allocates a fixed IP address to the Affinity's MAC address in order to avoid unexpected address changes. The MAC address is displayed by the ip command – in the example in section 4.2.1.1, it is 00:50:c2:40:54:75.
If you cannot learn the IP address in this way, there are three methods available to discover which address has been allocated.
If your network includes Güralp Minimus digitisers, Minimus+ digitisers or Fortimus accelerometers, you can enable the guralp-responder service. This allows an Affinity to be detected using Guralp Discovery Software - see section 4.2.1.5 for details.
4.2.1.1 Address discovery – serial connection
You can connect via a serial port (as described in section 4.3) and issue the ip command:
G12345 ~ # ip addr show eth0
2: eth0: <BROADCAST,MULTICAST,UP,LOWER_UP> mtu 1500 qdisc pfifo_fast qlen 1000
link/ether 00:50:c2:40:54:75 brd ff:ff:ff:ff:ff:ff
inet 192.168.0.90/24 brd 192.168.1.255 scope global eth0
inet6 fe80:250:c2ff:fe40:5475/64 scope link
valid_lft forever preferred_lft forever
G12345 ~ #
The key things to note here are the adapter status and the IP address. The first line of the output should contain the word UP, confirming that the adaptor has been enabled. The IP address that has been assigned is shown on the line beginning inet - in this case, it is 192.168.0.90 (with a netmask of 24 bits indicated by /24).
Note: With an IP version 6 network, the IP address will be on a line beginning inet6. In practice, most networks today are still IPv4, as in the above example.
4.2.1.2 Address discovery – Scream's “Detect servers” tool
Start with the Affinity turned off. Then, from Scream's “Network control” window, select the “My Client” tab. Right-click in the server list-box and select “Detect servers…” - Scream will then start monitoring DHCP traffic on the local network. Power up the Affinity and allow it a minute to boot. When Scream notices a DHCP negotiation with an appropriate MAC address, it will display the allocated IP address in the window. You can add the Affinity to Scream's list of servers by clicking the appropriate button.
4.2.1.3 Address discovery - GCFPing the multicast address
Scream's “GCFPing” feature can send a special UDP packet to any configured address. Affinities respond to multicast packets addressed to 239.193.15.67. This address is pre-configured when you first install Scream. To use this feature, right-click on the multicast address and select GCFSEND:B from the context menu:
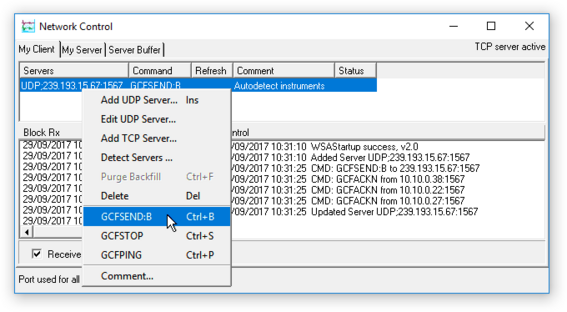
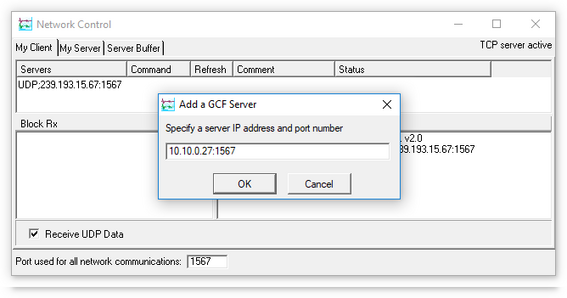
All accessible Affinities (and many other GCF servers) will respond and their IP addresses will be displayed in the right-hand "Control" window. Once you know the appropriate address, you can add the server to Scream by right-clicking in the Servers list at the top of the window and selecting "Add UDP Server … Ins" from the context menu. Enter the IP address and default port (1567) into the resulting window, as shown below, then click  .
.
4.2.1.4 Address discovery – GCFPing the broadcast address
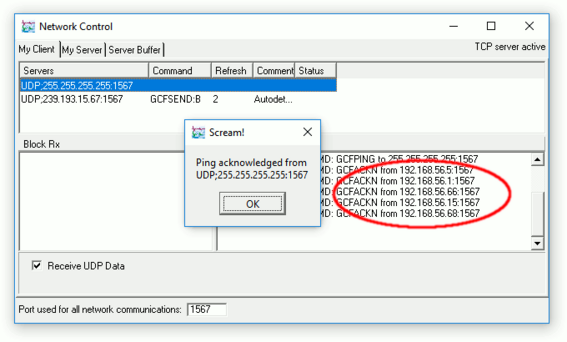
Scream's “GCFPing” feature can send a specially formatted broadcast packet to its broadcast address, reaching all hosts on the local network. Any GCF servers that see this packet should respond with a GCF acknowledgement packet (GCFACKN). Scream displays the IP addresses associated with all acknowledgement packets that it receives.
To use this feature, add a new UDP server with an IP address of 255.255.255.255. Right-click the server and select GCFPING from the context menu. A window will appear as shown below if the ping packet is acknowledged and, in the control pane (at the bottom right of the main window), a GCFACKN line will be printed for every address that responded to the GCFPING. In the example below, you can see responses from 192.168.56.5, 192.168.56.1, 192.168.56.66, 192.168.56.15 and 192.168.56.68. These are the addresses of all GCF servers listening on port 1567 on the local network. One of these will be your Affinity.
4.2.1.5 Address discovery – using Güralp Discovery software
The guralp-responder service allows the Affinity to respond to network scans performed by Güralp's Discovery software. The service is not started by default. It can be started from the web interface by navigating to Control → Services, scrolling down to the Guralp responder entry and clicking the associated  button.
From the command line, run
svc guralp-responder start
Once the responder service is running, Discovery will identify the Affinity on its local network.
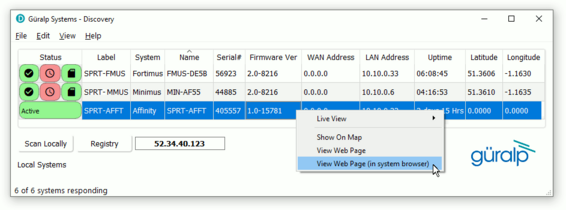
The entry will show the IP address of the Affinity together with limited status information. Right-clicking on the entry shows the context menu, as above, which allows you easily to reach the Affinity's web interface.
Navigate to Home→Configuration→Data handling→Services
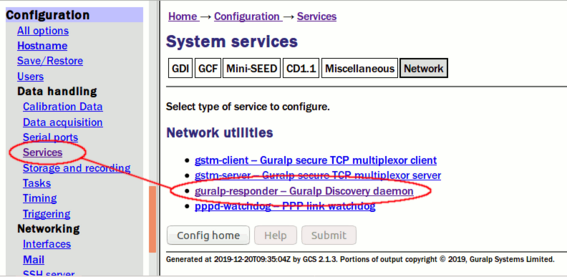
and click on the guralp-responder link. Click through the link on the next page to configure the default instance. The following configuration options are available:
Enable - This check-box controls whether the service is started automatically when the Affinity boots
Host label - This field allows the label shown on Discovery's main page to be changed frrom its default, which is the host-name of the Affinity
Enable sending to the Registry - If this check-box is ticked, the Affinity will periodically broadcast its details to the registry server identified in the remainder of this form. This facility allows Affinity units connected to the Internet via dynamic IPs to be tracked, monitored and controlled. See the Minimus manual, MAN‑MIN‑0001, for further details.
Registry address - This field allows specification of an alternative registry server, if desired. Güralp own and operate the server at 52.34.40.123, which is the default, and this server is available for public use. You may prefer to operate your own registry server if, for example, your telemetry network is not connected to the public Internet. In this case, please contact Güralp support for details of downloading and running the server software and then enter the I.P. address of your server here.
Cloud registry group identifier - If you use the standard Güralp registry server, you may wish to arrange that you see only your own digitisers and not those of other users. You can do this by providing a "group identifier" in this field.
Note: Every participating device and instance of Discovery needs to be configured with an identical group identifier.
When configuration is complete, click the  button to save your changes.

4.2.2 Link-local addresses
Many systems, when configured for DHCP, will generate a random address if no DHCP server is present. This is known as a “link-local” or APIPA address. For IPv4 networks, it will be in the range 169.254.0.0 to 169.254.255.254 (i.e. on the 169.254.0.0/16 network). For IPv6 networks, it will be in the fe80::/10 network. The random, host-specific part of the address is derived from the (unique) MAC address, so there are unlikely to be conflicts between addresses of systems in networks with small or medium numbers of hosts.
This is useful when, for example, visiting a remote Affinity: A laptop can be plugged directly into the network port of the Affinity (using a cross-over cable, if necessary) and, provided both systems are set to use DHCP, both will assign themselves addresses on the same network. If the laptop is running Scream, you can open Scream's Network Control window and add a UDP server using the link-local network's broadcast address, 169.254.255.255, and start communicating immediately. If the address of the Affinity is required (for, say, web access), this can be read from Scream's control window, or in the acknowledgement window resulting from a GCFPING.
The Affinity will search for a DHCP server once every minute and, should one become available, it will ask it for a new address.
4.2.3 Assigning a static IP address
If you wish to configure a static IP address, you must first connect to the command line via a serial port. This process is described in detail in section 4.3.
4.2.3.1 Assigning a static IP address using net-setup
Once logged in, issue the following command:
G12345 ~ # net-setup
Note: This command relies on the Affinity understanding what type of terminal emulator you are using. If the display is corrupted and not usable, set the TERM variable (see the Platinum manual for details), or simply power-cycle the Affinity and use the ip command (see section 4.2.3.2) instead.
The following screen is displayed:
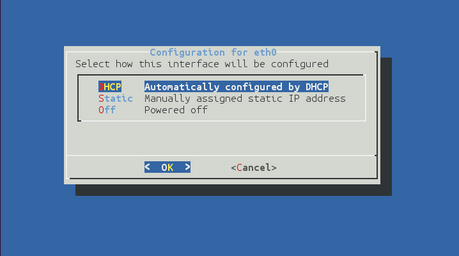
Using the  and
and  keys (or, on some systems, depending on your terminal type, the mouse), select whether you wish to use DHCP or static addressing. The red letters in the display indicate short-cut keys so, for example, you can, key
  to select DHCP or
  to select static addressing. Use the ENTER key to confirm your choice. If you do not wish to make a change, use the
  key to select “Cancel” and then key ENTER to close the net-setup tool and return you to the command prompt.
If you select static addressing, the following screen is displayed:
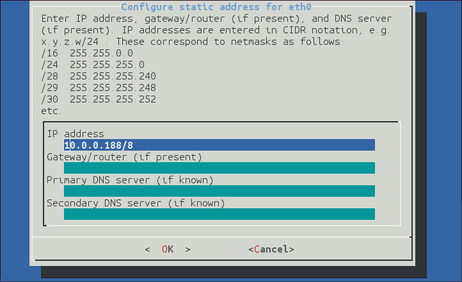
The IP address field must be populated with a valid IP address in CIDR notation. If you know the netmask but not the corresponding CIDR notation, use the information on screen as a guide or search the web for an on-line converter.
If your network has a router which acts as a gateway to the Internet or to other networks, use the
key (or, on some systems, the mouse) to move to the “Gateway/router” field and enter the address of the gateway in standard, dotted-quad notation (e.g. 10.0.0.1).
If your network has a DNS (domain-name service) server, sometimes called a name-server, use the
key (or, on some systems, the mouse) to move to the “Primary DNS server” field and enter the address of the name-server in standard, dotted-quad notation (e.g. 10.0.0.5).
Note: If your network is connected to the Internet but you do not know the name of your DNS server, ask your Internet Service Provider for the correct address to use or enter 8.8.8.8, which is a free, public DNS server operated by Google Inc.
Use the ENTER key to confirm your choice and reconfigure the network. If you do not wish to make a change, use the
key to select “Cancel” and then key ENTER to close the net-setup tool and return you to the command prompt.
4.2.3.2 Assigning a static IP address using the ip command
The ip command is an alternative to net-setup. You may wish to use it if
you want to configure a temporary address without updating the configuration files
you cannot use the net-setup utility for any reason
you are very familiar with the linux command line
Log in as normal and then issue the following command:
G12345 ~ # ip addr add 192.168.0.1/24 dev eth0
replacing the example IP address (192.168.0.1/24 in the example above) with the required value. It must be specified in CIDR format, where the actual address is followed by the number of bits of the network mask. The above example uses 192.168.0.1 with a netmask of 255.255.255.0 (24 bits of network address). A PC connected to this network could communicate with the Affinity if it was configured to use an IP address of (for example) 192.168.0.2 with a matching netmask of 255.255.255.0.
Note: IP addresses assigned using this method will be lost if the unit is rebooted. To permanently assign an IP address, use net-setup (see section 4.2.3.1), the web interface or gconfig. Please see the Platinum manual for more details.
If you wish to connect to the Affinity from a PC, they must either both be on the same physical network and have the same network address (usually the first three numbers of the IP address) or be able to connect to each other via routers.
In the latter case, you will need to tell the Affinity the address of its default router (also known as the gateway). Issue the command:
G12345 ~ # ip route add default via 192.168.0.254
substituting the address of your network's default router in place of the example address (192.168.0.254) shown.
If you wish to be able to access your Affinity across the Internet, perform firmware upgrades or access GSL remote support, you will also need to configure a default router as described in the preceding paragraph.
Note: Both the static IP address and any route configured in this way are temporary and will persist only until the Affinity is rebooted or powered off. Refer to the Platinum manual for information about configuring permanent static IP addresses and routes.
If you wish your Affinity to initiate connections with remote systems across the Internet, or to be able to access firmware upgrades, you need to configure a DNS server (also known as a name-server). If you do not know the address of your DNS server, your Internet Service Provider (ISP) will be able to tell you. You can also use 8.8.8.8, which is a free, public DNS server operated by Google Inc.
Enter the command
G12345 ~ # echo "nameserver 8.8.8.8" >> /etc/resolv.conf
substituting the address of the required DNS server in place of the example address (8.8.8.8) shown in the example above.
4.2.4 Connecting to the web interface
The Platinum firmware on the Affinity provides a web interface for configuration and control of the module and connected equipment. While there are other methods of connecting, the web interface is recommended.
Once the IP address of the Affinity has been set or determined, enter it into the address bar of a web browser to connect to the module's web interface . The examples below are for an Affinity address entered into Firefox and Internet Explorer:


The web interface will initially show a status display and a brief menu which contains an option to log in. Click on the link and enter the default user-name of root and password of guralp3.
If you are connecting to the Affinity over a network that you consider insecure (such as the Internet), it is recommended that you use the HTTPS (secure HTTP) protocol, which uses TLS to encrypt the link. Simply change the http:// prefix to https:// in the browser's address bar. Most browsers will complain that the certificate cannot be verified: This is not a problem: simply press the “accept” button to proceed. The link will then be encrypted and nobody will be able to “sniff the wire” in an attempt to discover passwords and other data.
Once connected and logged in, you will be presented with the main summary screen and a much larger menu. The summary screen contains general information about the status and health of the connected modules and equipment.
The exact contents and layout of this screen will vary depending on the configuration of both the Affinity and of any attached devices.
See the Platinum manual for information on using the web interface.
4.2.4.1 Connection trouble-shooting
If the browser fails to connect, the most likely explanation is that the machine running the browser does not have working network communications to and from the Affinity. This can be verified by “pinging” the IP address of the browser from the command line of the Affinity:
G12345 ~ # ping -c3 192.168.0.2
PING 192.168.0.2 (192.168.0.2): 56 data bytes
64 bytes from 192.168.0.2: seq=0 ttl=63 time=2.284 ms
64 bytes from 192.168.0.2: seq=1 ttl=63 time=1.129 ms
64 bytes from 192.168.0.2: seq=2 ttl=63 time=1.944 ms
--- 192.168.42.1 ping statistics ---
3 packets transmitted, 3 packets received, 0% packet loss
round-trip min/avg/max = 1.129/1.785/2.284 ms
G12345 ~ #
To resolve this class of problem, ensure that the cables are functioning (which can be verified by checking the diagnostic lights on most network switches/hubs) and double-check that the PC and Affinity are on the same subnet (which means the CIDR suffices must match and the first sections of the IP addresses – as defined by the CIDR suffices - must also match).
The website http://en.wikipedia.org/wiki/IP_address has some useful information for those for whom sub-networking is unfamiliar.
4.2.5 Connecting to the command line using SSH
SSH (Secure SHell) is the most flexible way to control an Affinity, but it is less friendly than using the web interface. It is possible to configure more advanced operations using SSH but the majority of control and configuration tasks can be achieved most easily through the web interface.
SSH is shipped as standard with most Linux distributions and is available for Windows as part of the free terminal emulation package PuTTY, which is available from http://www.chiark.greenend.org.uk/~sgtatham/putty/
4.2.5.1 SSH connections using the ssh program (Linux PCs)
To use SSH, you must know or discover the IP address of the unit, as described in the previous section. Once you have the IP address, issue the ssh command on the PC you are using:
mypc$ ssh root@192.168.0.1
Replace 192.168.0.1 with the IP address of the Affinity.
The first time you use SSH to connect to any host, you will be asked to verify the “host key”. This is normal but, if you are ever asked this again, it means that either the host key of the Affinity has changed – perhaps because of a firmware upgrade – or there is a network address conflict or, worse, a security problem on your network.
user@mypc:~$ ssh root@192.168.0.1
The authenticity of host '192.168.0.1 (192.168.0.1)' can't be established.
RSA key fingerprint is 62:a6:70:29:d4:1a:db:5a:75:6e:96:13:54:f5:a9:d9.
Are you sure you want to continue connecting (yes/no)? yes
Warning: Permanently added '192.168.0.1' (RSA) to the list of known hosts.
root@192.168.0.1's password:
G12345 ~ #
You will be prompted for a password; the default password is guralp3. Note that no characters will be echoed to the screen as you type the password.
Once connected, you will be presented with a shell prompt which is ready to accept commands.
When you are finished with your SSH session and want to disconnect, enter exit at the command line, or type  +
. There are a number of escape sequences for controlling the session, all of which begin with a tilde ('~') so, if you need to send a tilde character to the Affinity, type two tildes consecutively. For more information, see the section on “Escape Characters” in the manual at https://manpages.org/ssh
+
. There are a number of escape sequences for controlling the session, all of which begin with a tilde ('~') so, if you need to send a tilde character to the Affinity, type two tildes consecutively. For more information, see the section on “Escape Characters” in the manual at https://manpages.org/ssh
Note: If you plan to use ssh regularly to communicate with your Affinity, you can configure the system to bypass the password prompt when logging in from a list of pre-authorised computer/user combinations. This involves generating a unique key-pair (for the user and PC which will access the Affinity) and then copying the public half of the key-pair to the Affinity. This can be more secure than passwords and is fully documented at https://www.ssh.com/academy/ssh/keygen. For details about uploading your keys to the Affinity, see the Platinum manual.
4.2.5.2 SSH connections using PuTTY (Windows PCs)
To use PuTTY, you must first know or discover the IP address of the unit, as described in the previous sections. Once you have the IP address, start PuTTY by choosing it from the “Start” menu or double-clicking on its icon.
You will be presented with the following screen:
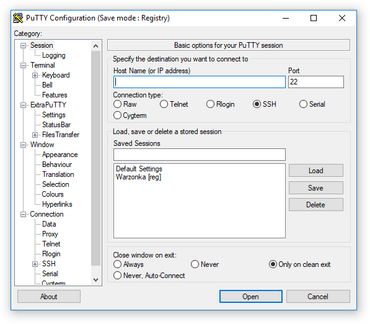
Enter the IP address of the Affinity into the Host Name (or IP address) field, check that SSH is selected as the Connection type and then click the  button.
The first time you use SSH to connect to any host, you will be asked to verify the “host key”:
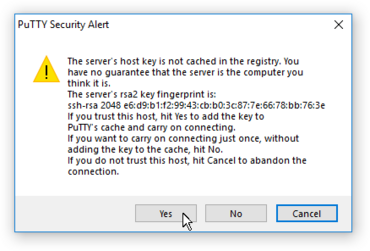
This is normal (simply click  to dismiss the dialogue) but, if you are ever asked this again, it means that either the host key of the Affinity has changed – perhaps because of a firmware upgrade – or there is a network address conflict or, worse, a security problem on your network.
You will now be prompted for a login name: the default is root. Type this at the prompt and press the ENTER key. You will next be prompted for a password; the default password is guralp3. Note that no characters will be echoed to the screen as you type the password.
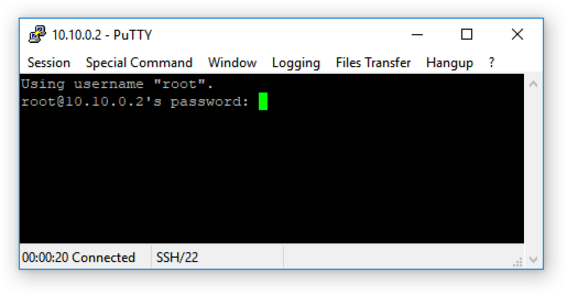
Once connected, you will be presented with a shell prompt which is ready to accept commands. The shell prompt contains the serial number of the Affinity.
When you are finished with your SSH session and want to disconnect, type “exit” at the command line, or
+
.
PuTTY allows you to save multiple sessions, along with a default login identity and screen colours for each. See the PuTTY manual for more details.
Note: If you plan to use ssh regularly to communicate with an Affinity, you can configure the system to bypass the password prompt when logging in from a list of pre-authorised computer/user combinations. This involves generating a unique key-pair (for the user and PC which will access the Affinity) and then copying the public half of the key-pair to the Affinity. This can be more secure than passwords and is fully documented at https://www.ssh.com/academy/ssh/keygen. For details about uploading your keys to the Affinity, see the Platinum manual.
4.3 Connecting to the Serial Console
The serial console of the Affinity is accessed using the GPIO connector. The Affinity is shipped with a blue serial cable, terminating in a female DE9 connector, which can be used for console connections.
Once you have connected the serial cable, you can run either Scream or a terminal emulator to interact with the Affinity.
4.3.1 Using Scream
Select Terminal... from the File menu. A window will open, from where you can select the correct serial port:
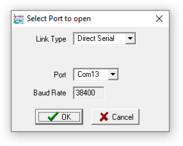
Set the Baud Rate to 38400, as shown, and click  . Once the Affinity and computer are communicating properly, an emulation window will open and you will see the Login: prompt. If the prompt does not appear immediately, press the ENTER key a few times.
Note: If a terminal session has just been closed, it can take up to ten seconds for a new session to start.
4.3.2 Using a terminal Emulator
You are free to use whatever terminal emulation software you wish. Common choices are applications such as minicom on Linux or PuTTY on Microsoft Windows. See the Platinum manual for more information.
Configure your emulation software to use the correct serial port. Set the line speed (Baud rate) to 38,400 and the communication parameters to eight data bits, no parity bits and one stop bit. This combination is commonly referred to as “8-N-1”. Turn off all hardware flow control (RTS/CTS and/or DSR/DTR should not be used). Turn off all software flow control (XON/XOFF should not be used).
Once the emulator is connected, you will see a Login: prompt. If the prompt does not appear immediately, press the ENTER key a few times.
Note: If a terminal session has just been closed, it can take up to ten seconds for a new session to start.
4.3.3 Logging in
The Affinity is shipped with a default user-name of root and password of guralp3. (Additional users with controlled capabilities can be added if required).
Enter the user name and password. Note that nothing will display on the screen when typing the password. You will then be presented with a shell prompt, which will accept commands as shown in the image below:
G12345 login: root
Password:
G12345 ~ #
The output may vary slightly due to the configuration of the unit. In particular, the Affinity name, as displayed in the prompt (G12345 in this example), will be different.
4.4 Viewing data
Once you know the IP address of the Affinity, it is simple to view the data using Güralp's Scream! Software. To do this:
Start Scream! And choose “Network Control” from the “Windows” menu (or key
+  , which has the same effect).
Switch to the “My Client” tab.
Tick the “Receive UDP Data” check-box to start Scream! listening.
Right-click anywhere in the Servers list box, and select “Add UDP Server…” (or key
 , which has the same effect). Enter the IP address of the Affinity.
Note: If you have already configured the Affinity's Scream server to use a non-standard UDP port, type a colon and the required port number after the IP address, e.g. 192.168.0.14:1568. The default port is 1567: this is used if no port number is entered.
Test communications by right-clicking on the newly-added server, and selecting GCFPING from the context menu (or by keying
+  , which has the same effect). A message appears in the Control pane logging the ping being sent. If communication is good and the server accepts client requests, you will receive an acknowledgement message (GCFACKN) from the server. This will also appear in the Control pane.
Request data by right-clicking on the server and selecting GCFSEND:B from the context menu (or by keying
+  , which has the same effect). Streams should soon begin to appear in Scream!'s main window.
Note: The steps above can be repeated as many times as necessary to pull data from several servers. Scream! remembers all the network settings when it exits, and automatically tries to reconnect when you start it again.
Switch to the main window and select the streams that you wish to view by holding the
key while clicking each. Once all desired streams are selected, key Enter to open a WaveView window showing live data streaming from the Affinity.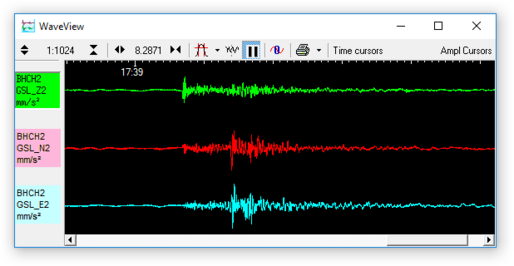
For more details, please see the Scream! Manual, MAN‑SWA‑0001, which can be downloaded from http://www.guralp.com/documents/MAN-SWA-0001.pdf