Chapter 11. Recording and playback
Scream! allows you to record all incoming data and store it on the local hard disk of your computer. To do this, you should configure the file-name format and destination directory, then select the streams that you want to record from Scream!'s Main Window, right-click and choose Start recording from the pop-up menu. The streams will display Yes in the Rec. column to indicate that they are recording.
The selection of streams to record is stored in the scream.rec file (see section 16.3) so that, if scream is subsequently set to automatically record all streams (see section 11.1.1), the original, manual selection can be restored if the automatic option is later deselected.
When Scream! starts recording, it starts at the earliest point in the current stream buffer, and immediately records all the data that it can. For continuous streams, the recorder will soon catch up with the real-time data.
If there is a gap in a stream (e.g. because you are using adaptive mode: see section 10.5.6), Scream! will delay recording that stream until the gap is filled. If the gap reaches the end of the stream buffer (as described in section 5.1) before data are transmitted to fill it, Scream! will give up and begin recording data from after the gap. If there are unwritten data due to a gap, an ‘*’ symbol will appear next to “Yes” in the recording column, and a right-click menu option Flush to Disk is available which will force writing of all data immediately for the selected streams.
By default, recorded data are placed in a data directory within Scream! 's installation directory, in GCF format. Scream! records files for each stream separately, which it puts in that stream's own directory. This directory may contain one or several GCF files.
Caution: If you do not have write permission on the recorded data directory, Windows may record to the virtual store instead. Please see the Microsoft documentation for information about the virtual store. Linux systems and Windows systems without virtual store support will indicate an error ERR in recording in the stream list:
11.1 Recording
Scream! has a number of options which allow you to change the way data are recorded and filed. From the Main Window, select Setup… from the File menu to open the Setup window. Two tabs on this window control the way that Scream records incoming data: the Recording tab and the Files tab. In addition, the scream.ini configuration file can be modified with a new section that controls other aspects of data recording.
11.1.1 The "Recording" configuration options
Click on the Recording tab. The available options are described in the following sections.

The upper part of this pane allows you to instruct Scream! to record various types of streams automatically. These options control the Rec setting when a new stream is received (e,g, after start-up). The options are remembered for the next time Scream! is started up.
Auto Record—Enable for High Sample Rates : Tick this box to make Scream! automatically save all local data streams with sample-rates above that specified in the “Files” granularity field.
Auto Record—Enable for Low Sample Rates : Tick this box to make Scream! automatically save all local data streams with sample-rates below that specified in the “Files” granularity field.
Auto Record—Enable for Status Streams : Tick this box to make Scream! save all local status streams automatically.
Auto-record downloaded streams : If you have selected Auto-download on heartbeat, you can tick this box to instruct Scream! to automatically record to the local hard disk any data that it receives as a result of a “download” instruction that Scream! issues (see below).
Auto-download on heartbeat : If a digitiser has been configured to record data into its own Flash memory only (FILING mode), it transmits heartbeat status messages. With this box ticked, Scream! will listen for heartbeat messages, and ask the digitiser to send saved data whenever it receives one. This option should ONLY be used when the connected digitisers are in FILING mode (or in DUAL mode with no continuous streams enabled - see section 10.5 for more details).
Close Files after timeout : Normally, Scream! keeps GCF files open whilst it records them. This can be a problem in some situations, because no other program can access the file whilst it is open. To make Scream! close the files after each write, tick this box, and enter a time (in seconds) in the field which appears. Scream! will close the file if it has not written anything to it for this number of seconds.
Note: If any of the Auto-Record options are disabled after use, any streams which had previously been set to record (by manually enabling them from the Main Window's stream list) will continue to be recorded. The list of streams for which recording has been manually enabled is stored in the file scream.rec. See section 16.3 for details.
The lower section tells Scream! how to use its hard disk space:
If Stop on Disk Full is selected, then Scream! will stop recording data once it runs out of space in its directory. This way, the data recorded will have a known starting point.
If you select Ring Buffer, then Scream! will start deleting the oldest files in the data directory in order to make space for new data, so that you will always have access to the most recent recorded measurements.
Caution: Scream! does not check whether it created the files itself. If you put your own files in Scream!'s data directory, then they are at risk of being deleted.
Note: Scream! uses operating-system time-stamps (not file-names) to decide which files are oldest.
If Stream Buffer Only is selected, Scream! will delete any file which no longer appears in the stream buffer. This is useful if you are only recording to preserve data in the stream buffer through restarts of Scream!.
If there is very little space on the disk, the PC's operating system can become slow or unstable. By default, Scream! will consider the disk “full” when only 50 MiB of space remains on it. You can change this amount by altering the value at bottom right (Leave nnn MiB free disk space).
Changes to these settings take effect as soon as you click 

11.1.2 The "Files" configuration options
Another part of the Setup window allows you to alter the way in which Scream! files the data it records. Click on the Files tab to open the following pane:

The options you can change are:
Base Directory: This specifies the root directory in which data files will be saved. There are useful notes about the choice of directory in section 3.3. Files for each stream are stored in sub-directories below the directory specified. The sub-directory structure is defined by the file-name format.
Note: You can quickly browse this directory by right-clicking on the Files section header icon ( ) in the source tree and selecting Explore recording base folder from the context menu:

Filename format: This allows you to describe how you want files to be named, by entering a format specifier. The string you enter is used to construct the file names for all files. Among the specifiers you can use are:
YYYY the year number (e.g. 2003),
M the month number (1 – 12),
D the day of the month (1 – 31),
H the hour (0 – 23),
N the minute (0 – 59),
S the second (0 – 59),
R or J the day number in its year (1 – 366),
X the date represented as an 8-digit hexadecimal number (this allows a complete date to fit in the DOS 8.3 format, for compatibility),
I the System ID,
T the Stream ID (e.g. MYDMZ2),
E the Serial Number of the digitiser, as given in the first 4 characters of the Stream ID (e.g. MYDM). You can change this Serial Number when you reconfigure the digitiser, so it does not always correspond with the Güralp Systems assigned serial number.
C the component identifier (Z,N,E,M etc);
P the sample rate, in samples per second;
A the name of the stream, if you have set a mapping (see section 6.4.2), otherwise the same as T.
The specifiers MM, DD, HH, NN, SS, RRR, JJJ, IIIIII, TTTTTT and EEEE are the same as their single-letter counterparts, but they are padded with zeros or underscores to a constant length. YY can also be used for a 2-digit abbreviation of the year (e.g. 03 for 2003), and MMM for a 3-letter month name (jan, feb etc.).
Any other letters (including lower-case letters) in the file-name will be left as they are, so you can add constant descriptions or field separators as you wish. Owing to operating system limitations, you cannot use any of the punctuation marks * ? " : < > | in file-names. You can, however, create directory structures by using the back-slash (\) character under Windows or the solidus (/) under Linux. For example:
T\YYYY_MM_DD;HHhNNmSSs.msd
will give file-names like
dmz2\1997_10_05;07h35m20s.msd
Caution: You should always ensure that files are given unique names. Scream! writes each stream separately. If it finds that it cannot write to a file because it is already open for another stream, the write will fail and data will not be recorded.
Scream! can record data in many formats. Some file formats, such as GCF and MiniSEED, divide their internal data into blocks, each of which has a time-stamp. Such formats can store streams which includes gaps. Most other formats are not block-structured and only have a single time-stamped header at the start of the file. If Scream! is saving data in a non-block-structured format and encounters a gap in the stream, it starts a new file.
Caution: For formats other than GCF and MiniSEED, if the file-name configuration does not permit sufficient granularity (e.g. one-hour-long files with no time-of-day indication in the file-name), Scream! will silently over-write the previous file, resulting in loss of data. You should pay particular attention to the file-name settings when using these formats in order to avoid this scenario.
Data Format : Selects the format of the recorded data files. Options are GCF, SAC, MiniSEED, P-SEGy, PEPP, SUDS, GSE, UFF (ufa and ufb; see below), CSS and SEG2.
A single instance of Scream! can record in one format at a time; if you need output in multiple formats, you can either:
record in GCF and perform conversions later using freely-available tools; or
record in one format and set up a Scream! server to relay real-time data to another Scream! on the same computer (see Chapter 7).
Byte Order : For SAC, SEG-y, UFB, CSS and SEG2 files, the byte order of the files can be specified. This can be used to match the byte order to the native order of the platform where you are going to perform analysis. GCF and MiniSEED are defined to be in “Motorola or SPARC” byte order. PEPP and SUDs data are defined to be in “Intel” byte order. Byte order is not applicable to the ASCII-like GSE or UFA formats.
Granularity : This setting allows you to specify how large files are allowed to become before a new one is started, for three different types of stream (high sample rates, low sample rates and status streams).

The distinction between high and low sample rates is set by the number in the Sample Rates >= box; the remaining boxes give the number of hours of data that Scream! should combine into a single file for each type of stream. In the example above, streams with a sample rate of 20 samples per second or above will be recorded in files with up to one hour of data per file; lower-rate streams will be recorded in four-hour files, whilst a new status file will be started every twelve hours. You will need to choose a Filename format (see above) which gives each file a unique name.
If you prefer to set a limit on a file's size, rather than its duration, choose Kilobytes from the drop-down menu (instead of Hours or Minutes) and set as appropriate.
Post-processor : This option allows you to specify a program, batch-file or shell-script which Scream! will run every time it closes a file. The name of the file is passed as a parameter.
You can use this feature to interface to other analysis or archival systems, for example:
you can use FTP or email to send files to remote data centres,
you can perform format conversion using a third party utility,
You can post-process file data headers to add site-specific information.
You can pass data to your own MATLAB® scripts - see section 11.1.12 for details.
11.1.3 EXPORTINFO configuration options
A number of output file formats require some additional static information for populating header fields or mapping stream names. This information must be specified in a section of the scream.ini file in a section headed
[EXPORTINFO]
You can add this section header to the end of your scream.ini if it does not already exist. The location of the scream.ini file is given in section 16.3.
After the [EXPORTINFO] section header, add one or more lines in the format
KEY=VALUE
Some key/value pairs are used for mapping from Güralp stream IDs to stream names in a format recognised by the International Federation of Digital Seismograph Networks (FDSN). These are known as FDSN-format or SNCL-format (Station/Network/Channel/Location) names. These key/value pairs required for these mappings are described below.
Other key/value pairs are optional or mandatory for specific file formats. These will be described in the relevant sub-sections for each format.
11.1.3.1 Stream name mapping
Channels whose names should be mapped into FDSN format should be listed, one per line, in the format
SysID-StreamID=sta:SSS chan:CCC net:NN loc:LL
or
SysID-SerialNumber=sta:SSS net:NN loc:LL
or
SysID=net:NN loc:LL
where
SysID is the System ID,
StreamID is the Stream ID,
SerialNumber is the serial number,
SSS is the desired station name,
CCC the desired channel code,
NN is the desired 2-character network code, and
LL the desired location code.
If you use a SysID-SerialNumber line, Scream! will apply it to all streams from the digitiser with that serial number, filling in the channel code automatically.
If you use a SysID line, Scream! will apply it to all streams from any digitiser with that System ID, filling in the channel code automatically and taking the Station Name from the digitiser's serial number.
If both instrument (SysID-SerialNumber) and stream (SysID-StreamID) lines are present, the stream lines will override the instrument lines. Likewise, a SysID-SerialNumber line will override a line with just SysID if both are present. This allows you to set default values for an instrument or network with single statements.
If you omit a specification, Scream! will fill in the default value. Specifying a value for loc is optional.
For example:
[EXPORTINFO]
GSL0=net:UN loc:B1
GSL0-DOWNH=sta:BHD
GSL0-SURFX4=sta:SMO chan:LKO
specifies that:
the Network code and Location code are set to UN and B1 respectively for every stream from the digitiser with SysID GSL0.
all streams from GSL0 with SerialNumber DOWNH will have the Station code set to BHD.
all other streams from GSL0 will have their Station codes set to the SerialNumbers of their streams (which is the default behaviour) and their Channel codes generated automatically …
… except for the X4 tap, which will have Station code SMO and Channel code LKO (which signifies an exterior thermometer sampled at one sps).
11.1.4 UFF file format
Universal File Format (UFF) is a commonly-used interchange format for seismic data. Two types of UFF format are supported: ASCII and binary, where the extension .ufa denotes the ASCII variant, and .ufb denotes the binary variant. The byte order used for the binary variant is specified in the Recording pane of the Setup window. ASCII does not have byte-ordering options. Details for the layout of the UFF format can be obtained from the University of Cincinnati at www.sdrl.uc.edu/sdrl/referenceinfo/universalfileformats.
You can instruct Scream! to record incoming data directly in UFF format. To do this, open the Files pane of the Setup window as above and select either UFF ASCII (.ufa) or UFF Binary (.ufb) in the Data format drop-down menu. However, UFF files tend to be large, and the format does not retain the full resolution of the data gathered by the sensor. It is recommended that you keep the initial recording in GCF format, and then convert to UFF as required using the batch-processing tools provided (see section 11.1.12).
Files in UFF format must represent a contiguous period of time. If a discontinuity is detected in the incoming data stream, then the file which is currently recording will be closed and a new file opened with a file-name and time-stamp matching the start of the new file. This operation will take place regardless of the options you have specified for Granularity, although the Granularity options will still work. For example, if you specify files lasting one hour, a new file will be opened on the hour, every hour, whether or not a discontinuity occurred during the previous hour (which will have caused a new file to be opened at that point).
11.1.5 MiniSEED file format
Scream! supports recording in the IRIS MiniSEED format, using the same rules for generating file and directory names as for GCF files (see section 11.1.2), but using the extension .msd.
Data are stored in 4K blocks with Motorola byte order, using Steim-1 compression. If a discontinuity is detected in the incoming data stream, then the block which is currently being built is written to disk, and a new block is started with its time-stamp in the header. Files continue to be created according to the options you have specified for Granularity.
Unless mapped, the MiniSEED headers are formed to comply with the FDSN (International Federation of Digital Seismograph Networks) SEED naming conventions:
The MiniSEED Station ID is set to the instrument's System ID.
The MiniSEED Channel ID is composed of three characters: the band code, the instrument code and the orientation code:
The band code (first character) is derived from the sample rate according to the following rules:
Rates ≥ 80 samples/s use H as the band code
Rates of between 10 and 79 samples/s use B
Rates between 2 and 9 samples/s use M
Rates of 1 sample/s use L
All streams use H as the instrument code (second character) in the Channel ID. This signifies "High-gain seismometer".
Streams ending in Zn, Nn, and En use Z, N, and E respectively as the orientation code (third character) in the Channel ID.
The MiniSEED Network code must be specified in the [EXPORTINFO] section of scream.ini.
The optional MiniSEED Location code can be specified in the [EXPORTINFO] section of scream.ini or left blank. See section 11.1.3 for details about [EXPORTINFO].
The default mapping is illustrated below:

The default name mapping can be over-ridden on a per-digitiser basis, a per-instrument basis or even on a stream-by-stream basis. See section 11.1.3 for information about [EXPORTINFO] and stream name mapping.
11.1.6 SAC file format
Scream! supports recording in the SAC format, using the same rules for file and directory names as for GCF files (see section 11.1.2), but using the extension .sac instead of .gcf.
Files in SAC format must represent a contiguous period of time. If a discontinuity is detected in the incoming data stream, then the file which is currently recording will be closed and a new file opened with a file-name and time-stamp matching the start of the new file. This operation will take place regardless of the options you have specified for Granularity, although the Granularity options will still work.
Before you start recording SAC files, you should ensure you have selected the correct byte-order in the Recording tab of the Setup window.
By default, Scream! uses the SAC header field KSTNM to store the stream's System ID; the Stream ID is output in the KCMPNM header field.
You can set your own header fields by preparing an [EXPORTINFO] section in the scream.ini file. See section 11.1.3 for more details. The specifications that you can use are:
net: or KNETWK: Sets the KNETWK (network) header field.
sta: or KSTNM: Sets the KSTNM (station name) header field.
chan: or KCMPNM: Sets the KCMPNM (component name) header field.
type: or KINST: Sets the KINST (instrument) header field.
STLA: Sets the STLA (station latitude) header field.
STLO: Sets the STLO (station longitude) header field.
STEL: Sets the STEL (station elevation) header field.
CMPINC : Sets the CMPINC (component inclination) header field.
KUSER0 :, KUSER1 :, KUSER2 : Sets the appropriate user header field.
If you miss out a specification, Scream! will fill in a default value.
Note: Status streams are recorded as plain text, as with GCF files.
11.1.7 SUDS file format
Scream! supports recording in the USGS SUDS 1.x format, using the same rules for file and directory names as for GCF files (see section 11.1.2), but using the extension .sud.
Files in SUDS format must represent a contiguous period of time. If a discontinuity is detected in the incoming data stream, then the file which is currently recording will be closed and a new file opened with a file-name and time-stamp matching the start of the new file. This operation will take place regardless of the options you have specified for Granularity, although the Granularity options will still work.
The files generated have STATIONCOMP and DESCRIPTRACE values in the header structures, using the following fields:
sc_name.network and dt_name.network : These are set to the last three digits of the System ID.
sc_name.st_name and dt_name.st_name : These are set to the the first four digits of the Stream ID.
sc_component : this is set to v for Zn streams; n for Nn streams; e for En streams; m for the Mux channels Mn.
11.1.8 GSE file format
Scream! supports recording in the GSE 2.0 format (cm6 sub-format) using the same rules for file and directory names as for GCF files (see section 11.1.2) but using the extension .cm6.
Files in GSE format must represent a contiguous period of time. If a discontinuity is detected in the incoming data stream, then the file which is currently recording will be closed and a new file opened with a file-name and time-stamp matching the start of the new file. This operation will take place regardless of the options you have specified for Granularity, although the Granularity options will still work.
You can set your own header fields by preparing an [EXPORTINFO] section in the scream.ini file. See section 11.1.5, for more details.
The values that you can specify are sta:, chan:, aux:, calib:, calper:, hang:, and vang:
Each specification sets the header field with the same name. If you omit a specification, Scream! will use a default value.
11.1.9 CSS file format
Scream! supports recording in the CSS 3.0 flat file format, using the same rules for file and directory names as for GCF files (see section 11.1.2), but using the extension .w. An additional file, the wfdisc table, is created and stored in the location specified as Base directory.
.w files in CSS format must represent a contiguous period of time. If a discontinuity is detected in the incoming data stream, then the file which is currently recording will be closed and a new file opened with a file-name and time-stamp matching the start of the new file. This operation will take place regardless of the options you have specified for Granularity, although the Granularity options will still work.
Samples are stored in the .w files as signed 32-bit integers (s4 or i4), using the Byte Order you have specified. Scream! updates the wfdisc table whenever data are added to a .w file.
You can set your own header fields by preparing an [EXPORTINFO] section in the scream.ini file. See section 11.1.5, for more details.
The values that you can specify are sta:, chan:, wfid:, calib:, calper:, type:, segtype:, and commid:
Each specification sets the header field with the same name. If you omit a specification, Scream! will use a default value.
11.1.10 pSEG-y file format
Scream! supports recording in the PASSCAL-modified SEG-y format (sometimes called pSEG-y), using the same rules for file and directory names as for GCF files (see section 11.1.2), but using the extension .sgy.
The main differences between the PASSCAL variant and standard SEG-y are:
the reel identification header is omitted (3200 bytes EBCDIC and 400 bytes binary).
Additional fields are defined in the “unassigned” bytes 181-240 of the trace header. These are required for recording continuous time-series data, which standard SEG-y would not otherwise be capable of.
Files in SEG-y format must represent a contiguous period of time. If a discontinuity is detected in the incoming data stream, then the file which is currently recording will be closed and a new file opened with a file-name and time-stamp matching the start of the new file. This operation will take place regardless of the options you have specified for Granularity, although the Granularity options will still work.
Before you start recording SEG-y files, you should ensure you have selected the correct byte order in the Recording tab of the Setup window.
Scream! sets header fields in SEG-y files as follows:
CHANNEL_NAME : The last two characters in the Stream ID, e.g. Z2.
STATION_NAME : The first four characters in the Stream ID.
SENSOR_SERIAL : The System ID.
CHANNEL_NUMBER : 1 for Zn streams; 2 for Nn streams; 3 for En streams; 4 – 19 for the 16 Mux channels Mn, adding four to the Mux channel number (e.g. stream M8 will appear as 12).
Status streams are recorded as plain text, as for GCF files.
11.1.11 SEG2 file format
Scream has limited support for recording data in SEG2 format, using the same rules for file and directory names as for GCF files (see section 11.1.2), but using the extension .cm6.
Whereas SEG2 files are intended for recording a single shot gather, spanning a few seconds for multiple channels in one file, Scream! is optimised for continuous data recording. Therefore, Scream! can only record one channel per SEG2 file and post-processing with SEG2 file manipulation tools may be necessary.
Files in SEG2 format must represent a contiguous period of time for a given channel. If a discontinuity is detected in the incoming data stream, then the file which is currently recording will be closed and a new file opened with a file-name and time-stamp matching the start of the new file. This operation will take place regardless of the options you have specified for Granularity, although the Granularity options will still work.
The recorded files are in standard SEG2 format, revision 1, using 32-bit fixed-point integers. The byte order is user-selectable in the recording options (see section 11.1.2).
The File Descriptor Block strings included are:
ACQUISITION_DATE = date of start of data in file, in DD/MM/YYYY format
ACQUISITION_TIME = time of start of data in file, in HH:MM:SS format, to the nearest second
Note: The SEG2 format recommendations for ACQUISITION_TIME do not include fractional seconds. If the data sample rate is greater than 250 sps, therefore, there is a possibility that the specified time may be rounded by an arbitrary fraction of a second when compared to the true data start time. See the GCF Protocol description for details of higher sample rate packetisation.
TRACE_SORT = AS_ACQUIRED
UNITS = NONE
Note: The actual units of the samples is in digitizer counts - please refer to instrument calibration documents for conversion factors to ground movement values.
The Trace Descriptor Block strings included are:
DELAY = 0
LINE_ID = the SysID-StreamID identifier - see section 5.3.
SAMPLE_INTERVAL = Sample delta (1 ÷ sample rate) in seconds
TRACE_TYPE = SEISMIC_DATA
11.1.12 Converting GCF files to other file formats
On occasion, you may need to convert pre-recorded GCF files into one of the various data formats supported by Scream!. For example, you may want Scream! to record data in GCF format and convert it to UFF later, to ensure that you retain all the data received from the sensors. Güralp provide a number of command-line tools for this purpose. At the time of writing, available converters include:
gcf2msd - GCF to MiniSEED
gcf2asc - GCF to a variety of ASCII formats, including UFF and UFA
gcf2sac - GCF to IRIS SAC
gcf2gse - GCF to GSE
Please visit Support→Software on our website for the latest versions of these converters, detailed usage instructions and details of all converters available.
11.1.12.1 MATLAB® integration
You can also use GCF data in your own MATLAB® scripts. GCF files can be read directly into MATLAB using a simple script.
Download the example script from our website at
http://www.guralp.com/download/matlab/readgcffile.mPlace the script in your MATLAB scripts directory, and launch MATLAB.
You can now access the function readgcffile() using the format
[samples, streamid, sps, ist] = readgcffile(filename);
All samples in the file are returned in the array samples. The Stream ID is returned as a string of up to 6 characters in streamid, whilst sps is the sample rate used, in samples per second. The value ist is a serial date number representing the start time of the data.
The GCF file to be read, specified as filename, may contain continuous, interrupted, or overlapping data for one or several streams.
The file readgcffile.m includes a sample function to plot the data from any GCF file. This can be adapted to create your own MATLAB software.
Caution: This script is provided "as-is", and should only be considered as an example of how to read GCF data in MATLAB®.
11.2 Playback
Note: Most of the operations described in this section are deprecated. Better solutions exist, as documented in the appropriate subsections. If you have trouble using any of the alternatives, please contact support@guralp.com for advice.
11.2.1 GCF files
Note: The replay function of Scream! in real-time mode, documented in this section, is deprecated. Scream!'s View mode is now the recommended method for viewing GCF files. See section 2.2 for details.
To replay a stored GCF file or files:
Select File → Replay Files… from Scream!'s main menu and select the data you want to replay, or drag GCF files from a Windows “File Explorer” window into Scream!'s Main Window.
You can also select directories and drag them into Scream!'s Main Window. Scream! will replay all the GCF files it finds in that directory.
Microsoft Windows will not let you select files from more than one window at the same time, but you can perform multiple drag-n-drop operations into the Replay Control that appears after the first file-drop. You can also use the Search tool in Windows to select files from more than one directory. Open a window on the topmost data directory and click Search, or press

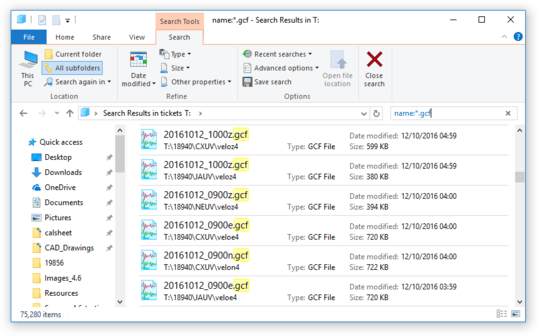
Fill in your search criteria (e.g. name: *.gcf), and click Search. You can now select some or all of these files and drag them all into Scream!.
The Main Window will change to include the file(s) you selected:
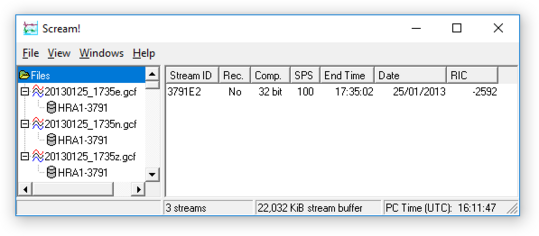
Select streams from the files in Scream's Main Window, and view them in a WaveView window.
The Replay Control window contains controls for moving through the files.
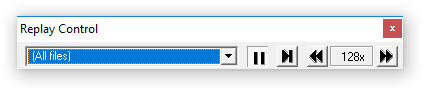
To begin with, the replay is set to the beginning of all files, and the Pause button (

Use the Slower


Scream! will replay data into the stream buffer, which has a limited length. If your file is longer than the buffer, Scream! will eventually begin overwriting old data. To see this data, you will have to begin the replay again.
If your file is shorter than the memory buffer, you can safely choose the highest speed and play the entire file into memory.
You can read files into memory one at a time by selecting them in the drop-down box. If you select All files, the files are replayed together at the same rate.
When you are ready to play the file, un-pause the replay by clicking on the Pause button (
).Alternatively, click the Block step button (

Open WaveView windows as required on the data streams. WaveView windows begin in continuous mode, starting at the last data “received” (i.e. played back). All the normal functions of WaveView windows are available to you (see Chapter 6).
If you want to pause the WaveView window to examine or measure signals, it is recommended that you pause the replay beforehand, so that the data you are viewing stays in Scream!'s memory buffer. If you leave the replay running, the data you are viewing may be replaced with newer blocks.
When all files have finished playing back, the Replay Control window will disappear. You can continue to work with the data that remain in Scream!'s memory buffer.


11.2.2 Reading hard disks
Note: The replay of data from disks, as documented in this section, is deprecated. It is recommended to use the gcfxtract utility for faster offloading of data. Visit Support→Software on the Güralp website for more information about gcfxtract.
Note: Depending on your security settings, you may need elevated privileges in order to read DFD-formatted disks. Windows users may need to start Scream! by right-clicking on the icon or start-menu entry and selecting Run as administrator… from the context menu. Linux users may need to add their username to the disk group (or to another group with raw disk access) with a command like
sudo usermod --append -G group my_username
You can use Scream! to replay streams direct from Güralp Systems portable DFD disks. These are normally FireWire or USB (e.g. for Güralp 6TD disks) but SCSI is also supported. Up to 100 disks can be connected to the system at once, depending on your operating system and hardware. To read a disk directly, Scream! may need administrator (root) privileges.
Caution: When a DFD disk is connected to a Windows PC, the operating system will not recognise the file-system and will offer to re-format it. Do not allow it to do so: you will lose some data from the disk and make it hard to recover the rest. If you accidentally find yourself in this position, please contact support for advice.
Choose File → Replay SCSI disk from Scream!'s main menu. If Scream! cannot detect any suitable interfaces, this option will be greyed out.
Scream! will now search for DFD disks, and search for data streams on each disk it finds. When it has finished, a Select streams for Replay window will open.
Select the stream or streams you wish to replay, and click

The streams will appear in Scream!'s Main Window as a group, and the Replay Control window will open; you can now replay the files as above.
You can open more groups of streams by repeating steps 1 – 4 as desired.

To record data from the disk into your file system, right-click on the streams when they appear in the Main Window and select Start Recording, as for a real-time stream. Data will be recorded in the file format and using the file-names you specified in the Recording and Files tabs of the Setup window. For the highest replay rate, do not open WaveView windows on the streams as you replay them.
Alternatively, if you are using Linux, you can create a raw disk image with the command dd. For more information, see the Linux man page for dd.
Scream! can read raw disk images as if they were connected disks; to attach an image to a disk slot, run Scream! with the command line
scream /disknn=image.bin
where image.bin is the path of the image file, and nn is a slot number (between 0 and 99). This command line option can be repeated as many times as necessary.
Once you have read all the data on a disk, you can “blank” or reinitialise it by selecting File → Reset SCSI disk from the main menu. You can now remove the disk and re-use it in, for example, a 6TD. Scream! will not reset a DOS-formatted disk this way, in case it contains other files besides data. (DOS disks can be reformatted by your operating system.)
11.2.3 SCSI tapes
Scream! can also replay data directly from an attached SCSI tape, provided that
it detects a SCSI interface with at least one tape drive connected, and
a suitable ASPI driver layer has been installed.
If more than one tape drive is connected, Scream! will use the one with the lowest SCSI ID.
To record data, select File → SCSI Tape → Record Data. All data subsequently received by Scream! will be recorded onto the tape, regardless of where it comes from, or whether the Rec. option is set for the streams. Choose File → SCSI Tape → Record Data again to stop recording.
If the tape drive fails or goes offline for any reason, Scream! will begin buffering data internally, and will continue recording once the fault has been resolved.
To replay data, select File → SCSI Tape → Replay Data. This opens a Replay window for loading the data on the tape into Scream!. Data are loaded into Scream! one block at a time; Scream! then waits until a time determined by the Faster and Slower icons in the Replay window before loading the next block. Setting these icons to Max stops Scream! from waiting at all. If you are using a slow tape drive, Scream! may not need to wait, and so the faster replay speeds will be equivalent.
Do not attempt to replay data from the tape whilst you are recording to it.
To rewind the tape to the beginning, select File → SCSI Tape → Rewind. If you are recording data onto the tape, Scream! will resume recording as soon as the rewind operation finishes.
To eject the tape, select File → SCSI Tape → Eject, or press the Eject button on the tape device. If you are recording data onto the tape, Scream! will begin buffering data internally until the tape drive is ready to accept new data, and will automatically resume recording on the new tape. This feature allows you to “hot-swap” tapes directly, without losing any data.
If no compatible tape drives are detected, these menu options will be greyed out.
11.3 Automatic playback
If a directory called autoload is present in Scream!'s program directory, Scream! will automatically look in it for GCF data and play it into the stream buffer in real time, as if it came from a local serial port. The data appear under Autoload in the Files section of Scream!'s stream list.
This feature allows you to transfer real-time data to Scream! by merely placing files in the designated directory. For example:
If your acquisition equipment only has FTP access to the computer running Scream!, you can gather data into GCF files and transfer them every so often into the autoload directory, where Scream! will process them next time it is running; or
You can set up a separate script on your computer that periodically fetches GCF files from a Web server.
Once a file has finished playing back, Scream! deletes it from the autoload directory. If you want to keep the data, you will have to re-record them from Scream! into a directory that you specify. If Scream! cannot delete it, it remembers the file so that it does not try and replay it again. However, if you exit Scream! and restart, Scream! will replay the file if it is still there.
Note: Data from the autoload directory will not be transmitted over the network.