Chapter 4. Acquiring data
When Scream is first started, the Main Window is displayed along with the Setup dialogue. The next step is to configure sources for data acquisition.
Data can be acquired:
from digitisers directly connected over serial lines - see section 4.1 for details about configuring serial ports to accept such data;
from digitisers connected over serial modem links - see section 4.2 for details about configuring Scream to use modem connections; and/or
from digitisers, acquisition units and other instances of Scream connected over a network, such as a local Ethernet network or the public Internet. See section 4.3 for details about configuring Scream as a network client.
Any combination of these sources can be used simultaneously. There are no software restrictions to the number of sources that can be configured and active. Modern PCs can cope with with many hundreds, if not thousands of simultaneous data streams.
4.1 Acquiring data via serial ports
If the Setup dialogue is not visible, select File → Setup… from the Main Window's menu. If the Com Ports page is not visible, bring it to the front by clicking on its tab.
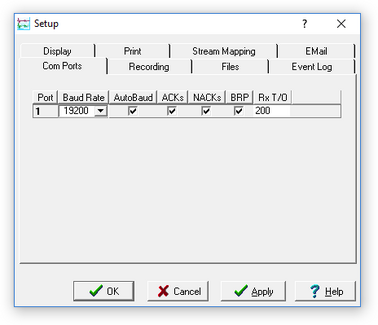
The serial ports available to Scream! are listed in the table. Identify each port, and the instrument connected to it.
If you are using Microsoft Windows, the Port number corresponds to the COMn number of the serial port. If you are using Linux, port numbers 1 to 64 refer to the built-in serial ports /dev/ttyS0 – /dev/ttyS63. Ports 65 and above refer to USB-connected serial ports beginning /dev/ttyUSB0. Subtract 65 from the port number to get the ttyUSB number.
A port may not be listed if it is not installed, suitable drivers are not available another program is using it or the user does not have permission to access it. Scream! scans your computer for new ports each time you open the Setup window. To make Scream! scan the ports again, click the Port column heading.
Note: Linux users should discover which system group provides access to the serial ports by entering the command:
ls -g /dev/ttyS* /dev/ttyUSB*
This will produce output like:
crw-rw---- 1 uucp 4, 64 May 24 15:55 /dev/ttyS0
crw-rw---- 1 uucp 4, 65 May 24 15:55 /dev/ttyS1
crw-rw---- 1 uucp 4, 74 May 24 15:55 /dev/ttyS10
crw-rw---- 1 uucp 4, 75 May 24 15:55 /dev/ttyS11
crw-rw---- 1 uucp 4, 76 May 24 15:55 /dev/ttyS12
⋮
from which it can be seen that, in this case, the group is uucp. It may be different on your system: dialout is another common result. Once you have discovered the group, add each scream user to it with commands like:
sudo usermod -a -G uucp myusername
replacing uucp with the group discovered as before and myusername with the desired user's login. Repeat as necessary to add any additional users.
Configure each port according to the settings of the digitisers connected to them:
Baud Rate : The speed of the serial link to the digitiser. The current digitiser product range defaults to 38,400 baud. Older 3-channel Güralp digitisers default to a speed of 9,600 baud; 6-channel digitisers use 19,200 baud; EAM units use a baud rate of 115,200 by default. If you do not know the baud rate of your digitiser's output port, select Auto-Detect from the drop-down menu to have Scream! attempt to detect it for you. The instrument must be producing data for this to work.
You can set all ports to the same baud rate by clicking on the column heading and choosing a suitable value from the drop-down menu.
If you are using Scream! for real time data, you will not need to change any of the remaining settings.
AutoBaud : Once connected, Scream! dynamically alters its baud rate to fit with the instrument to which it is connected. However, this can interfere with transmission over very noisy links. If you have problems, clear this check-box.
ACKs : This check-box controls whether Scream! should send Acknowledged messages to this digitiser in response to incoming data blocks. It should normally be enabled.
NACKs : This check-box controls whether Scream! should send Not Acknowledged messages to this digitiser when it detects a failure in transmission. It should normally be enabled.
BRP : This check-box controls whether Scream! should attempt to recover dropped blocks from the instrument using the Güralp Block Recovery Protocol. You should clear this box if you are using a single-direction (simplex) communications link.
If you clear all three check-boxes (ACKs, NACKs and BRP), Scream! will never acknowledge data packets that it is sent. This is particularly useful in situations where you need to connect to a digitiser without altering the flow of data. For example, a digitiser in FIFO or ADAPTIVE mode will normally save data in Flash memory only if data packets are not acknowledged. When you come to download the saved data from such a digitiser, you should clear these check-boxes before connecting the digitiser. Doing this will ensure that incoming data continues to be saved on the digitiser, rather than transmitted to Scream!.
Rx T/O (receive time-out) : The time, in milliseconds, that Scream! will wait for the sender to finish transmitting a block, before assuming that it is complete. If the instrument stops transmitting in the middle of a block, Scream!'s diagnostics will detect it and request retransmission next time the instrument is on-line.
Note: You can tick or clear all the check-boxes in a column by clicking on the column heading.
Click


If any digitisers are connected, data streams should now begin appearing in the right-hand portion of Scream!'s Main Window.
Another way to configure a serial port is to right-click on its entry in the streams list (the left-hand panel in the Main Window) and selecting Configure… However, you can only do this if data have already arrived through the port, making it appear in the streams list.
From this page, you can double-click on the port number of an open Com port to go directly to a terminal session on that port.
If you want to access Scream! servers on the network (i.e. EAMs, or other instances of Scream!), you will need to add the servers to the list using the Network Control window. See section 4.3, for more details.
Scream! will remember all the data sources you have specified on exit. When you next open the program, it will automatically try to re-establish all the connections.
4.2 Acquiring data over dial-up links
Scream! can manage the retrieval of data from your installation using dial-up modems attached to your local PC. This feature is optimised for use in conjunction with the triggering capabilities and Flash recording modes of Güralp digitisers.
Dial-in support for continuous streams or triggered streams is automatic: if a remote system calls in on a port configured for dial-up, any data sent will be displayed automatically and recorded if so configured. In addition, the Auto-download on heartbeat option can be used to request recorded data from systems in FILING mode. See section 10.5.2 for details.
Two new items, Dialup… and Hang up appear in the right-click context menu for each modem-equipped serial port in the source tree. These can be used to initiate and terminate out-going calls.
Click File → Setup… on Scream's menu bar. Select the Com Ports tab.
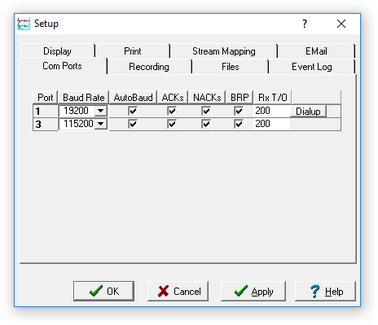
You will see a list of all the serial ports available on your computer. This example shows a computer with two serial ports, COM1 and COM3. Scream issues AT commands to all COM ports and, if a modem is detected, the

Make sure the baud rate and other flags are set up correctly for the modem and then click
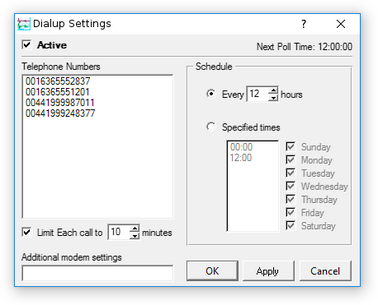
Enter the telephone number of the remote modem. If you want to contact several remote installations in turn, list their numbers, one per line.
In the right-hand panel, tick Every (12) hours, and set the value to your chosen polling interval.
Tick the Limit each call to n minutes check-box, and enter a suitable call length. Scream! will also hang up if it fails to receive any data for a specified length of time.
Ensure that you allow enough time in each call to download all the new data, given the sample rates and baud rate that you have chosen. For example, if the modem connection can achieve 19200 baud, then a station outputting continuous 200 samples/s data for 3 components would require a continuous connection to collect all the data. If the data rate were only 20sps, then the modem would only need to be connected for 10% of the time (e.g. a 6-minute call every hour).
If the local modem needs extra commands, you can add these under Additional Modem Settings. Some useful commands are Q1 to enter “quiet mode”; E0 to turn off local echo, and S0=1 to turn on the auto-answering facility. Modem commands normally start with the attention sequence AT; Scream! adds this sequence automatically, so you do not need to enter it in this box.
Some modems have dip-switches which allow you to set permanent defaults for each command. These can be useful for autonomous installations, when you want to ensure that the modem does not enter an unrecoverable state.
When all the settings are correct, tick the Active check-box and click

To switch off polling without losing your settings, clear the Active check-box.


If you have more than one modem attached to your computer, you can set each one up with a different set of numbers and polling times. You might want to do this if:
you want to collect data from several stations simultaneously; or
using several modems allows you to reduce call charges (e.g. you might use a cellular modem to contact installations on GSM networks, and a standard PSTN modem to contact those on land lines).
You can have up to 99 modems collecting data simultaneously, each with an unlimited number of scheduled dial-up times and telephone numbers. Scream! will remember all the settings when you exit.
4.3 Acquiring data from network sources
Scream can receive GCF data from sources such as networked digital instruments (e.g. 6TDs or 3TDEs), networked digitisers such as Affinity, Platinum systems such as EAMs and NAMs, and other copies of Scream.
These sources can push data to Scream, in which case it functions as a passive client and the configuration is referred to as "server-push". Alternatively, Scream! can be configured to actively request data from them, in which case it functions as an active client and the configuration is referred to as "client-pull". Both modes can be used simultaneously. These functions are configured from the My Client tab of the Network Control Window.
4.3.1 Passive client / server-push
In passive client mode, Scream! simply listens for incoming UDP packets on the port specified in the Port used for all network communications box. To configure Scream as a passive client, ensure that the "Receive UDP data" check-box is ticked and ensure that the port indicated in the Port used for all network communications box is not blocked by a firewall:

All blocks of GCF data received on the selected port will be listed in the "Block Rx" panel and the associated instruments and digitisers will appear in the source tree in the Main Window.
Note: You must configure the sources (servers) to push data to Scream using the IP address of the PC running Scream! and the port indicated in the Port used for all network communications box.

4.3.2 Active client / client-pull
In active client mode, Scream! must be configured to pull data from the remote sources.
The standard mode of transmission in Scream! uses UDP. Blocks of GCF data are received in UDP packets, which are shown in the Block Rx pane. UDP does not guarantee that data will be successfully received, although there is a mechanism for recovering missed packets - see section 7.4 for details. If data are lost and subsequently recovered, a diagnostic message will appear in the Control pane.

To configure Scream to request data from a source, ensure that the "Receive UDP data" check-box is ticked, right-click anywhere in the Servers list of the My Client tab and select "Add UDP Server…" or use the keyboard shortcut 

Type in the DNS name or IP address of the source followed by a colon (':') and the source port number. (If the source port number is omitted, the number specified as the Port used for all network communications at the bottom of the window is used.) Click 
Right-click on the new server so that the context menu appears:

To check whether the server is contactable and can return data, select GCFPING from the menu (or, without right-clicking, left-click and use the keyboard shortcut 

If the new server replies, an acknowledgement will be shown:

Both the PING command and the response(s) will be shown in the Control pane.
Note: If multiple servers respond, as might be the case if you GCFPING a broadcast address, the addresses of all the responding servers will be shown in separate GCFACKN entries in the Control pane.
To start data being transmitted, select GCFSEND:B from the context menu or use the keyboard shortcut 

The GCFSEND:B command is automatically re-sent every two minutes so that the server knows that the client is still alive. The countdown in the Refresh column indicates number of minutes remaining before the next issue.
To request that data transmissions stop, right-click on the server entry and select GCFSTOP from the context menu, or left-click on the entry and use the keyboard shortcut 

The steps above can be repeated as many times as necessary to pull data from several servers. (If several servers are selected, context menu commands or keyboard shortcuts will apply to all selected.) When you close Scream, it will remember which servers you are pulling from. It will automatically issue a GCFSTOP command as it closes, and a GCFSEND:B again when it re-starts.
Scream keeps track of the last block number received and, if the next block is not as expected, it will request backfill (see section 7.4). If Scream has been closed for a long time, a large amount of back-fill data can be requested. The Status column shows the progress of the back-filling process. If these data are not required, the process can be cancelled by selecting "Purge Backfill" from the context menu or by left-clicking on the entry and using the 

4.3.3 Acquiring data from networked 6TDs and 3ESPCDs
Most digitisers, digital instruments and acquisition units transmit GCF data using the Scream transport protocol. This is also the protocol that Scream! uses when transmitting GCF data between copies of Scream!.
6TDs and 3ESPCDs with wired or wireless networking capability, however, transmit GCF data using the BRP transport protocol. This is the same protocol that is used over direct serial connections to digitisers: BRP packets are simply encapsulated in TCP packets. Details of the GCF format, the Scream protocol and the BRP protocol are available in the Support→FAQs section of our web site.
To request data from one of these BRP servers, right-click anywhere in the Servers list of the My Client tab and select "Add TCP Server…". The "Add a TCP (serial) server" dialogue opens. Type in the DNS name or IP address of the source followed by a colon (':') and the source port number, which is usually 10002. Click
To open a TCP connection to request data, right-click on the server entry and choose "Connect" from the context menu or left-click on the entry and use the keyboard shortcut 

To request that data transmissions stop, right-click on the server entry and select "Disconnect" from the context menu, or left-click on the entry and key 

4.3.4 Requesting data over TCP links
In situations where UDP cannot be used, Scream! can also request data from digitisers, digital instruments and acquisition units using the Scream transport protocol over TCP.
Note: TCP is a connection-orientated protocol and has much higher overheads than UDP, which is packet-orientated. UDP is normally favoured.

To request data from a server over a TCP link, right-click anywhere in the Servers list of the My Client tab and select "Add TCP Server…". The "Add a TCP (serial) server" dialogue opens. Type in the DNS name or IP address of the source followed by a colon (':') and the source port number, which is usually 1567. Click
To open a TCP connection to request data, right-click on the server entry and choose "Connect" from the context menu or left-click on the entry and use the keyboard shortcut 
To request that data transmissions stop, right-click on the server entry and select "Disconnect" from the context menu, or left-click on the entry and key 
4.3.5 Requesting data from Multicast servers
Multicasting is a feature of TCP/IP which allows a server to send network packets to several clients at once. These are most often used on local networks. Multicast servers use addresses between 224.0.0.0 and 239.255.255.255. EAMs and NAMs, for example, always listen on the multicast address 239.193.15.67. (Mnemonic: 239.193 is in the privately-assignable block and 1567 is the default scream port.)
To request data from a multicast server, ensure that the "Receive UDP data" check-box is ticked, right-click anywhere in the Servers list of the My Client tab and select "Add UDP Server…" or use the keyboard shortcut 
If you then right-click on the entry, the context menu has entries for Connect, Disconnect and GCFSEND:B.
Selecting Connect instructs Scream! to join the multicast group with that address, and start listening to any servers transmitting to that address. If the server is running, data should begin appearing immediately.
Selecting Disconnect makes Scream! leave the multicast group. You can be in several multicast groups simultaneously, and join or leave each one independently of the others.
You can also issue GCFSEND commands to the multicast address, to pull data from any compatible instruments that are on the local network (EAM, NAM, Affinity etc).
Keyboard shortcuts can also be used for these functions, as with other servers.
4.3.6 Detecting data sources
There are two methods to detect servers: DHCP snooping and Multicast.
4.3.6.1 DHCP snooping
DHCP snooping listens for DHCP broadcast packets to and from Güralp products, which can be identified from their MAC addresses. DHCP packets do not traverse routers, so this method only detects servers on the local network.
Note: DHCP snooping only works when Scream is running on a Windows PC or laptop. It is not available to Linux users.
To automatically find a network device on the local network using DHCP snooping, right-click anywhere in the Servers list box and select the option Detect Servers … from the context menu. This opens a dialogue box, and starts listening for DHCP traffic to/from Güralp products. Any servers detected are displayed in a list in the dialogue box. Select any device from the list and click Add to add it to the list of configured servers.
4.3.6.2 Multicast
When Scream! is first installed, the server list is pre-populated with an entry for the Güralp standard multicast address, 239.193.15.67, with a comment of "Auto-detect instruments".
This address is used by EAMs, NAMs and *TDE instruments. It is part of the RFC 5771 "Administratively-scoped" address range, which means that its traffic can traverse suitably configured routers within an organisation, including VPN links over the public Internet.
Caution: Multicast traffic using this address cannot traverse the public Internet without explicit multicast routes or some form of packet encapsulation, such as a VPN link or SSH tunnel.
When Scream! starts, it sends a GCFSEND:B UDP packet to the multicast address. Any systems listening on this address respond with GCFACKN UDP packets. The control pane shows the addresses (and ports) of the responding systems and those systems will then start transmitting GCF data using the Scream protocol over UDP (although entries for them will not be created in the "Servers" list).
Note: A server that starts transmitting data because of a multicast GCFSEND will transmit GCF data from its "normal", unicast IP address (i.e. not the multicast address) to the "normal" unicast address of the PC running Scream. GCF data are not transmitted over the multicast link itself in this case, although multicast transmission can, in fact, be manually configured and used, if required. See section 7.2 for details of multicast transmission.
In the example below, a GCFSEND was transmitted at 10:31, as indicated in the Control pane, and three servers responded immediately. The Block Rx pane shows that these three servers have started transmitting data.

Note: Windows and Linux handle static multicast routes differently from normal static routes. Users with multiple network interfaces should consult their operating system documentation if this feature does not behave as expected.