Chapter 12. Printing options
Scream offers a number of printing options, which are described in this chapter.
Note: On some older versions of Windows, if you print to a printer which is not your computer's default, Scream! will revert to using the default printer immediately afterwards.
Note: On Linux systems, Scream! respects the PRINTER environment variable. You can start a copy of Scream! with a specific printer preselected by using a command such as
PRINTER=PDFgateway scream
or you can put a line like
export PRINTER=KyoP5026
in your .profile, your .bash_profile or even in your scream.sh.
12.1 Page printout
The simplest way to print from Scream! is in page mode, using your operating system's printer drivers. The print-out reproduces the vector data visible in a single WaveView window, including scaling factors, filters and cursors (but not spectrograms). Data in the window are stretched to fill the page.
Choose File → Printer Setup… to display your operating systems' standard Printer Setup window and select from the options for your printer and paper.
Open a WaveView window on the streams you want to print.
If desired, pause the window and zoom in on an area of interest. Make any other necessary adjustments.
Click the Print button

Alternatively, click the arrow beside the Print button and select Page Print (monochrome) to print the same data in black and white. Black and white output is more suitable for copying or faxing.

12.1.1 Automatic printing
To produce page printouts from a WaveView window on your default printer at regular intervals:
Click the arrow beside the Print icon

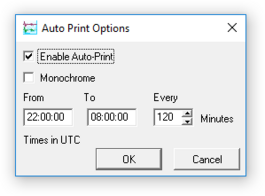


If you want print-outs in black and white, tick Monochrome.
In the three boxes below, specify the time period each day when Scream! will auto-print, and the interval between print-outs. Printing takes place at the end of each time period.
For example, if you set From to 05:00:00, To to 10:00:00 and Every to 120 (minutes), Scream! will automatically print the contents of this WaveView window every day at 07:00, 09:00 and 11:00 UTC. If you have also set the WaveView window's width so that it displays 120 minutes of data, the resulting printouts will cover the entire period 05:00–11:00.
Click


Each page has a title at the bottom, which is taken from the title of the WaveView window. To change this title, right-click in the window and select Label…. Enter a new label, and click
. This label is also used as the job name when Scream! sends data to your printer.
Any changes you make to the WaveView window will now be reflected in later printouts. If you want to examine the data yourself without disturbing the printing, you should Duplicate the WaveView window (

12.1.2 Automatic screen-shots
You can save screen-shots from a WaveView window at regular intervals. These can be saved to a file or used as input files for another program. The WaveView window does not have to be visible for a screen-shot to be taken, so you can minimize it once you are happy that everything is working correctly.
Click the arrow beside the Print icon
Choose Auto-screenshot… and tick Enable Auto-Screenshot.
Set the time interval between screen-shots in the two boxes beneath. Unlike Auto-Print, a screen-shot will be taken at this interval throughout the day.
Enter a file name for the screen-shot in Save to File. If you also want Scream! to run a command using this file as input, enter it in the Execute Command box. Screen-shots are saved in PNG format so, under Windows, you should add .png to the end of the file-name.
Ticking Force Size, and filling in an image width and height in the two boxes that appear, forces the WaveView window to have the size that you specified. Every image will also have this size. Whilst Force Size is active, you cannot resize the window. However, you can still obscure it with other windows, or move it partially off the screen.
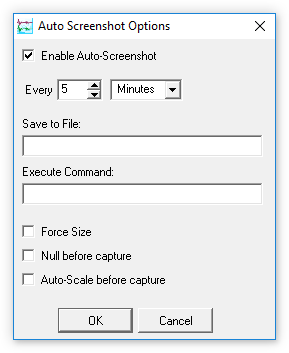
Ticking Null before capture nulls (centres vertically) all unlocked streams immediately before taking the screen-shot.
Ticking Auto-Scale before capture sets the scale factor for all unlocked streams so that each trace just fits within its lane.
Note: If you do not Save to File or Execute Command, you can still Null or Auto-Scale before capture; this can be a useful way of keeping traces within a WaveView window over long periods, even if you do not need screen-shots.
The Null and Auto-Scale before capture cause the WaveView window to be redrawn immediately before a screen-shot is taken. If the window includes a spectrogram, this will be lost. If you need to save screen-shots that include spectrograms, clear these two options.

Screen-shots are bitmaps, best for publishing on the Web or another low-resolution medium. If you intend to print the traces later, consider saving them in vector format by using Auto-Print and setting your default printer to Print to file (or a PDF generator such as "Microsoft print to PDF" or, under Linux, the PDF driver within CUPS).
12.2 Continuous printout
Scream! includes built-in drivers for printing continuously to a parallel-connected Epson ESC/p (Epson Standard Code for Printers) compatible printer (this includes most dot-matrix printers, and many others, although you may need to explicitly enable this mode on your printer). You can print in continuous mode from any WaveView window, although only one WaveView window can be used as a print source.
Note: If you do not have a physical parallel port on your computer, please see section 12.2.1.
Because Scream! bypasses the printer drivers of your operating system when it prints in continuous mode, you will need to set up the printer options manually:
Choose File → Setup… to display the Setup window. Choose Print.
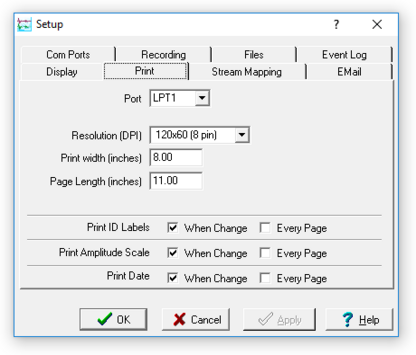
This window only applies to continuous mode printing; for page mode printing, you should use the standard File → Printer Setup… window.
Set Port to the name of the parallel port connected to the printer (or an emulated port redirected to a real printer).
Set Resolution to a suitable value for the printer, in dots per inch (DPI) or pins. Ensure that the mode you select is within the capabilities of the printer, as Scream! cannot do this automatically.
Set Print Width to the width of the printout, in inches (leaving some room for binding, notes etc., if desired) and Page Length to a suitable value, also in inches. Page Length does not need to correspond to an actual page size; it is only used to specify when to print certain labels (see below).
The final three options determine when to print various labels, namely: the Stream ID of each stream, an amplitude scale, and a date-stamp.
If you select Every Page for one of these, the label will be printed at intervals of Page Length, above.
If you select When Change, the label will be printed whenever that attribute of the controlling WaveView window changes, i.e. the Stream IDs when a stream is added or removed from the window, the amplitude scale when the vertical zoom factor is changed, and the date every midnight.
Click
 .
.Create a WaveView window containing the streams you want to print.
Choose a suitable amplitude scale for each stream within the window. Each trace will occupy the relative width across the page as it does across the controlling window.
Choose a suitable time scale in the window. The figure between the Scale icons

Because printer lines are generally smaller than screen pixels - a typical screen resolution is about 75 DPI - the printed traces will appear squashed relative to the window. On a 75 DPI screen (or printer) at a scale factor of 5, an inch (25.4 mm) will correspond to fifteen seconds of data; on a 300 DPI printer, the same scale factor would produce an inch of output every sixty seconds.
Make any other choices you require (offsets, block boundaries etc).
When you are happy with the appearance of the window, click the arrow beside the Print icon

(If the Continuous Print option is greyed out, check that you have not enabled continuous printing for another WaveView window.)
The printer will output a short banner, after which it will begin plotting the data.
To stop printing, click the Continuous Print icon again.


The display settings for the window will now continue to be reflected in the printout. If you want to examine the data yourself, you should Duplicate the WaveView window (
Whilst continuous printing is in progress, do not attempt to print any other documents to the same printer through the operating system. If you need to do this, you should temporarily stop printing from Scream! and restart when you are done.
12.2.1 Parallel port redirection under Windows
Under Microsoft Windows, Scream! can only print in continuous mode to a named, local "LPT" port on your local machine. However, Windows can map a local port to a shared printer on the network. Once you have done this, you can use the mapped port name to print in continuous mode.
Key


In the resulting window, type
net use port-name printer-name
where port-name is the name of the new port to create (e.g. LPT2) and printer-name is the network share name of the printer you want to use (e.g. \\server\myprinter). The port-name that you choose should be different from any physical port on your PC.
The program should report The command completed successfully. For more information about the net command, see the Windows documentation.
You can now use the new port name in Scream!'s Setup window.


Note: When Scream! prints in paged mode it uses your installed printer drivers, and can access printers shared across a network as normal. You do not need to map a local port if you only want to print a page at a time.